Tuesday, July 31, 2018

Afghanistan endlos

10:05:00 PM

Ein Beitrag von: Christopher Horne

Wie so viele Bücher über diese Region behandelt „Afghanistan endlos“ kriegerische Konflikte vor Ort. Anders aber als die meisten Bücher möchte sich „Afghanistan endlos“ des laif-Fotografen Daniel Pilar nicht in den allgegenwärtigen Kanon der Kriegsästhetik einreihen, sondern den Blick auf den Alltag der stationierten Bundeswehrtruppen im ISAF-Verband zeigen.

Dabei zeigen die Fotos oft eine gestalterische Banalität einerseits und Distanziertheit der Soldat*innen mit ihrem Umfeld. Nichts scheint wirklich zu stimmen, die Truppen wirken fehl am Platz, der Einsatz ohne klares Ziel. Es besteht eine fruchtbare Beziehung zwischen Text und Fotos.

Soldat putzt sich Zähne

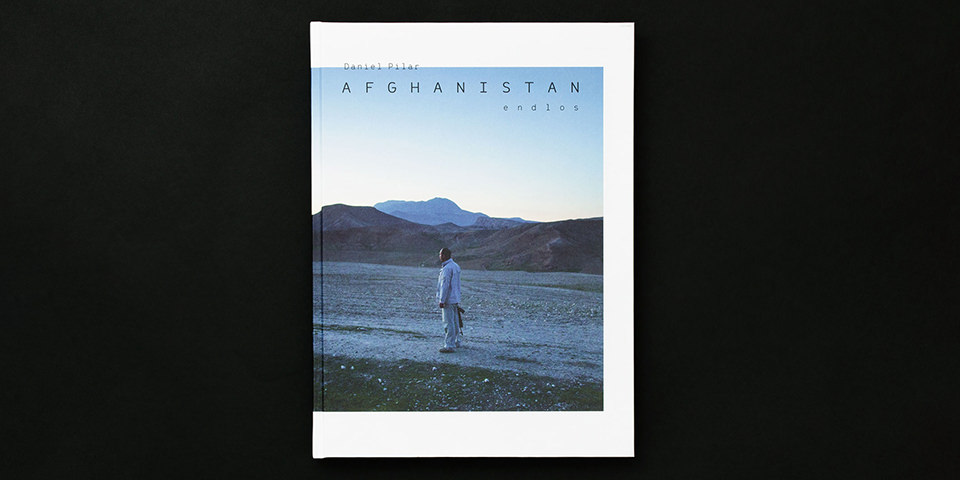
Das Titelbild ist Programm: Ein Mann in Armeekleidung blickt in der Abenddämmerung, mittig in eine Steinwüstenlandschaft gesetzt, in Richtung Westen und hält sein Gewehr lässig in der rechten Hand nach unten. So endlos wie der Titel verspricht, wirkt auch seine Umwelt. Das Buch scheint schon auf dem Titel zu suggerieren: „Hier passiert nicht viel.“ Doch das stimmt nur teilweise.

„Afghanistan endlos“ ist unterteilt in drei Abschnitte plus Anhang: Nach dem Vorwort des Fotografen („Sandsäcke und Uniformen, Badelatschen und Radarfallen. Ein unwirklicher Alltag in Afghanistan“), in dem Pilar den situativen Kontext des Themas umreißt, führt der politikwissenschaftliche Artikel von Dr. Philipp Münch („Afghanistan. Die Logik einer endlosen Intervention“) tiefer in die Motivation und politischen Hintergründe des Afghanistaneinsatzes der Bundeswehr ein.

Erst ab Seite 24 beginnt der fotografische Teil. Und das ist wichtig. Die drei Kapitel ergänzen sich gut. Die beiden Artikel geben gewissermaßen einen Lesehinweis für das gezeigte Bildmaterial und seine Einordnung.

Soldaten sonnen sich

Im Vorwort erläutert Daniel Pilar nicht unkritisch seine Motivation, dieses Buch zu erstellen. Von Beginn an, seit seinem ersten Afghanistanaufenthalt als Bildjournalist im Jahr 2007, faszinierte es ihn, hinter die Kriegsschauplätze zu blicken und journalistisch das Land, seine Kultur und seine Gesellschaft zu ergründen.

Er erzählt von seinen Begegnungen mit den Menschen an der Waffe, die für Deutschland „die Sicherheit am Hindukusch verteidigen“ sollen, sich aber politisch und ideologisch fehl am Platz fühlen. Aber soldatischer Eid ist soldatischer Eid – und so ein Auslandseinsatz bedeutet nun einmal weitaus mehr Geld.

Pilar erzählt von Menschen, die zum größten Teil im Lager bleiben, ihre Zeit absitzen und nach einigen Monaten wieder nach Deutschland reisen. Er erzählt gleichzeitig von den wenigen anderen, die diese Kamerad*innen als „Drinnis“ bezeichnen und den Schritt vor die Lagertore wagen – und damit in höchst unsicheres Terrain.

Soldaten sehen durch Ferngläser

Ferner erzählt er vom inszenierten Charakter des Einsatzes, dass beispielsweise Fototermine vor allem für die heimische Bevölkerung eine Botschaft transportieren sollten: Das ist kein Kampfeinsatz und wir sind auch bald wieder weg, obwohl in Afghanistan bereits 55 Bundeswehrsoldat*innen bei sogenannten Zwischenfällen umgekommen sind.

Das Stichwort „Inszenierung“ greift der Politologe Münch in seinem nachfolgenden Artikel wieder auf, indem er nachvollziehbar und detailliert nachzeichnet, wie es zum Afghanistan-Einsatz nach 9/11 gekommen ist und dass es vor allem das Interesse Deutschlands und anderer Staaten gewesen sei, sich militärisch einzubringen, um in den internationalen Beziehungen ein stärkeres Gewicht zu erhalten.

Lesende Bundeswehrsoldaten

Das ist nachvollziehbar, schließlich strebt Deutschland schon seit Längerem einen ständigen Sitz im Sicherheitsrat der Vereinten Nationen an. Es ging nach dieser Analyse nie um eine Befreiung Afghanistans. Messbare, ernstzunehmende Ziele seien nie formuliert worden, anhand derer man Erfolg oder Misserfolg des Einsatzes feststellen könnte. Genau diese Fehlstellung der Zielsetzung und der Abgang eines sinnvollen Konzeptes führten nach Ansicht Münchs aber dazu, dass für den Einsatz in Afghanistan kein Ende in Sicht ist.

„Afghanistan endlos“ zeigt die Welt aus Sicht der Bundeswehr in Afghanistan sowohl auf dem Campus als auch teilweise außerhalb – aus dem Auto heraus, in Polizeibaracken mit schimmligen Wänden oder auf Trainingsgelände in der Wüste. Das Buch schafft es wunderbar, die politischen Unsäglichkeiten und Widersprüche, die mit dem Einsatz einhergehen, auf die Situation der Bundeswehr vor Ort zu projizieren.

Konsequenterweise sprechen die Bilder die dichotome Sprache von Langeweile und Spannung: nicht selten mittig, bühnenhaft und beschreibend gestaltet, um dann im Kontext von Außeneinsätzen ins Gegenteil umzuschlagen, um dynamisch und subjektiv eine gänzlich andere Geschichte zu erzählen.

Mädchengruppe

Das Schlimmste im langweiligen Campusalltag ist es, dass die einzige Flucht das Sonnenbad und die paar Minuten am Tag, um über das Münztelefon mit der Familie zuhause zu sprechen, sind. Kein Rausch, kein Internet, wenig Abwechslung. Die krasse Alternative zu dieser Monotonie des Alltags ist die Unsicherheit, in die sich die Truppen außerhalb des Campus begeben.

Das Buch behandelt neben der Alltagsbeschreibung außerdem eine Reihe emotionaler Kategorien: Auf der einen Seite kann man sich das Schmunzeln nicht verkneifen, wenn mitten in der afghanischen Wüste ein Gartenzwerg, Sinnbild des deutschen Spießbürgertums, das Blumenbeet (rote Rosen) bewacht.

Andererseits macht sich ein Gefühl von Unbehagen und Fremdheit breit, wenn neben den Patrouillen mit den afghanischen Kolleg*innen der Besuch beim Barber der einzige und direkteste Kontakt mit Einheimischen ist. Der Gang zum Barber ist regelmäßige Notwendigkeit, die Patrouille eine soldatische Pflicht. Nichts davon jedoch geschieht freiwillig.

Soldaten laufen einen Berghang entlang

Das Buch ist ein schön zu lesendes Essay über den chaotischen und halbherzigen Afghanistaneinsatz der Bundeswehr, das sich vor allem durch die vorangestellten Texte erschließen lässt. Alles in diesen Fotos schreit nach Sommerferienlager, das man sich nur wiederwillig ausgesucht hat.

In Anbetracht der Opfer auf allen Seiten, die dieser internationale Militäreinsatz hervorgebracht hat, ist das ein frevelhafter Vergleich. Das ist die Stärke von „Afghanistan endlos“. Im Gegensatz zur üblichen Kriegsästhetik portraitiert das Buch einerseits die Menschen des Krieges, die Einsatzkräfte, die mit zu diesem Konflikt beigetragen haben. Darüber hinaus aber schafft das Buch noch viel mehr.

Die analytischen Einleitungstexte, die gut erfassbar das Fehlen politischer Planung und Zielsetzung kritisieren, werden anhand der Fotos konkretisiert und damit als Beweisführung greifbar. Am Ende bleibt ein unwohles Gefühl.

Informationen zum Buch

Afghanistan endlos von Daniel Pilar
Sprache: Deutsch
Einband: Gebunden
Seiten: 112
Maße: 20,7 x 27,7 cm
Verlag: Kettler
Preis: 38 €


kwerfeldein – Magazin für Fotografie https://ift.tt/2O1Ajwy

Sourced by Time Trap Photography sharing the best photography tips, news and tricks throughout the industry. Time Trap Photography is dedicated to freezing those special moments in life that can be revisited and admired for generations to come. - Shannon Bourque
Please visit our main site for booking availability and rates.


"Time


Receive valuable industry knowledge delivered free to your email each day.


"Time

Time Trap Event Landscape Photo - July 31, 2018 at 08:05PM

8:10:00 PM


Shared by Time Trap Photography Instagram page. I'm dedicated to freezing those special moments in life that can be revisited and admired for generations to come. - Shannon Bourque
Please visit our main site by clicking on the logo below for booking, availability, and rates.  


"Time


Receive valuable industry knowledge delivered free to your email each day.
"Time

Are You Excited? Nikon Mirrorless Camera Announcement Coming August 23rd

2:05:00 PM

New gear and rumors of new gear – it's the stream that keeps the gossip mill of the photography world turning.

And when it's Nikon gear, that steady stream can often turn into a flood because, let’s face it, people love the Japanese optics manufacturer.

Ending months of speculation, Nikon has confirmed that a mirrorless camera is on its way but details will have to wait.

According to Nikkei, one of the largest and most trusted news outlets in Japan, those fans will have another reason to love Nikon this August 23rd when the company officially announces its new mirrorless device in full. You might be wondering what the big deal is since so many companies show off new gear around this time but, for Nikon, it is kind of a huge moment.

Image via Irina Kostenich from Pexels.com.

For those that may not hang on Nikon’s every word, this is a big deal as it is the company’s first foray into the mirrorless market, a highly competitive niche dominated by Sony and Canon.

Details remain sketchy at the moment but press rumors speculate that all will be revealed in Tokyo on August 23rd, including the camera's release date, final specs, and, most importantly, pricing.

In terms of performance, expectations range from everything plus the kitchen sink to a device barely capable of taking a picture of the comparable Sony unit, depending on who you ask. As with all rumors and hints of rumors, there’s a lot of bias swimming around out there, too.

Analysts think the company is gunning for a release this Fall/Winter in time for the critical holiday shopping season and the company is throwing a ton of effort behind the product to meet this deadline.

The new Nikon mirrorless will compete head-on with Sony and Canon as the company hoping to differentiate itself through “the best optical technology including lenses” according to Nikkei. Additionally, Nikon has scheduled fan events to take place throughout Japan beginning in September where many people think the company will take the opportunity to show off their new mirrorless units to their most devoted customers.

You can watch a video from the company teasing the new camera here on YouTube.

Are you excited? Leave your thoughts in the comments below

Let's block ads! (Why?)


Light Stalking https://ift.tt/2vaK4l9

Sourced by Time Trap Photography sharing the best photography tips, news and tricks throughout the industry. Time Trap Photography is dedicated to freezing those special moments in life that can be revisited and admired for generations to come. - Shannon Bourque
Please visit our main site for booking availability and rates.


"Time


Receive valuable industry knowledge delivered free to your email each day.


"Time

Now Open: X-Pedition Havana

12:29:00 PM

We are announcing our second X-Pedition photo workshop, in Havana, Cuba for January 11-18, 2019.

A joint project of Strobist.com and Washington, D.C.-based Focus On The Story, X-Peditions are a shooting-intensive week centered at the intersection of journalistic photography and off-the-beaten-path travel.

You can learn full details about the January Havana workshop, here.

Please note: if last year is any indication, this trip will fill quickly. If you would like to learn more about X-Peditions in general, and/or to add your name to the advance notice list, you can do so here.

Thanks,
David

Let's block ads! (Why?)


Strobist https://ift.tt/2ArEHTp

Sourced by Time Trap Photography sharing the best photography tips, news and tricks throughout the industry. Time Trap Photography is dedicated to freezing those special moments in life that can be revisited and admired for generations to come. - Shannon Bourque
Please visit our main site for booking availability and rates.


"Time


Receive valuable industry knowledge delivered free to your email each day.


"Time

Here Is Why I Exposure Bracket Every Shot

11:05:00 AM

One of my first photographic jobs was running an E-6 lab for a London based production company. The company has three full-time photographers and it was my task to make sure the countless rolls of Ektachrome made it safely to the other side of the Durst processing machine.

One of the first things that struck me was that for every roll of 36, there would only be 6 actual shots. The reason for this is that the photographers bracketed. Colour transparency film had notoriously tight exposure latitude and getting even half a stop off could be the difference between good and unusable.

In recent years I have returned to bracketing, here are the reasons why.

Slide film had a notoriously shallow latitude to exposure. By Vincenzo Reina on Flickr

What Is Bracketing?

Camera’s meters are not perfect. They can be fooled by an excess or lack of light, trying to average out what they see. Our eyes and even experience are also not perfect, so while we might think we have nailed the exposure, it might, in fact, be off.

Bracketing allows us to take our preferred exposure either metered or estimated and also create a range of other identical shots that are both over and underexposed. The vast majority of cameras can now automatically bracket anywhere between 3 and 7 images and either 1/3rd or 1/2 stops.

A bracket is a range of different exposures around the metered exposure

Why Do I Bracket?

There are a few reasons that I choose to bracket on every shoot. The first is for exactly the same reason my film based colleagues did all those years ago, to get the perfect exposure. Modern digital raw files have a high tolerance to post-production, but depending on what you are shooting, your preferred exposure for post-production might need to be over or underexposed. With a bracket, you can select the best exposure for the look that you are trying to achieve.

One of the main reasons to bracket, of course, is the improve the dynamic range of our sensors.  My drone for example, whilst it has a pretty good sensor, does not have anywhere near the dynamic range of an APS-C or Full Frame sensor.

The simplest form we might use would be to blend a sky from an underexposed shot with the ground of a correctly exposed shot. This is a relatively simple task in Photoshop and a nice wide bracket will allow you to select the best-looking sky and best-exposed foreground. 

The drone struggled with the dynamic range in this shot.

Beyond a simple merge, we, of course, have HDR, high dynamic range photography. If you bracket every shot, you can improve look of that shot by using an HDR merge in either Photoshop or Lightroom. Indeed if you use Lightroom, you can merge RAW files into a RAW HDR file giving you a large range of editing options and a lot of latitude to play with.

The secret with an HDR merge is to make the image look as natural as possible. Our eyes can see a wider range of tones than a camera sensor, but they are also not perfect. You should aim to make your HDRs look as similar to the way your own eyes saw that scene. When you go beyond that, you get into the garish over-processed HDR look that has been much debated.

By combining the images we can see much more detail without any quality loss. By Jason Row Photography

There is one other reason why bracketing can be useful. It can help reduce noise when shooting at high ISOs. Because digital sensors do not record noise in the same place for each shot, we combine a series of different exposures. This can be either via HDR or Photoshop’s blending techniques, such as image stacking. The blending in either of these will merge reduce the areas of harsh noise in the image making it look much cleaner. It's a useful solution when the tripod is back at home. 

You can also reduce noise by bracketing an exposure. By Jason Row Photography

It's Not All Good News

There are one or two downsides to bracketing. The first of course is that it can take 5-7 times the amount of storage space both on your SD card and your hard drive. It also takes a lot more power from your battery shooting 5-7 shot bursts at 5 frames per second or more.

However, if you are working on a professional job, or trying to get a shot that will be technically perfect, the pros far outweigh the cons. Personally, when I edit my shots in Lightroom, I sort images by time to delete all the shots in an unwanted bracket. This helps conserve a lot of my hard drive space.

Bracketing is a very useful tool. Whether you choose to bracket every shot is a personal preference based on your own shooting style, however, whatever you shoot there will be times when a bracket will be highly advantageous to you.

Do you regularly bracket your shots? Tell us about your experiences in the comments below or on the forums.

Further Resources

Let's block ads! (Why?)


Light Stalking https://ift.tt/2NWMMS0

Sourced by Time Trap Photography sharing the best photography tips, news and tricks throughout the industry. Time Trap Photography is dedicated to freezing those special moments in life that can be revisited and admired for generations to come. - Shannon Bourque
Please visit our main site for booking availability and rates.


"Time


Receive valuable industry knowledge delivered free to your email each day.


"Time

If You Keep Smashing Your Screen, Then Samsung Has Something For You

8:05:00 AM

The only downfall to having thin glass trays manage everything in your life using highly sophisticated but delicate electronic equipment is that they are, aside from everything else, made out of glass. It is almost as if form and aesthetic trumps function when it comes to smartphones and this has led to countless mishaps when it comes to wear and tear.

As anyone who has owned a smartphone can tell you, a nice big crack doesn’t end the product’s life but it certainly doesn’t improve yours. And when it shatters? Isn’t that a terrible day indeed.

Image via Largo Polacsek from Pexels.com.

Those days might be a thing of the past if Samsung’s new unbreakable screen becomes the industry standard. Samsung’s new flexible organic LED display is able to withstand bends and drops due to a unique layering process that uses fortified plastic rather than glass, allowing the screen to survive bends that no glass device could ever handle.

Discussing the breakthrough, general manager of the Communication Team at the Samsung Display Company Hojung Kim said, “The fortified plastic window is especially suitable for portable electronic devices not only because of its unbreakable characteristics but also because of its lightweight, transmissivity and hardness, which are all very similar to glass.”

Samsung’s unbreakable designation comes after an extensive round of tests with OSHA and the US Department of Defense. The glass from Samsung had to withstand a battery of tests including a drop test of 4 feet above ground twenty six times in a row and a high temperature/low temperature test, among others, according to Ephotozine. After the performance of the tests the team would test the Samsung device for functionality and recorded that no damage or loss of functionality occurred after the tests.

You can watch a video of the tech in action on YouTube by clicking here.

Let's block ads! (Why?)


Light Stalking https://ift.tt/2n0IKwA

Sourced by Time Trap Photography sharing the best photography tips, news and tricks throughout the industry. Time Trap Photography is dedicated to freezing those special moments in life that can be revisited and admired for generations to come. - Shannon Bourque
Please visit our main site for booking availability and rates.


"Time


Receive valuable industry knowledge delivered free to your email each day.


"Time

3 Secrets To Having Fun with Juxtaposition

6:00:00 AM

Juxtaposition is one of those highly popular adjectives you can find in photography, but what does true juxtaposition means?

Well, it basically can be defined like this, it is the photographer's choice of combining two contrasting elements inside one frame.

Nevertheless, such a simple to define concept can still lead to confusion. Such confusion starts when people start to simply combine random, unrelated elements without thinking about the meaning of the overall image.

The great trick about juxtaposition is to find two elements that create a narrative when blended together. Their relationship can be bold and ironic, or obvious and complementary.

What is Juxtaposition Really About?

Photo by Kevin Jarrett on Unsplash

Juxtaposition is a powerful tool, and it works well in photography, but it should always be used with wisdom and even caution. The hidden trick is to see connections most people won't see between contrasting elements.

The surprise element in well-executed juxtapositions are those unexpected ways in which two elements are related in the same frame

Note: There should be a limited number of contrasting elements in the frame, think two or three, otherwise the impact of the narrative gets lost.

In some photography genres like street photography, juxtaposition can be some sort of serendipity, while in more controlled situations, it can even reach the purest of art forms.

Things To Consider When Working With Juxtaposition

The point of view is the obvious first step if you are working to style a juxtaposition rather than just find it because of luck.  

It is important to keep in mind that a telephoto lens will give you more tight shots, and a wide angle lens will give us rich-in-context images.

But overall, juxtaposition will always be the focal point of the composition of the photograph.

When looking to add elements of juxtaposition into your photos – here are some things you might like to think about:

  1. Scale – this could be multi-leveled, physical (eg big vs small) or conceptual
  2. Mood – tranquility vs commotion 
  3. Age – can you capture ancient vs modern elements for effect? 
  4. Irony – does the contrast add humor to your image?

My Own Experience With Juxtaposition

I think I've only been able to capture a scene with an interesting juxtaposition once – and is this one.

Photo by Federico Alegría

I saw the blind man walking on the sidewalk, and I instantly knew he was going to walk in front of the Ray Charles graffiti on a wall.

I would have preferred to have a wider shot depicting his feet, but everything happened so fast, that I couldn't manage to walk back in a safe way (it would have required to step on the street and cars were passing by).

Nevertheless, the huge juxtaposition makes this shot something I can still feel proud today.

Juxtaposition is challenging, I won't lie to you, but it will give you huge levels of satisfaction if it is done right.

If you are interested in further understanding and improving your composition, take a look at Understanding Composition by Kent DuFault over at Photzy

Further Resources

Let's block ads! (Why?)


Light Stalking https://ift.tt/2mWMvmz

Sourced by Time Trap Photography sharing the best photography tips, news and tricks throughout the industry. Time Trap Photography is dedicated to freezing those special moments in life that can be revisited and admired for generations to come. - Shannon Bourque
Please visit our main site for booking availability and rates.


"Time


Receive valuable industry knowledge delivered free to your email each day.


"Time

31. Juli 2018

4:05:00 AM

Das Bild des Tages von: Frieda Rike


kwerfeldein – Magazin für Fotografie https://ift.tt/2NYTYwX

Sourced by Time Trap Photography sharing the best photography tips, news and tricks throughout the industry. Time Trap Photography is dedicated to freezing those special moments in life that can be revisited and admired for generations to come. - Shannon Bourque
Please visit our main site for booking availability and rates.


"Time


Receive valuable industry knowledge delivered free to your email each day.


"Time

Monday, July 30, 2018

Männerbilder von Mehran Djojan

10:05:00 PM

Aufnahmen von Männern sind selten, noch seltener ist Männerakt. Ob auf Instagram oder Ausstellungen, Frauen als Motive dominieren überall. Deshalb ist es immer wieder schön, auch gute Männerportraits zu entdecken, wie die des jungen Berliner Fotografen Mehran Djojan. Angesprochen auf seine Männerbilder schreibt er:

Ich fotografiere beides, Männer und Frauen. Das hat sich ganz natürlich ergeben, da meine Modelle zu 90 % Freund*innen oder Mitstudierende sind. Dass nicht viele Fotograf*innen alle Geschlechter portraitieren, ist mir erst bewusst geworden, nachdem ich so oft auf meine Männerportraits angesprochen wurde. Für mich macht es keinen Unterschied, wen ich fotografiere. Mein Modell muss mich einfach inspirieren.

Ein Mann hält sich eine Banane an den Kopf

Mann mit Rasierschaum im GesichtMännerakt vor Blumen

Männerakt vor Blumen

Männerportrait

Abstrakter Männerakt mit Orangen

Männerportrait

Mann mit GlitzerMännerakt

Männerportrait

Männerportrait

Männerportrait mit HändenSpringender Mann

Männerportrait

Männerakt in abstrakter Pose

Mehr von Mehran findet Ihr auf seiner Webseite. Außerdem könnt Ihr ihm auf Instagram oder Facebook folgen.


kwerfeldein – Magazin für Fotografie https://ift.tt/2vkR65S

Sourced by Time Trap Photography sharing the best photography tips, news and tricks throughout the industry. Time Trap Photography is dedicated to freezing those special moments in life that can be revisited and admired for generations to come. - Shannon Bourque
Please visit our main site for booking availability and rates.


"Time


Receive valuable industry knowledge delivered free to your email each day.


"Time

Let’s Get Started – A Beginners Guide to Layers in Photoshop

8:01:00 AM

Perhaps the standout feature that Photoshop has over Lightroom is layers. The problem is that, for many, Photoshop’s layer tools can be a daunting and confusing prospect. This is compounded by the fact that there are several different Photoshop tools that use the layer technique. 

Today, we are going to give you a basic overview of the most common layer tools in Photoshop. Rather than a tutorial, this will be a run through of what they do and why you would use them.

We will look at Layers, Adjustment Layers, and Layer Masks. Along the way, we will also make a pit stop at Blending and Opacity

A Look At Layers.

The basic Layers tool has been around since Photoshop v3 way back in 1994. For pure photographic editing it has been largely superseded by Adjustment Layers but it still has much relevance to the photographer today.

The easiest way to understand layers is to think of your photograph as a slide. With your slide laid flat on the lightbox, a layer can be seen as a clear acetate film placed over the top. On to that acetate, you can write, draw shapes, blur or opaque out parts of the slide below. 

Photoshop layers work just like this. They make it easy to add a shape or text, resize and move it independently of the image below. You can add multiple layers all doing separate things and for each object on a layer, you can add an effect such as a drop shadow or a bezel effect. 

A basic text layer.

Adjustment Layers

If a layer is a clear acetate film over your slide, an Adjustment Layer is an exact copy of your slide, except one that you can make multiple different edits to without affecting the quality of that slide.

In Photoshop if we make an image adjustment such as curves and save it, the image will be degraded ever so slightly. 

However, with add an Adjustment Layer we can make multiple and dramatic edits without affecting the integrity of the image. Whereas Image Adjustments is found under the Image section of the menu, Adjustment Layers is found in the Layers section. However, many of the image adjustment tools we are familiar with have Adjustment Layer equivalents.

For basic exposure, there are Brightness/Contrast, Levels, Curves, and Exposure. Beyond that, there are adjustment layers for colour, saturation, photo filters and more. For each specific edit, you wish to make you can add a new adjustment layer.

You can then choose how to merge those layers using blending or opacity. This allows you to vary the effect of each adjustment relative to others. 

Selective Color adjustment layer

Opacity and Blending

These are the two tools that define how individual layers are merged together. Opacity simply dials up or down the translucence of the effect. If a layer is set to 0% it is completely transparent. and the layer beneath will be visible If it is set to 100% it is completely opaque and the layer below cannot be seen.

Blending is a way of merging two layers together. At a basic level, it works like a dissolve between two shots in a film.

There are multiple different Blend Modes. Some work out differences in luminosity between the layers, some colour. Some are very subtle some are dramatic. The easiest way to find the best blend mode for a layer is simply to experiment.

You can also move layers up and down to get different effects. The thing to remember is that adjustment layers are non-destructive so you can play around to get the right look without affecting image quality

Layer Masks

A Layer Mask is a copy of the original image where we can black out parts of that image. This enables us to work on parts of it without affecting the areas that we have masked. In the case of a Photoshop Layer Mask, the area that we have blacked out reveals the layer below. If that lower layer is, for example, darker, the masked area of the upper layer will also appear darker. 

We can also mask out Adjustment Layers. This would allow us to hold back a colour correction in a specific part of an image.

Layer Mask is a powerful way to edit selected parts of an image

Layers are an amazing part of Photoshop. Getting a handle on how they work is the first stage in using them on your images. As we mentioned at the top, this article is only meant to be an overview rather than a tutorial.

However, if you would like us to go into more detail on how to use the three layer tools mentioned above let us know in the comments. 

Let's block ads! (Why?)


Light Stalking https://ift.tt/2AlT8sn

Sourced by Time Trap Photography sharing the best photography tips, news and tricks throughout the industry. Time Trap Photography is dedicated to freezing those special moments in life that can be revisited and admired for generations to come. - Shannon Bourque
Please visit our main site for booking availability and rates.


"Time


Receive valuable industry knowledge delivered free to your email each day.


"Time

3 Free Guides for Perfect Black and White Photos

6:01:00 AM

I could talk about Black and White Photography forever, for real, and today I want to share with you three free guides that will help you take better black and white photographs. And hopefully, I'm still on time for sharing them with you before you make mistakes as the ones I made in my first encounters with photography.

Black and White photography has always been very appealing to me, and since my first days as a photographer, I wanted to create jaw-dropping photographs that made people stop and stare in monochrome.

Photo by Elisabetta Foco on Unsplash

Except for a couple of really expensive cameras since the appearance of digital cameras, black and white photography has been a thing that happens truly in post-production rather than in camera.

Therefore deciding whether a photograph should stay in color or if it could work better in black and white is a very good place to start if you want to make amazing photographs.

Here in this guide, Jason D. Little shares with us exactly that, how to decide whether a picture should be transformed into monochrome or whether it should be developed as a color photograph.

Street photography is one of those genres that works quite well in black and white. Not all street photographs look great in color because there is a huge lack of control of what is happening in front of our eyes, and that's why you'll see a lot of black and white images in Diane Wehr's freed guide on street photography.

Last but not least, one of the biggest treasures available for free at Photzy thanks to our friend Kent DuFault. Here you'll get a very interesting taste of what black and white photography is all about.

Photo by William Sura

Black and White photography is not a genre but a decision, and whatever you do, in post-production, you need to understand one thing. And that thing is that Black and White will always work better if there is an intention behind it, messages get delivered better in monochrome when the color versions are way too distracting.

Let's block ads! (Why?)


Light Stalking https://ift.tt/2LA1qSF

Sourced by Time Trap Photography sharing the best photography tips, news and tricks throughout the industry. Time Trap Photography is dedicated to freezing those special moments in life that can be revisited and admired for generations to come. - Shannon Bourque
Please visit our main site for booking availability and rates.


"Time


Receive valuable industry knowledge delivered free to your email each day.


"Time

6 Effective Tips to Sell Your Photos

5:10:00 AM

So you want to sell your photos? I can help you start this journey. I have been a full-time photographer since 1995, so I have experienced more than 20 years of this ever changing industry. Through the years, I have met many art photographers and have learned to understand the photography market and how to sell photographs.

Sell Your Photos like these from Iceland

Arial Fine Art Print, Iceland

Here are the six most important points I have learned…

Know your Market

Knowing the market is very important! Whether you are in a coffee shop, gallery, or outdoor art festival, knowing the market will help determine your success.

How do you determine the market? Look around and research. What is the price point of the artwork on display? What subject matter/sense of location do you observe? Does the area cater to tourists or locals? With these questions answered, you will know how or if your work will fit. Keep in mind that very high end galleries, fine art shows, and museums have an extensive mailing list and a worldwide collector base. So if you look at these, you will notice that they are more open to a variety of art and imagery as well as higher price points. But on the other end, they have a much higher expectation of uniqueness and quality.

Outdoors shows are a great way to get your work in front of different markets. You will get a sense of the demographics of the majority of your buyers. You will also see what images people are most drawn to.

Find your Market

Finding your market is another route you can take. If you have a beautiful portfolio of ocean scenes, your best market will be in areas where there is an ocean. You can still sell this work elsewhere but it will be much harder. Many buyers (not collectors) of art and photography are attempting to match their decor. If you are in an area of southwestern architecture and interior design, you will have the best luck with images of the southwest. Again, research is imperative here. Talk to other artists, visit the gallery/art festival to see what is on display and selling, and look at their websites to see what style of art dominates. You may not want to waste your time and energy on a gallery that only shows the work of dead impressionist painters.

Also know what the market can bear. If you want to sell your photos in a flea market, people are expecting certain price points that are dramatically different than they find in the high end galleries. Keep your prices consistent across the board but maybe only offer your smaller and less expensive prints at the flea market with the hopes of up-selling them to your more expensive work.

Research galleries to see if they are a good fit for your work. Some galleries have solo one month exhibits and bring addition recognition to your art.

Create a Quality Product

We are our own best advocates. But making and creating positive relationships with others goes a long way. This plays true on the internet as well. Learn to get along with other artists, gallery owners, art show directors, and collectors because word of mouth is a huge part of this business. I have created great relationships with collectors who have then invited me to teach them about photography around the world. You never know who will pass your name onto others.

Develop Relationships

Our photography is the greatest representative of us. Every gallery I have the pleasure of being represented by requires flawlessness in the final displayed piece. You should require the same of yourself regardless of the venue. Don’t look at a coffee shop as a way to dispose of your damaged or substandard work but instead put your best foot forward.

There are many avenues a photographer can take in order to sell their images. Look around and see what options present themselves.

Don’t Compete with Low Priced Artists

Visit any number of websites or art festivals and you will find an array of different price points. Don’t succumb to the pressure to sell your photos by lowering your prices. Instead, find a way to project value for your work. With this and experience, you can demand higher prices. But be realistic as well. Understand your expenses of capturing the images, your time and expenses in creating and getting the work ready for display, and your general business expenses. Don’t just price the work based on how much it cost to print. There is so much more that you have invested in each and every image. Plus, the more competitively we as photographers price our work in relation to painters and other artists, the more value people will put on photography.

Learn to Sell

Get your work out there and learn to sell it.  Buyers love stories. They want to know what inspired you and they want to know how their life will be enriched by the purchase of your artwork. I believe 50% of most fine art sales is attributed to the connection the buyer had with the artist and the other 50% is the connection the buyer had with the artwork.

If you are getting started in trying to sell your photos then good luck. And for those of you who have been doing this for few years, please feel free to share your ideas in the comments below.

About Author Christine Hauber

The current that underlies Christine Hauber's work is the concept of serenity in a world of chaos. With 25 years of professional photography experience, she continues to be attracted to the simplicity of the minimal and thus makes every effort to be a faithful visual recorder of the world around her. She wishes for her images to distill scenes ranging from the ephemeral to the eternal, from the abstruse to the symbolic. As a dedicated artist, she strives constantly to explore and expand her definition of the splendor and mysterious in life and nature. Her images have an ethereal and enduring quality.

Christine's work is published in various books, magazines and websites and has been printed and hangs in homes and offices worldwide. She teaches private photography workshops worldwide focusing on the needs of each unique client.

Let's block ads! (Why?)


Visual Wilderness https://ift.tt/2K6Jt8D

Sourced by Time Trap Photography sharing the best photography tips, news and tricks throughout the industry. Time Trap Photography is dedicated to freezing those special moments in life that can be revisited and admired for generations to come. - Shannon Bourque
Please visit our main site for booking availability and rates.


"Time


Receive valuable industry knowledge delivered free to your email each day.


"Time

30. Juli 2018

4:01:00 AM

Das Bild des Tages von: Matthias Dengler


kwerfeldein – Magazin für Fotografie https://ift.tt/2mVduPw

Sourced by Time Trap Photography sharing the best photography tips, news and tricks throughout the industry. Time Trap Photography is dedicated to freezing those special moments in life that can be revisited and admired for generations to come. - Shannon Bourque
Please visit our main site for booking availability and rates.


"Time


Receive valuable industry knowledge delivered free to your email each day.


"Time

Sunday, July 29, 2018

Feuerwelten – eine fotografische Expedition

10:05:00 PM

Eine Frau in Kostüm mit brennenden Fächern.

Ein Beitrag von: Jonas Klemm

Seit meiner Kindheit ist Fotografie in meinem Leben immer präsent gewesen. Nachdem ich mit meinen Eltern aus unseren Urlauben zurückkehrte, wurden immer mit Spannung die Dia-Abende in großer Runde mit Familie und Freund*innen erwartet. An diesen Abenden konnte man alles noch einmal Revue passieren lassen, sich erinnern und mit Geschichten vom norwegischen Polartag oder von kuriosen Echsen auf den Kanarischen Inseln glänzen. Die Erinnerungen und die staunenden Gesichter der Großeltern waren dann der unbezahlbare Lohn für mich als Kind.

Und so wollte ich das dann natürlich auch bei meiner ersten eigenen Reise handhaben. Nur, dass ich meist für das Erzählen der Geschichten zuständig war und nicht für das Fotografieren. Das hatte immer mein Stiefvater übernommen, der nun aber nicht dabei war. Dadurch sollte mein erstes selbstgewähltes Ziel zu einer echten Herausforderung werden. Ich entschied mich dafür, nach knapp 20 Jahren noch einmal zurück ins unvergessliche Norwegen zu reisen – dieses Mal allerdings, um die Polarnacht zu erleben. Und natürlich habe ich darauf gehofft, die Aurora Borealis (auch Polarlichter genannt) erleben zu dürfen.

Ausgestattet mit der analogen Spiegelreflex meines Vaters, einer Nikon F65 , fühlte ich mich gut gerüstet. Nur konnte ich kaum die Automatiken der Kamera unterscheiden und von Langzeitbelichtung hatte ich noch nie etwas gehört. Ohne zu weit ausholen zu wollen: Wir hatten Glück, Polarlichter erleben zu dürfen, doch es blieb bei einer spektakulären Erinnerung. Ein Freund, den ich dort besuchte, hatte zumindest ein Stativ und konnte so wenigstens ein paar Fotos mit seiner Kamera machen. Aber das Gefühl, so etwas Spektakuläres zu sehen und es nicht festhalten zu können, es nicht zu Hause wie gewohnt anhand von eigenen Bildern erzählen zu können, war der Anfang meiner Begeisterung für die Fotografie.

Von nun an wollte ich lernen, Spektakuläres jeglicher Art fotografieren zu können. Und was bietet sich besser dafür an, als meine mit dem Feuer spielenden Freund*innen dafür als Übung zu nutzen? Dunkle Umgebung, sich schnell bewegende Menschen und die Charakteristik von Feuer als Lichtquelle. Das sind in Kombination schwierige Bedingungen, die ein Verständnis der Kameratechnik, aber auch der Bewegung des Motivs erfordern.

Zwei Personen im Dunklen mit Flammen an Stäben.

Man kennt von manchen Veranstaltungen mit Feuershow eigentlich nur zwei Arten von Fotos: Entweder die Feuerspieler*innen verschwinden in der Bewegungsunschärfe und helle Feuerstreifen irren durch das Bild oder es ist komplett schwarz und zwei kleine Flämmchen sind zu sehen. Wir hatten uns zum Ziel gesetzt, die einzelnen Elemente im Bild auch einzeln kontrollieren und steuern zu können. Gemeinsam haben wir verschiedene Dinge ausprobiert und uns auch mit Lichtmalerei beschäftigt. Die unterschiedlichsten Flammeneffekte wurden mit vielen Fototechniken verbunden.

Drei Personen im Dunklen mit Flammen an Stäben.

Wir waren gemeinsam auch auf vielen Feuerjonglagefestivals und mittlerweile fühle ich mich heimisch in der sehr familiären und internationalen Szene dieser Artist*innen. Auf einigen dieser Festivals koordiniere ich die Fotograf*innen und Videograf*innen und sehr oft werde ich nach den „richtigen“ Einstellungen für gute Feuerbilder gefragt.

Und das ist eine Frage, die man nicht pauschal beantworten kann. Es hängt von so vielen Faktoren ab und vor allem dem Bewusstsein, welche Art Foto die Fotograf*innen im Endeffekt haben möchten. Darum werde ich hier meine Herangehensweise an die wahrscheinlich am häufigsten vorkommende Situation beschreiben: Feuershow auf einem Mittelaltermarkt.

Mann im Dunklen mit Flammenkreis um sich.

Zielfrage: Welche Art Bilder möchte ich?

Für mich kommt dabei aufgrund der Umstände (Mittelaltermarkt-Flair, kaum bis keine Bühnenbeleuchtung) nur eine Art in Frage. Ich habe lediglich die Möglichkeit, meine Kamera und mich selbst zu ändern. Anfangs war dies die Nikon D5100 , bis vor Kurzem dann meine Nikon D600 , die ich nun nach einem Diebstahl wohl durch eine Nikon D750 ersetzen werde.

In der Regel gibt es kein Extralicht oder sonstige Möglichkeiten, zu justieren. Ich möchte das Spiel mit dem Feuer scharf abgebildet wissen, möchte eine schön tiefe Flammenstruktur, also „friere“ ich die Flamme ein. Das bedeutet, dass ich – abhängig von meiner Brennweite – eine relativ kurze Belichtungszeit benötige, zum Beispiel bei 85 mm an einem APS-C-Sensor mindestens 1/125 s.

Junger Mann und Stab mit brennenden Enden.

Wo stelle ich mich hin?

Ist irgendwo eine Laterne oder Fackel zu sehen, die in Richtung Showfläche leuchtet? Dann stelle ich mich in ihre Nähe. Sie wird mir nicht helfen, das Bild aufzuhellen, aber meinem Autofokus helfen, das Ziel zu finden – die Feuerjongleur*innen! Oft findet der Autofokus nur die hellen Lichtpunkte der geschwungenen Flammen, die aber auch oft weit weg von den Artist*innen beziehungsweise ihren Gesichtern sind.

Mann im Dunkeln mit zwei Feuerfontänen neben sich.

Was fotografiere ich da eigentlich?

Wenn die Show dann endlich losgeht, ist man als Besucherin*in meist ahnungslos, was denn eigentlich auf der Bühne passiert. Bevor ich mir die Kamera vor die Nase halte, schaue ich genau, mit welchem Jonglagegerät gespielt wird. Es gibt unglaublich viele unterschiedliche und ebenso viele unterschiedliche Arten, sie zu spielen. Und mit ein wenig Übung kann man während der Show auf verschiedene Situationen entsprechend reagieren.

Frau im Dunklen mit Flammen vor dem Gesicht.

Wie – „reagieren“? Macht das nicht die Automatik?

Die Automatik-Modi Blenden- oder auch Zeitvorwahl sind meiner Erfahrung nach nicht so gut. Sie messen permanent, aber können nicht antizipieren. Dies ist also meine Aufgabe – die ganze Zeit der Show über.

Bei der kurzen Belichtungszeit, die ich schon erwähnte, werdet Ihr Euch nun fragen, wie es denn mit der Blende und dem ISO-Wert aussieht. Nun, mit diesen Werten tanze ich immer einen Flamenco auf der Rasierklinge: Um eine gewisse Tiefenschärfe zu gewährleisten, die es mir erlaubt, auch bei schnellen Bewegungen die spielende Person im Fokus zu halten, nutze ich meistens eine Blende im Bereich f/4–6.3. Je nach Bewegungsgeschwindigkeit muss ich auch noch die Verschlusszeit erhöhen. Bis zu 1/320 s gehe ich hier meist maximal hoch.

Eine Frau in Kostüm mit brennenden Fächern.

Der Iso-Wert ist dementsprechend natürlich extrem wichtig, hängt aber maßgeblich von der ISO-Performance der Kamera ab. Aber sowohl auf Vollformat sowie auch auf den wesentlich anfälligeren APS-C-Sensoren haben sich Iso-Werte von 800 bis 2000 bewährt. Je mehr Flammen das Spielgerät hat und je langsamer sich die Artist*innen bewegen, desto sparsamer kann ich dabei mit dem ISO-Wert umgehen.

Und die meisten, die schon einmal so eine Show fotografiert haben, werden sich denken: „Das ist doch total unterbelichtet!“ (im doppelten Sinne) und haben damit auch völlig Recht. Denn der wichtigste und schwierigste Punkt kommt jetzt:

Timing!

Die Flamme ist wie eine Feder im Wind. Und meine einzige Lichtquelle. Das bedeutet: Nur dann, wenn die Flamme hell genug ist, um den Menschen zu beleuchten, kann auch das Foto entstehen, das ich mir vorstelle. Und wenn man mal in die Verlegenheit kommt, eine Show ohne Kamera zu beobachten und auf die Momente achtet, in denen das gegeben ist, wird man feststellen, dass das nicht oft passiert. Und genau diese Momente muss ich erkennen – bestenfalls, bevor sie eintreten.

Ein junger Mann mit Flammen an Schnüren und einer Glaskugel auf dem Kopf.

Nun bin ich nicht Yoda und kann entsprechend keine Bewegungen vorhersehen, aber mit ein wenig Taktgefühl kann man sich die Musik des Showacts zu Hilfe nehmen. Viele Bewegungsabläufe sind auf den Takt choreografiert und meistens sind so die Schlüsselmomente der Musik auch die Momente, die ich für meine Fotos suche.

Meine Kamera macht in 10 Sekunden 50 Serienbilder, ich brauche kein Taktgefühl!

Ja, kann hilfreich sein und insbesondere bei manchen Spezialeffekten ist das sogar sehr sinnvoll. Nur kann auch bei Serienbildern der entscheidende Moment übersprungen werden. Ich fahre mittlerweile bequemer, wenn ich versuche, das Timing einzuhalten, was auch in der Nachbearbeitung dankbarer ist, als mich durch 1.000 Bilder pro Showact wühlen zu müssen.

Ein junger Mann mit Flammen an Schnüren.

Nachbearbeitung?

Erst einmal kommt das Aussortieren. Übrigens liegt meine durchschnittliche Moment-Trefferrate bei etwa 1:10. Bei einem von zehn Bildern habe ich den hellen Moment der Flamme getroffen. Oft fällt das eine Bild dann aber noch aufgrund von Unschärfe oder ungünstiger Mimik aus der Auswahl. Da ist es manchmal schwer, sich nicht frustrieren zu lassen.

Viele der Bilder sehen, selbst wenn man den richtigen Moment erwischt hat, oft noch recht dunkel aus, rauschen oder stimmen nicht ganz von der Farbtemperatur (Farbtemperatur und Fokus überlasse ich immer der Automatik). Das korrigiere ich im Nachhinein im Camera Raw.

Es gibt nicht die geheime Einstellung. Das Geheimnis ist das Bewusstsein über das eigene Ziel und das Motiv vor der Kamera. Dem kann man sich im Rahmen der technischen Möglichkeiten nähern. Es braucht Geduld. Es braucht etwas Erfahrung. Es braucht Glück. Es braucht Übung! Aber mit diesen Tipps bekommt Ihr vielleicht ein Foto, das die Begeisterung der Artist*innen für die hypnotisierende Kraft der Flammen einfängt, auf dem man die Augen leuchten sieht und die fantasieanregende Struktur der Flammen wahrnehmen kann. Eben spektakulär!

Anmerkung der Redaktion für diejenigen, die eventuell selbst experimentieren möchten: Feuer ist und bleibt gefährlich! Feuerjonglage sollte nur betreiben, wer jahrelange Erfahrung mit dem Spiel der Jonglageutensilien ohne Feuer gesammelt hat. Feuerlöscher und Löschdecken sind immer mitzuführen. Zudem sollte immer eine zweite Person ohne brennende Utensilien bereit stehen, falls jemand Feuer fängt. Baumwollkleidung ist Pflicht, ebenso, dass die Utensilien adäquat getränkt werden, so dass die Brennflüssigkeiten nicht in die Umwelt gelangen! Weitere Informationen zum richtigen Umgang mit Feuer bietet zum Beispiel Feuerpädagogik e. V.für Interessierte an.


kwerfeldein – Magazin für Fotografie https://ift.tt/2K5omUc

Sourced by Time Trap Photography sharing the best photography tips, news and tricks throughout the industry. Time Trap Photography is dedicated to freezing those special moments in life that can be revisited and admired for generations to come. - Shannon Bourque
Please visit our main site for booking availability and rates.


"Time


Receive valuable industry knowledge delivered free to your email each day.


"Time

About Us

Time Trap Photography is dedicated to freezing those special moments in life that can be revisited and admired for generations to come. - Shannon Bourque

The lens in focus

“Life is like a camera. Just focus on what’s important and capture the good times, develop from the negatives and if things don’t work out, just take another shot.” — Unknown

TIME TRAP PHOTOGRAPHY COPYRIGHT 2016