Friday, May 31, 2019

The Trump Wall

10:04:00 PM

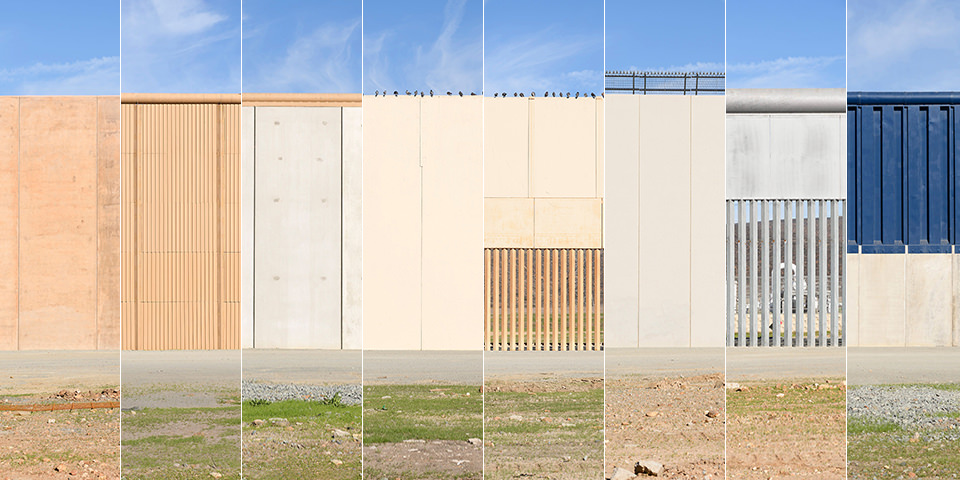
Kaum ein Wahlversprechen wurde so viel diskutiert wie die berühmte Trumpmauer. 3.145 km soll sie entlang der Kontinentalgrenze illegale Einreisen aus Mexiko in die USA unterbinden. Über zwei Jahre ist der Amtsantritt Donald Trumps nun her und noch immer steht sie nicht. Was bisher gebaut wurde, sind jedoch Prototypen, aufgereiht in San Diego, nahe der mexikanischen Grenze.

Hier hat sie der mexikanische Fotograf Daniel Ochoa de Olza dokumentiert, aus Sicht der mexikanischen Seite. Die Aufnahmen werden wohl ein wichtiges Zeitdokument werden und sind und bleiben vor allem eins: Ein Zeichen für Trumps Größenwahn.

Der Präsident hatte am 15. Februar einen nationalen Notstand ausgerufen, um die Mauer ohne parlamentarische Zustimmung finanzieren zu können. In der letzten Woche entschied ein Richter, dass der Bau gestoppt wird, weil das dafür nötige Geld vom Kongress nicht explizit zum Bau freigegeben wurde.

Mauerstück

Mauerstück

Mauerstück

Mauerstück

Mauerstück

Mauerstück

Mauerstück

Mauerstück

Hier in Deutschland erregt Trumps Bestreben durch die deutsche Geschichte gefühlt besonders viel Aufmerksamkeit. Die Prototypen erinnern mich selbst an die Mahnmale zum innerdeutschen Mauerbau, der mehr Leid als Schutz gebracht hat. Die Geschichte wird zeigen, ob einer der Prototypen tatsächlich einmal Vorbild für eine echte Mauer sein wird.


kwerfeldein – Magazin für Fotografie http://bit.ly/2wy1dp8

Sourced by Time Trap Photography sharing the best photography tips, news and tricks throughout the industry. Time Trap Photography is dedicated to freezing those special moments in life that can be revisited and admired for generations to come. - Shannon Bourque
Please visit our main site for booking availability and rates.


"Time


Receive valuable industry knowledge delivered free to your email each day.


"Time

5 Ways To Tell If A Shot Will Make A Great Black and White

8:03:00 AM

There’s something about a black and white image, isn’t there? A good black and white stirs something inside us. It may create an emotion, make us question or simply step back in awe.

The problem is, shooting great black and white shots can be tricky. Perhaps the trickiest part is knowing whether a shot will convert well to black and white.

  • Claim Your Free Camera Craft Cheat Sheet

Print it out and keep it for when you really need it - when you're out shooting!

I am sure that, like me, many of you have converted shots that you might think would be great in black and white, only to be entirely disappointed with the end result. The thing is, whether you are converting an existing shot, or shooting a new one, black and white has some very specific requirement to work well.

Today, we are going to look at a few of them. 

1. Scenes With Good Tonal Contrast

One of the primary factors that makes up a good black and white image is good tonal contrast. By that, we mean a range of tones from solid black through to pure white with several distinct mid-tones in the middle. 

The best black and white images work when different tones are on different layers through the image. For example, the pure black may be just in the background, while the subject is composed of a series of lighter tones. Those lighter tones separate the subject from the background, giving depth, while the variation in the lighter tones provides us with texture. 

Combing that depth and texture well can give us an almost three-dimensional look to our black and white photos.

Good tonal contrast is vital to black and white. Photo by Jonas Jacobsson 

2. Scenes With Contrasting Primary Colours

It might seem odd to suggest colour is essential in black and white, but it is, in fact, vital. Just as tonal contrast can give us depth, so can colour contrast. It also can help separate compositional elements within a scene. 

The primary colours are the best to work within black and white, usually in pairs. Green and Red, Green and Blue and Red and Blue are all combinations that can give a striking colour contrast to a black and white image.

Another reason for looking for these primaries is how we work in post-production. Our editing software will work predominately with primary colours. That means that we can change the saturation and lightness of those individual colour channels even in black and white. 

Decreasing the lightness of the blue channel, for example, will darken our skies. If we have fluffy white clouds in that sky, they will become more prominent. Increasing the lightness of green will lighten any foliage in a landscape,  helping it stand out from other elements in the scene. Colour contrast is as important to black and white as tonal contrast. 

The importance of colour cannot be overstated. By Jason Row Photography

3. Strong Directional Light

Light is, of course, important in all photos, but black and white images can benefit from strong directional light. This could be sunshine, flash or continuous light or reflected. By having an omnidirectional light source, we can cast shadows over our subject and background. This, in turn, creates a feeling of depth, similar to the use of good tonal contrast. 

There needs to be some subtlety to the light. Too hard or harsh and those shadows will go black, revealing no details. A good directional light will cast strong shadows that can still exhibit texture and detail in a good exposure. 

Strong directional outdoor light is a particular weapon in architecture and cityscapes. The geometry of modern life can create amazing shadows and textures.

Strong directional light creates shadow and mood. Photo by Daniel Horvath 

4. Textures

Texture is another element that can make for a fantastic black and white image. Leading on from above, strong directional light passing at a deep angle over a textured surface can give us very compelling monochromatic images.

Textures are all around us, from the rust on an abandoned car to the knurls and swirls of the bark of a tree. These textures can make an interesting abstract subject on their own or be used as a compositional element to highlight a different subject. Low, strong but not harsh light from one direction will be your friend here.

Textures can become visually striking in black and white. Photo by Ricardo Gomez Angel 

5. Geometry

Mathematicians will tell there is a beauty in geometry and they would be right. For photographers, there is a special kind of visual beauty to geometrical subjects, one that is especially so when shot in monochrome. 

Geometry is all around us but occurs more in human-made subjects than in nature. It can be as simple as the hard intersections of brutalist architecture to the subtle curves of a modern airport terminal. 

The shapes formed in geometry give rise to light and shade. When we combine that with low directional light, those shapes cast shadows on themselves and create the perfect feel for black and white architectural shots. Move close, and the architecture can become abstract.

Geometry is one genre where even harsh light can work in black and white. So long as the lighter areas have texture and detail, the shadows can be pure black and the shot will still work. 

Geometry has a special place in black and white. Photo by Alex 

Genres That Suite Black And White 

Pretty much any form of photography can look great in monochrome, but some are more suited. Street photography is an obvious choice. Photographers can use tonal contrast to highlight a subject against a darker or lighter tone.

Architecture is another genre highly suited. The geometry of buildings, combined with directional light, can make very striking images.

Portraiture, of course, light subjects well, separating them tonally from the background and you will get great shots. Older subjects are particularly suited to black and white; the lines and ageing of their face can bring a sense of depth to the image.

Landscapes and seascapes work well, especially in stormy weather with contrasty light and foreboding clouds. Long exposure landscapes and cityscapes are both great subjects.

Final Thoughts:

So, what are the best elements to look for when shooting or editing a shot for black and white?

  1. Good tonal contrast
  2. Primary colours especially those that contrast each other
  3. Strong directional light
  4. Textures
  5. Geometry

Black and white can be tough to get right. It’s not as simple as taking a shot and making in monochrome in Lightroom or Photoshop. If planning to shoot specifically for black and white, look out for some of the conditions we detailed above.

If planning to edit existing images to black and white, the same applies. Either way, if your shot has some or all of these elements, there is a pretty good chance you will get a cracking monochrome image out of it. 

Further Learning:

Make sure you take a look at Kent DuFault's Better Black And White Guide. This is a complete step by step guide to creating stunning black and white conversions – including teaching you everything you need to know about controlling tone and contrast to get the image you want.

Click here to take a look…

Let's block ads! (Why?)


Light Stalking http://bit.ly/2IczjUK

Sourced by Time Trap Photography sharing the best photography tips, news and tricks throughout the industry. Time Trap Photography is dedicated to freezing those special moments in life that can be revisited and admired for generations to come. - Shannon Bourque
Please visit our main site for booking availability and rates.


"Time


Receive valuable industry knowledge delivered free to your email each day.


"Time

5 Basic Gear Maintenance Tips That You Need To Be Across Now?

5:08:00 AM

It is true that our cameras nowadays are pretty disposable, and I'm not talking about materials but technology. Every year we get the latest and greatest and each new arrival promises to be the solution we were all looking for.

Well, maybe I'm overreacting here, but you get the gist. So far cameras get obsolete before they start wearing out. If you understand that, and you are able to see your gear as the tool that allows you to create beautiful images, then you'll be more able to enjoy this craft.

  • Claim Your Free Camera Craft Cheat Sheet

Print it out and keep it for when you really need it - when you're out shooting!

Even though cameras last longer than the technology they are built with, and the fact that they are tools and not newborns, you still need to give them proper maintenance.

Otherwise, you'll be prone to develop images with weird artefacts and even poor quality.

Today we are going to talk about the 5 basic practices that you need to rigorously do in order to keep your camera in nearly-pristine condition after a considerable amount of clicks.

1. Get a Dust Blower, and I Mean a Good One

The most evident invaders you can have in a camera or a lens (and pretty much any piece of gear from your laptop to your phone) are dust particles. Annoying and extremely sneaky, dust will land on top of your gear right after unboxing it, and from there, dust will continue to be with your gear until its ultimate end.

The best way to deal with a dry particle is by hitting it with some air, but please don't use your breath. The problem with your unlimited air supply is that it comes with germs and…the big one…moisture.

Giving our electronics' shiny parts your heat and moisture ladened breath isn't the end of the world, of course, but it should be done only under rare emergencies. Otherwise, use a blower, and not any weak blower, use a powerful one that delivers a nice consistent stream of air.

I tend to use air to dust my camera after using it at the end of the day, and I tend to focus on the knobs and dials rather than the lens' frontal element or the screen. You can do this as many times you want and it won't be a problem for your camera.

Blowing the dust away is one of those simple practices that will keep your gear more durable as time goes by.

2. Avoid Giving Your Lens Too Much Love

Cleaning a lens is required whenever smudges form, or if you accidentally left a greasy fingerprint on it. Cleaning a lens is properly done with lens cleaning liquids and chemicals by rubbing small amounts of them evenly with a microfiber cloth. One can get pretty obsessed with this, but the thing is that these chemicals are so strong that they can even leave your lens vulnerable.

Optical engineers have worked hard to develop proper coatings that help our cameras render color in the most real ways. If you clean our lenses too much, we end up weakening these coatings, and that is something we simply don't want.

Simply avoid giving you lens too much love, it is almost like taking care of a cactus. You can't give it too much water and you can't leave it to deal with its existence by its own means. Clean your lenses only when strictly needed.

3. Keeping Everything Dry

This is a practice that comes from the film era, keeping our cameras dry is essential, unless you want to end up with fungus forming inside of your lenses.

This might sound a bit exaggerated, but trust me, it isn't. I remember getting a set of Pentax lenses back in the day, and they were all filled with a cloudy thing inside them, I mean, in the internal optical elements. I took them to a mad camera scientist and he cleaned them for $25 a piece. He used some wacky acids and other chemicals.

The lenses are perfect nowadays. I asked the fellow the reason behind this fungus, and he told me moisture. These formations happen after some years, and it is extremely important to keep everything as dry as possible via silica bags.

Simple solution for a mighty problem, silica bags > fungus.

4. Change Lenses Fast

I don't know how can some people be able to detach their lenses from their cameras and still walk around with the thing hanging there vulnerable to ANYTHING that is in the air.

Really, I don't know how those people are able to sleep. Before changing to the Fuji's X100 system, I used a DSLR, and I always changed the lenses extremely fast and almost crouching. I was a total coward when doing this, but I never got a single (considerable) dust particle inside my sensor.

Nowadays this practice should be taken with even more care with mirrorless camera systems. Try to put your camera down in order to point the hollow mount to the ground, this way you will protect your sensor from gravitating particles. And please, do it fast.

Also important, always put a cover on your lenses rear end, dust particles landing there will give you harsher results than those on the frontal element.

5. Always Use Microfiber Cloths

We all have nice and soft cotton t-shirts, but don't be tempted – microfiber cloths are the way to go. Of course, if you are having an emergency, your one shirt might work just fine, but remember, your shirt might seem soft, but it might just leave some nasty scratches on your lenses surface. This also applies to viewfinders, which of course don't have direct implication in your images' quality, but is still important to keep as clean as possible.

Final Thoughts

You need to understand that dust happens, and it happens daily, always. Cameras and lenses are pretty well built these days, even though some strange elements can still get inside them. If you are planning on using a piece of gear for more than just a year or two, then weather sealed options should be on your radar when deciding on your latest photography-related investment.

Technology has advanced so it isn't nuts to have weather sealed gear anymore. This won't be a guarantee that you to be free of scratches and lens smudges, but it will definitely keep your sensor and other electronics a little bit more protected than regular sealing.

Let's block ads! (Why?)


Light Stalking http://bit.ly/2WyIHeB

Sourced by Time Trap Photography sharing the best photography tips, news and tricks throughout the industry. Time Trap Photography is dedicated to freezing those special moments in life that can be revisited and admired for generations to come. - Shannon Bourque
Please visit our main site for booking availability and rates.


"Time


Receive valuable industry knowledge delivered free to your email each day.


"Time

31. Mai 2019

4:10:00 AM

Das Bild des Tages von: Kathleen Vtr


kwerfeldein – Magazin für Fotografie http://bit.ly/2MkXDtc

Sourced by Time Trap Photography sharing the best photography tips, news and tricks throughout the industry. Time Trap Photography is dedicated to freezing those special moments in life that can be revisited and admired for generations to come. - Shannon Bourque
Please visit our main site for booking availability and rates.


"Time


Receive valuable industry knowledge delivered free to your email each day.


"Time

Night Photography: Tips for Capturing Moon

4:08:00 AM

Full moon on a clear night can create some beautiful and subtle details in the landscape. The moon is a gorgeous subject, but it night photography that includes exquisite details in the moon as well as in the foreground can be tough. Have you ever photographed the moon, only to discover that it is so bright in your photograph that it appears as a small, bright spot? Or that foreground is completely black?

  • Night Photography with Moon & Foreground at Grand Tetons National Park, Wyoming by Jay Patel

    Grand Tetons National Park, Wyoming by Jay Patel

  • Landscape Photo with Moon & Foreground at Zabriskie Point, Death Valley National Park, Califorina by Jay Patel

    Moon & Foreground at Zabriskie Point, Death Valley National Park, California

Night photography like the one that you see above is possible and can be hauntingly beautiful. But these landscape photos were created using two different techniques. The image from Glacier National Park is a composite image where the moon and the foreground were photography using two separate exposure and lenses. The second image from Death Valley National Park was captured using a single camera exposure using a telephoto lens. Lets take a close look at both of these techniques.

#1: Composite Night Photography Technique

I took the shot below at The Devil’s Golf Course in Death Valley National Park. A brilliant, harvest moon hung over the mountains… but my unedited photograph doesn’t show it. To capture the image I wanted, I used a “double-exposure” or blending technique. With my camera on my tripod, I took one exposure for the foreground, mountains, and sky. The scene was evenly exposed, except for the moon – so with the help of my tripod for a 30-second exposure, it was an easy shot. I used a 24mm focal length to capture the scene in the image below.

Night photo exposed for foreground captured with Wide angle lens by Varina Patel

Exposed for Foreground with a Wide Angle Lens – The Devil’s Golf Course, Death Valley National Park

When I had the landscape shot I wanted, I prepared my setup to capture a photo of the moon. I changed lenses – choosing a 300mm focal length so I could zoom in and capture the details in the moon. In the shot below, you can see that the moon is properly exposed – but the sky is completely black, rather than the deep blue it was in reality.

Night Photography with moon captured with a telephoto lens by Varina Patel

Photographing Moon with Telephoto Lens

In Photoshop, I combined the two images for a finished “composite” shot. Of course, the blended image isn’t entirely true to the reality of the scene – but neither was the original, unedited image. My finished composite captures the feeling of that huge, golden moon over the bizarre desert landscape.

Composite night photography with moon & foreground created in Photoshop by Varina Patel

Composite night photography with moon & foreground – The Devil’s Golf Course, Death Valley National Park – California

#2: Single Camera Exposure Technique

If composite imagery isn’t your thing – I have good news for you. It is possible to capture both the moon and foreground in a single camera exposure. The trick is to photography the moon at twilight. When the light is low, you can capture the moon and the foreground with a single exposure – without blowing out the moon or leaving the landscape pitch dark.

I took this shot at Sandy Beach on Oahu just after the sun had set, but while there was still some beautiful residual light on the scene.

Moon Photography at Sandy Beach, Oahu, Hawaii captured with a single camera exposure by Varina Patel

Moon Photography at Sandy Beach, Oahu, Hawaii captured with a single camera exposure.

Here are a few useful tips that I used to photography the moon in the above photo.

  1. I used a tripod to hold my camera steady. A 1/5 sec shutter speed let me blur my moving subjects in the foreground for a bit of motion without blurring the moon.
  2. I took a couple of test shots to make sure I had the focus I wanted both in the foreground and in the sky. I zoomed in to check the photo on the back of my camera to be sure the details in the moon were sharp.
  3. I stood well back from my foreground and used a long lens – 70-200mm with a 1.4x extender let me choose a 300mm focal length – which allowed me to zoom in to show the large size of the moon as it rose. A wide angle lens will leave you with a tiny, little moon that gets lost in the frame.
  4. Pay attention to the phases of the moon when you are planning your trips. We often plan our travels around the full moon, so we can capture it in all it’s glory if the weather cooperates.
Photographing moon with single camera exposure at Sandy Beach, Oahu, Hawai'i by Varina Patel

Photographing Moon with single camera exposure at Sandy Beach, Oahu, Hawai’i

Whether you choose to create a composite shot or a single exposure image like the one from Sand Beach in Hawaii, the moon is a beautiful subject.

Do have any more tips for shooting the moon? Please share them in the comments so that others can learn! And then, get out there and shoot the moon, everyone!

About Author Varina Patel

There is nothing more remarkable to me than the power of nature. It is both cataclysmic and subtle. Slow and continuous erosion by water and wind can create landscapes every bit as astonishing as those shaped by catastrophic events – and minuscule details can be as breathtaking as grand vistas that stretch from one horizon to the other. Nature is incredibly diverse. Burning desert sands and mossy riverbanks… Brilliant sunbeams and fading alpenglow… Silent snowfall and raging summer storms… Each offers a unique opportunity. I am irresistibly drawn to the challenge of finding my next photograph, and mastering the skills required to capture it effectively.

Let's block ads! (Why?)


Visual Wilderness http://bit.ly/2JO3EfV

Sourced by Time Trap Photography sharing the best photography tips, news and tricks throughout the industry. Time Trap Photography is dedicated to freezing those special moments in life that can be revisited and admired for generations to come. - Shannon Bourque
Please visit our main site for booking availability and rates.


"Time


Receive valuable industry knowledge delivered free to your email each day.


"Time

Thursday, May 30, 2019

#instakwer #59

10:01:00 PM

Für das heutige #instakwer wurde ich stark inspiriert vom obigen Bild von @annasterling.art. Es symbolisiert für mich die Jugend, die in den letzten Monaten immer lauter für die Rettung der Erde kämpft. Ob bei Demonstrationen wie Fridays for Future, bei konkreten Aufräum-Aktionen oder auch durch das eindeutige Wahlergebnis für die Grünen bei Menschen unter 30.

Ausgehend von Annas Foto habe ich in Euren Einreichungen nach weiteren Bildern gesucht, die den Klimawandel, Plastikverschmutzung und Umweltprobleme thematisieren bzw. thematisieren könnten. Ich musste zugegebenermaßen sehr lange suchen, denn auf Instagram gibt es doch vorrangig Bilder der heilen Erde oder hübsche Portraits. Entstanden ist dennoch eine sehr spannende Bildstrecke, wie ich finde. Aber entscheidet selbst.

Regenbogen auf Beton

© @wnotf

Ihr möchtet selbst ein Bild einreichen? Dann nutzt auf Instagram den Hashtag #instakwer und vielleicht seid Ihr schon beim nächsten Mal mit dabei.


kwerfeldein – Magazin für Fotografie http://bit.ly/2HLu4fP

Sourced by Time Trap Photography sharing the best photography tips, news and tricks throughout the industry. Time Trap Photography is dedicated to freezing those special moments in life that can be revisited and admired for generations to come. - Shannon Bourque
Please visit our main site for booking availability and rates.


"Time


Receive valuable industry knowledge delivered free to your email each day.


"Time

Full Frame Camera Options For Photographers On A Budget

8:03:00 AM

It wasn’t so long ago that full frame cameras were generally considered out of reach for budget-conscious photographers. But with a number of earlier generation full frame bodies still around and changes in the market due to the rise of mirrorless technology, a full frame camera is now well within reach for photographers with limited financial resources.

If you’re in the market for a budget full-frame DSLR/mirrorless camera, you will be delighted to know there are some great options available. Here are five of them.

  • Claim Your Free Camera Craft Cheat Sheet

Print it out and keep it for when you really need it - when you're out shooting!

Top Picks

Sony a7II

Sony’s a7II features a 24-megapixel sensor with a native ISO range of 100-25600, 117 phase detection focus points (25 contrast detection points) and it was the first full frame body to feature 5-axis in-body image stabilization (IBIS).

As with many mirrorless cameras of its generation, battery life isn’t excellent.

Introduced in 2014 at a cost of $1700, the Sony a7II can now easily be found for about $900.

Alternative: Sony a7. Slightly slower autofocus and startup times compared to the a7II, and no IBIS. But a $700 price tag might make those points irrelevant.

Nikon D610

When it first hit the market in 2013, the Nikon D610 body would have set you back $2000. Now, you can find it for half that. So what do you get for $1000?

A DSLR with a 24-megapixel sensor, dual SD card slots, weather sealing and, of course, access to Nikon’s vaunted lens lineup.

Alternative: Nikon D750. Interestingly, the cost of a new D750 is only about $100 more than a new D610, and used prices are similarly competitive. A Nikon D750 will get you a 51-point autofocus system, a tilting rear LCD (a first for full frame DSLRs) and built-in WiFi.

Canon 6D

Compared to the previous entries in this roundup, the Canon 6D is a pretty basic camera. That’s not necessarily a bad thing, though.

The 6D, introduced in 2013 at a retail price of just over $2000, is a 20-megapixel DSLR with a native ISO range of 100-25600, 11 focus points (one cross type), built-in WiFi and weather sealing. It’s an EF mount camera, so you’ll have a deep pool of high-quality lenses to choose from.

You shouldn’t have much trouble finding a used 6D for $600-$800.

Alternative: Canon 6D Mark II. The second generation of this camera features a 26-megapixel sensor, native ISO 100-40000, digital image stabilization and a fully articulating rear LCD. The 6D Mark II was released in 2017, so the discounts aren’t as substantial yet, but at around $1100 it’s still an option worth considering.

Dinosaur Adoption

Canon 5D

Yes. The original Canon 5D. The 5D Classic, as it is often lovingly referred to. This 12-megapixel dinosaur hit the DSLR market in 2005 with a price tag of $3500. Today you can easily find one for about $300.

The 5D changed the game in terms of affordability and size, as other full frame cameras of the time were comparatively huge and expensive (the Canon 1Ds Mark II, for example, was $8000).

The 5D is a no-frills camera. There is nothing to get in your way or distract you. And its sensor produces images that exhibit an almost film-like quality. Portrait photographers particularly love it for the way it renders skin tones.

Nikon

Rebased in 2008, Nikon’s second full-frame DSLR is, like the Canon 5D, something of a cult icon. The D700 is another 12-megapixel dinosaur that has all the features you need and none you don’t. It is a photo making tool.

The D700 entered the market at $3000 and can now be had for less than $500, making it an old but viable option for full frame seekers.

Final Thoughts

A full frame camera isn’t the final word in photography; it’s not going to magically turn you into an awesome photographer. And not having a full frame camera isn’t going to stop you from being an awesome photographer.

But larger sensors do represent a few advantages — technical and aesthetic — that some photographers might want to exploit. So if you are, indeed, on the hunt for a full frame camera, all the above selections (including the dinosaurs) are worth your consideration.

Have we missed your favorite? Make sure you tell us your budget full-frame camera options in the comments below

Further Reading

Let's block ads! (Why?)


Light Stalking http://bit.ly/2EKeQ9f

Sourced by Time Trap Photography sharing the best photography tips, news and tricks throughout the industry. Time Trap Photography is dedicated to freezing those special moments in life that can be revisited and admired for generations to come. - Shannon Bourque
Please visit our main site for booking availability and rates.


"Time


Receive valuable industry knowledge delivered free to your email each day.


"Time

25 Stunning Photographs Of Glamourous Hairstyles

5:03:00 AM

Photographers and hairstylists need to work closely together in order to produce truly amazing images of various hairstyles, both traditional and unconventional ones.

Proper camera settings and lighting matter a lot when it comes to makeup and hairstyle photography – it can be a demanding genre for novice photographers!

  • Claim Your Free Camera Craft Cheat Sheet

Print it out and keep it for when you really need it - when you're out shooting!

If you are looking to learn more about portrait photography then take a look at our Light Stalking Portrait Photography page. This page brings together every portrait photography tutorial and tip on the site (and several other sites) that we think will round out your skills as a portrait photographer.

The following 25 images are great examples of creative hairstyle photography – we hope they will inspire you to shoot something equally stylish on your own.

Let's face it, photographing amazing images of our furry family members isn't that much different to capturing a great portrait. If you are interested in taking your portrait photography to the next level then please take a look at The Art Of Portrait Photography. This beautiful guide is the guaranteed fastest way to start producing your own inspiring, memorable portraits that convey real meaning and emotion.

In this guide you'll learn:

  • Where to find the best natural light
  • How to get great shots with minimal equipment
  • How to make your own lighting gear from stuff that’s lying around your house
  • How to bend, squeeze, and alter light for dramatic effects
  • How to pose a single subject and groups of subjects
  • What are the best lenses to use
  • How good of a camera do you need
  • What steps to take for razor-sharp photos
  • What f/stop should you use
  • And much more…

Check Out The Art Of Portrait Photography Here

If you want to learn more about fashion and glamour photography, feel free to check out the following links!

Further Resources:

  1. How To Plan A Fashion Photography Shoot
  2. Got Your First Fashion Show Coming Up?
  3. Essential Tips For Photographers Considering An Outdoor Fashion Shoot
  4. The Beginner’s Guide To Makeup Photography
  5. Hairstyles Photography Ideas
  6. How To Photograph Hair Models

Further Reading:

Take a look at our fantastic Portrait Photography page where we've brought together every portrait photography tutorial and tip on the site (and several other sites) that we think will round out your skills as a portrait photographer.

Just a friendly reminder that this page is also a living document for portrait photographers who want a single online reference for the craft. It will change and be updated often, so bookmark it and come back as you need to.

Further Learning:

The Art Of Portrait Photography is your chance to truly master portrait photography, and produce your own inspiring, memorable images that convey real meaning and emotion. In The Art Of Portrait Photography, you will discover the insider secrets used by professionals to take your portrait photography to the next level.

Grab Your Copy Now

Let's block ads! (Why?)


Light Stalking http://bit.ly/2YSBtj6

Sourced by Time Trap Photography sharing the best photography tips, news and tricks throughout the industry. Time Trap Photography is dedicated to freezing those special moments in life that can be revisited and admired for generations to come. - Shannon Bourque
Please visit our main site for booking availability and rates.


"Time


Receive valuable industry knowledge delivered free to your email each day.


"Time

30. Mai 2019

4:03:00 AM

Das Bild des Tages von: Wandering Heart


kwerfeldein – Magazin für Fotografie http://bit.ly/2Id1vH5

Sourced by Time Trap Photography sharing the best photography tips, news and tricks throughout the industry. Time Trap Photography is dedicated to freezing those special moments in life that can be revisited and admired for generations to come. - Shannon Bourque
Please visit our main site for booking availability and rates.


"Time


Receive valuable industry knowledge delivered free to your email each day.


"Time

Wednesday, May 29, 2019

Time Trap Portrait Instagram Photo - May 29, 2019 at 10:11PM

10:24:00 PM


Shared by Time Trap Photography Instagram page. I'm dedicated to freezing those special moments in life that can be revisited and admired for generations to come. - Shannon Bourque
Please visit our main site by clicking on the logo below for booking, availability, and rates.  


"Time


Receive valuable industry knowledge delivered free to your email each day.
"Time

Silence is the source of great strength. _ Featuring: @ingieiam 💫 _ Designer: @fantasycreationsbynicole Make-up: @savbryce 💄 Hair: @pbandjammyyy . . . . . #conceptualshoot #sacramentofashion #pictonmagazine #dopeports #moodyports #portraitheart #portraitvision #timetrap_portraits #supermodel #modelphotography #fashionmodel #nature_perfection #folkcreative #VisualsOfLife #MoodyGrams #visualambassadors #exklusive_shot #thecreative #peoplescreatives #sombresociety

10:13:00 PM

via Time Trap Photography http://bit.ly/2YUcbkL

Image by Time Trap Photography sharing the best photography tips, news and tricks throughout the industry. Time Trap Photography is dedicated to freezing those special moments in life that can be revisited and admired for generations to come. - Shannon Bourque
Please visit our main site for booking availability and rates.


"Time


Receive valuable industry knowledge delivered free to your email each day.


"Time

About Us

Time Trap Photography is dedicated to freezing those special moments in life that can be revisited and admired for generations to come. - Shannon Bourque

The lens in focus

“Life is like a camera. Just focus on what’s important and capture the good times, develop from the negatives and if things don’t work out, just take another shot.” — Unknown

TIME TRAP PHOTOGRAPHY COPYRIGHT 2016