Sunday, March 31, 2019

Ghosts along the dead track

10:05:00 PM

Karte einer Eisenbahnstrecke

Ein Beitrag von: Zorana Musikic

In Ghosts along the dead track mache ich mich auf die Suche nach den Geistern der Geschichte, entlang der Schienen der Polarkreiseisenbahn, einem der größenwahnsinnigsten Bauprojekte Stalins, als strategische Bahn geplant, die zu einem geplanten sowjetischen Kriegsmarine-Stützpunkt führen sollte – für den Fall eines Angriffs der USA über die Beringstraße.

1459 km lang sollte die Strecke Tschum–Igarka werden und vom Ob bis zum Jenissei über den Permafrostboden führen. Von 1947 bis 1953 arbeiteten geschätzt 300.000 Gulag-Gefangene am Bau der Bahn, die einem Drittel dieser Menschen ihr Leben gekostet haben soll – bei neun Monaten Schnee im Jahr und Temperaturen bis -50 °C. Das Gulag-Projekt trug die Bezeichnungen Nummer 501 und Nummer 503.

Landschaft

Bis zu Stalins Tod im Sommer 1953 wurden knapp 600 km der Trasse fertiggestellt. Der Weiterbau wurde vom Kreml umgehend gestoppt und nur das knapp 200 km lange Teilstück Tschum–Labytnangi in Betrieb genommen. In den sechziger Jahren erhielt die Teilstrecke Nadym–Urengoi große Bedeutung, als bei Urengoi das zweitgrößte Erdgasvorkommen der Welt entdeckt wurde. Die verlassene Strecke wurde reaktiviert und bis zum Hafen von Jamburg am Ob-Busen verlängert. Alle anderen Teilabschnitte fielen in einen eisigen Dornröschenschlaf.

Hier bin ich letzten September gestartet, südlich der Stadt Nadym, wo der gleichnamige Fluss von einer Reihe von Pipelines gekreuzt wird, die von den nordwestsibirischen Erdgas- und Erdölfeldern in den europäischen Teil Russlands bzw. weiter nach Westeuropa führen und bin entlang der Bahntrasse bis zum ehemaligen Bahnhof und Lager Jarudei gelangt.

Bahnstrecke über einem See

Begleitet hat mich Vadim Gritsenko, Historiker aus Nadym und ein sibirischer Don Qixote der Polarkreisbahn. Seit Jahrzehnten arbeitet er daran, ein Museum, eine Gedenkstätte aufzubauen, sammelt Artefakte, dokumentiert, schreibt Bücher, versucht die Behörden von der historischen Relevanz zu überzeugen – erfolglos.

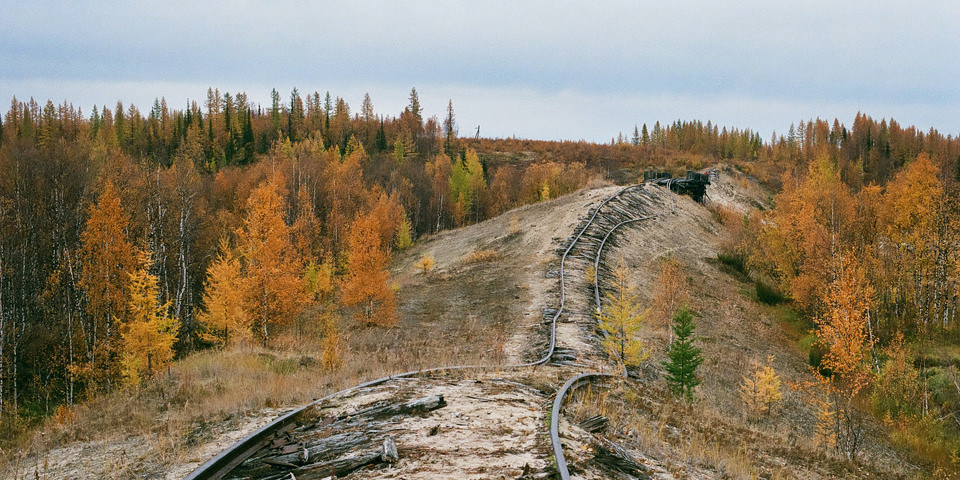
Immer noch liegt der größte Teil der Polarkreiseisenbahn nie genutzt, verfallen und von der Vegetation überwuchert in der sibirischen Tundra – die meiste Zeit des Jahres verborgen unter einer Schneedecke. Noch zeugen entlang der Trasse Wachtürme, Lager und Gräber von der Geschichte des Baus. Jahrzehntelang hat sich außer ein paar Abenteurer*innen – und Vadim – niemand für die Strecke interessiert.

Birken im HerbstKaputte Eisenbahngleise

Doch 2011 bekam ein spanisches Unternehmen den Auftrag für den Bau des 390 km langen Abschnitts Labytnangi–Nadym. Damit soll, fast 70 Jahre später, der mittlere Teil des sogenannten Abschnitt „501“ von Stalins „Toter Trasse“ in Betrieb genommen werden. Der Wiederaufbau umfasst auch den Bau einer 2,5 km langen Ob-Brücke und der 1,3 km langen Brücke für Auto- und Schienenverkehr über den Nadym. Im September 2015 wurde die Autobrücke eröffnet.

Auch die Deutsche Bahn steht derzeit in Verhandlungen, an dem 4 Milliarden Euro schweren Großbauprojekt teilzunehmen. Die Bahnlinie wird dem Abtransport von Erzen, Öl und Gas dienen, 24 Millionen Tonnen Rohstoffe sollen hier jährlich über die Gleise rollen. Eine Fertigstellung der gesamten Bahnstrecke Salechard–Igarka ist ebenfalls für die nahe Zukunft geplant, um die großen Bodenschätze der arktischen Gebiete besser erschließen zu können.

MännerportraitFrauenportrait

Mit den neuen Bauvorhaben und dem Sterben der letzten Zeitzeug*innen beginnen nun auch die letzten topografisch verortbaren Zeugnisse zu weichen – und werden innerhalb weniger Jahre vom neuen Bahnprojekt überschrieben sein.

„Ghosts along the dead track“ ist daher eigentlich ein antizyklischer Lauf aus der Gegenwart in die Vergangenheit gegen die Zeit – ein Versuch, die jahrzehntelang im Eis der sibirischen Tundra konservierten Überreste von Stalins „großartigem Plan zur Transformation der Natur“ zu dokumentieren, während das neue multinationale Bahngroßprojekt schon begonnen hat, sich seinen Weg über den Permafrostboden zu bahnen.

Holzkreuze auf dem Boden

Die Arbeit reflektiert mit künstlerischen Mitteln die fortlaufende Geschichte menschlicher Hybris und ihrer Opfer – entlang der Strecke einer Eisenbahn: von Stalin über Putin zu Gazprom, von der Sowjetunion bis zu unserer heutigen globalisierten Welt, vom Kalter Krieg bis zur Klimaerwärmung. Es wird eine Arbeit über Mensch und Natur, über Zivilisation und Fortschritt, über Industrie und Kapitalismus sein; eine Reise durch die menschenleere Tundra, der Heimat nomadisch lebender Menschen bis hin zu den Industriestädten und Gasfeldern der größten Erdgasvorkommnissen der Erde.

In einem Arrangement aus Inszenierungen, Portraits und dokumentarischen Aufnahmen, aber auch gesammelten Texten, Archivfotografien und -dokumenten möchte ich nicht nur die Geschichte der Stalinbahn erzählen, bevor sie vom nächsten Kapitel der Geschichte für immer überschrieben wird, sondern auch die unserer globalisierten Gegenwart.

Holzhäuser im Wald

Nun steht meine zweite Reise bevor – entlang der westlichen Hälfte der Linie 501, beginnend bei Salechard durch den sibirischen Winter. Die Eisenbahnstrecke soll dabei wieder die räumliche Achse meiner Reise vorgeben – ein kleines Teilstück ist mit dem Zug befahrbar, die restliche Strecke ist nur per Trekol, einer Art Monster-Jeep, zurücklegbar.

Dieses Mal habe ich die Chance, mich im April für eine Woche nomadisch lebender Menschen anzuschließen, mit ihnen und ihrer Rentierherde von über 10.000 Tieren zwischen Salechard und Nadym sowie auf der Jamal-Halbinsel unterwegs zu sein und ihren Alltag zu dokumentieren. Danach wird mich die Reise entlang der Bahn nach Nowy Urengoi führen, einem der wichtigsten Standorte von Gazprom. Und schließlich möchte ich versuchen, das alte Lokomotivdepot in Jermakowo zu erreichen.

Ermöglicht werden mir die beiden Reise durch das Grenzgänger-Stipendium der Robert-Bosch-Stiftung. Für die zweite Reise habe ich eine Co-Finanzierung durch Crowdfunding gestartet, da das Stipendium zwar die „normalen“ Reisekosten sowie Unterkunft und Verpflegung abdeckt, aber nicht die Ausgaben, die nötig sind, um überall dorthin zu kommen, wo man mit regulären Verkehrsmitteln unterwegs im arktischen Eis nicht hinkommt.


kwerfeldein – Magazin für Fotografie https://ift.tt/2V7zXs8

Sourced by Time Trap Photography sharing the best photography tips, news and tricks throughout the industry. Time Trap Photography is dedicated to freezing those special moments in life that can be revisited and admired for generations to come. - Shannon Bourque
Please visit our main site for booking availability and rates.


"Time


Receive valuable industry knowledge delivered free to your email each day.


"Time

Do as I Say, Not as I Do

8:13:00 PM

Do as I Say, Not as I Do

There are countless mistakes to be made and lessons to be learned as an outdoor photographer. Not everyone should need to make all those mistakes firsthand. There's plenty to go around.

Let me stipulate at the outset that I've made my fair share of mistakes over the years. Sometimes, everything seems to work out perfectly. Other times, not so much. And while I haven't made every possible mistake over the years, there have been times when it seemed as if I must be trying to. There had to have been some explanation.

Regular readers here may already be familiar with at least some of my goofs as I've written about them before. Suffice it to say, I've done things I wish I hadn't. The details are available for the interested, whether motivated out of sympathy or to have a chuckle at my misfortune. Or perhaps so you don't make the same mistakes I have.

Don't sit so close to the edge of a precipitous cliff that you aren't prepared to risk falling off. No, I never have fallen off, but I did come a bit too close for comfort many years ago when trying to finesse my tripod just a bit nearer. That was all it took to learn that lesson. Some shots are just not worth it. Falling a few hundred feet to a rocky shore below would more than just hurt. Definitely something I personally prefer to avoid, if you know what I mean.

On the other hand, if you find that you blew out the highlights in a shot, you hopefully will have time to notice the problem, make the necessary adjustments and reshoot. Cool. I mean, I don't want to give the impression that all mistakes are life threatening. Some may be embarrassing perhaps, or at least frustrating, but you can still be better off learning to avoid them.

Don't forget your tripod on the kitchen counter when leaving home for a weekend photo outing. Tripods are essential things for shooting at the edges of light when the landscape is bathed in the colors of sunset and twilight. Or when the stars come out. That sure did mess up my plans, I can tell you.

And don't let go of your tripod when shooting from a bridge over a deep gorge if there's any chance of sudden wind gusts. Chances can become realities, and cameras don't like doing a faceplant in the middle of a concrete roadway. Murphy's law doesn't play favorites, even for photographers working to get an amazing shot. Oh, and camera repairs can be expensive. There's another lesson learned. Tripods are cheaper to repair, but I'm better all of us can find things they'd rather spend money on.

No need to move on to my litany of non-tripod related mistakes. You probably get my general idea.

Now, you might think knowing these sorts of lessons should be common sense. Yes and no. Indeed, I already knew pretty well not to do all of these dumb things, and yet at some point over my involvement in photography, I've done them anyway. I had other things on my mind, it would seem. Lesson learned. Hopefully, I won't do the same thing again, or at least not again too soon.

You see, it's not possible to avoid all mistakes. And it's not even that we clearly aren't perfect. Mistakes happen. Score another one for Murphy's Law and all that. Seems to me all the more reason to pay attention and try to use your best judgement.

Most outdoor organizations stress remembering the "ten essentials" including first aid supplies, flashlight, adequate food and water, and so on. The exact list varies, and some have thirteen or other item counts. If you are shooting outdoors, consider yourself part of the target audience. Don't go out with your camera if you're not properly prepared to go out at all. There are some lessons you are better off not learning first hand.

But here's the thing. If mistakes never do happen to you, you're doing something wrong, or at least not making the most of your opportunities. As the old saying goes, if you're not making some mistakes, it probably means you're not trying hard enough. If you keep pushing yourself to do better, you are bound to make mistakes. When trying something new, it's important to understand that mistakes sometimes come with the territory. Once you've mastered that new skill, it is hoped that the chances of a mistake should naturally decrease. And you can move on to different mistakes.

But that's not a license to throw caution to the wind. If you find yourself unsure of how best to proceed, try this simple test: can some given choice be undone, and if so, at what cost? If you fall off a cliff, it probably can't be undone unless you expect to grow wings on the way down. If your camera falls on the ground, it can be repaired, but it's gonna cost you. If you leave your tripod behind, it depends on how far you have to go to retrieve it. Either that, or it will put a major crimp in what subjects you can shoot without it.

When you know you have a choice to make, this can give you a yardstick to judge alternatives and avoid ones that seem too dangerous or iffy. Put in another way I suppose; don't do something you might regret. This might not save you from absentmindedly leaving your tripod behind someday but could save you or your gear from a nasty fall if you keep it in mind.

So, don't do as I do (or at least did). Do as I say. You'll no doubt still make your own mistakes anyway of course. There's probably nothing I can do to stop you.

But do be careful out there.

Let's block ads! (Why?)


Earthbound Light Photography Tips https://ift.tt/2TM7GWk

Sourced by Time Trap Photography sharing the best photography tips, news and tricks throughout the industry. Time Trap Photography is dedicated to freezing those special moments in life that can be revisited and admired for generations to come. - Shannon Bourque
Please visit our main site for booking availability and rates.


"Time


Receive valuable industry knowledge delivered free to your email each day.


"Time

31. März 2019

4:03:00 AM

Das Bild des Tages von: Klaus


kwerfeldein – Magazin für Fotografie https://ift.tt/2YCkZMW

Sourced by Time Trap Photography sharing the best photography tips, news and tricks throughout the industry. Time Trap Photography is dedicated to freezing those special moments in life that can be revisited and admired for generations to come. - Shannon Bourque
Please visit our main site for booking availability and rates.


"Time


Receive valuable industry knowledge delivered free to your email each day.


"Time

Saturday, March 30, 2019

browserfruits 13.2019

10:05:00 PM

Bevor Ihr gleich die frischen Links durchstöbert, überlegt doch einmal, ob Ihr nicht auch einen Artikel bei kwerfeldein veröffentlichen möchtet. Wir bekommen zwar bereits täglich Gastartikelanfragen, wissen aber auch, dass sich viele völlig unbegründet gar nicht trauen, ihre Arbeiten einzureichen. Dabei freuen wir uns sehr, Neues zu entdecken. Wie ein Gastartikel funktioniert, erfahrt Ihr hier.


Linktipps

• Wie ist es, ein Kind mit Trisomie 21 zu haben? Snezhana von Büdingen hat Mütter mit ihren Kindern portraitiert, die von den Herausforderungen des Alltags berichten. Und den Glücksmomenten. → ansehen

• Großartige Luftaufnahmen: Die prämierten Fotos des Drone Photo Contest werden auf Bored Panda gezeigt. → ansehen

• Diese Seite hat historische Aufnahmen von gleichgeschlechtlichen Paaren gesammelt, um die Liebe zu feiern und zu zeigen, dass es Homosexualität schon immer gab. → ansehen

• Bei der Gender Spectrum Collection handelt es sich um eine Stockbibliothek mit trans- und nichtbinären Modellen, die den Medien dabei helfen soll, Mitglieder dieser Gemeinschaften besser zu vertreten. → ansehen

• Vogue berichtet über David Bailey und seine limitierte Retrospektive, die beim Verlag Taschen erscheint. → ansehen

• Vice hat ein Interview mit dem Magnumfotografen Alec Soth, der sich in seiner Fotografie gerade umorientiert und weg von kommerziellen Fotos möchte. → ansehen

• In Paris wurden in dieser Woche das neue Huawei P30 und P30 Pro vorgestellt. Auf t3n gibt es einen sehr technischen Artikel, der sich vorrangig mit den Kameras und der neuen Technik dahinter befasst. → ansehen

• Markus Hofstaetter bietet Passfotos auf Kollodium-Nassplatte an. Wie er das macht, erklärt er in seinem Blogbeitrag. → ansehen

• Der weißen Minderheit gehört das mit Abstand meiste Farmland in Südafrika. Ist das gerecht nach den Jahren des rassistischen Apartheid-Regimes? Diese Frage hat das Land tief gespalten. Emerge zeigt eine Fotoreportage von Lando Hass und Lucas Bäuml. → ansehen

• Anton Gorlin gibt auf My Modern Met Tipps für Wüstenfotografie. → ansehen


Buchempfehlungen

„Auschwitz. Fall of the Modern Age“ : Das Projekt „Auschwitz – Ultima Ratio of the Modern Age“ ist eine fotografische Untersuchung der Zusammenhänge zwischen der Moderne und dem Holocaust. Die visuelle Analyse erfolgt dabei anhand der Architektur und Infrastruktur des größten Vernichtungslagers im Dritten Reich: Auschwitz-Birkenau. Das Buch ist im Mitteldeutschen Verlag erschienen und kostet 30 €.

„Extreme Wildlife Makrofotografie“ : Insekten und Spinnen gekonnt in Szene zu setzen, ist einer der anspruchsvollsten Bereiche der Makrofotografie. In diesem Buch lernt Ihr, wie Ihr mit enormen Vergrößerungen genauso atemberaubende Bilder festhalten könnt wie der Autor Alexander Mett. Viele praktische Tipps zur optimalen Ausrüstung, zu Kameraeinstellungen, Top-Locations in Deutschland und wie Ihr ein Focus Stacking macht, runden das Buch ab. Es ist im Verlag Bildner erschienen und kostet 39,90 €.


Ausstellungen

Tish Murtha: England ’78–’81
Zeit: 30. März – 12. Mai 2019
Ort: Freundeskreis Willy-Brandt-Haus, Stresemannstr. 28, 10963 Berlin

Distant Islands: Fotografien zum Brexit
Zeit: 30. März – 12. Mai 2019
Ort: Freundeskreis Willy-Brandt-Haus, Stresemannstr. 28, 10963 Berlin

Joachim Brohm / Alec Soth: Two Rivers
Zeit: 29. März – 7. Juli 2019
Ort: NRW-Forum Düsseldorf, Ehrenhof 2, 40479 Düsseldorf

Lauren Greenfield: Generation Wealth
Zeit: 30. März – 23. Juni 2019
Ort: Haus der Photographie / Deichtorhallen, Deichtorstr. 1–2, 20095 Hamburg

Anja Niedringhaus – Bilderkriegerin
Zeit: 29. März – 30. Juni 2019
Ort: Käthe Kollwitz Museum Köln, ⁢Neumarkt 18–24, ⁢50667 Köln


Drüben auf Instagram

screenshot

@gamergram.gg – Ohne Kamera fotografieren? In vielen Computerspielen ist dies möglich. Diese Instagramseite sammelt die besten virtuellen Aufnahmen aus verschiedensten Spielen.


Videos

Ihr habt noch eine Gameboy-Kamera? Dann kombiniert sie doch mal mit den Instax-Sofortbildern. Wie? Lomtro erklärt es.


Ein Videoportrait über Fred Baldwin und Wendy Watriss, die sie sich Ende der 1960er trafen und als Paar beschlossen, sich beruflich auf die USA und speziell auf den ländlichen Süden zu konzentrieren.


Das Titelbild stammt von Julius Drost. Vielen Dank!


kwerfeldein – Magazin für Fotografie https://ift.tt/2YCvj7K

Sourced by Time Trap Photography sharing the best photography tips, news and tricks throughout the industry. Time Trap Photography is dedicated to freezing those special moments in life that can be revisited and admired for generations to come. - Shannon Bourque
Please visit our main site for booking availability and rates.


"Time


Receive valuable industry knowledge delivered free to your email each day.


"Time

How Learning To Grade Footage Can Help You Colour Correct Images

8:03:00 AM

Once you have weaned yourself off Jpegs and in-camera colour profiles, you may find that the colours in your images are not quite what you expected or wanted. If you are shooting RAW, there is no colour correction or white balance applied. You need to do that in post-production.

To newcomers and even experienced photographers correcting colour in images can be challenging. You correct a colour issue in highlights and the shadows swing the wrong way. You get the sky looking great but that sand beach now looks bluish. It's all a very fine balancing act.

Many of us now also shoot high definition or even 4K video. Although this often has a mild colour correction applied in camera, we still need to correct further in post-production. 

Editors call this process colour grading and as photographers, it can be a useful skill to learn. Here’s why.

What Is Colour Grading?

Colour grading and colour correction are terms that are relatively interchangeable in video editing. In general, however, colour correcting does just that, corrects colour shifts in various tonal ranges of the footage. Colour grading then applies a colour style to that footage. 

Look carefully at virtually any well-made film or video these days and you will see it will have been colour graded. It may have been given a warm yellow feel to denote hazy days of summer, maybe a neon green cast as in the Matrix to denote when the film is inside the Matrix itself.

Colour grading gives mood to a film and can do the same for a photograph.

You Need A Calibrated Monitor

If you are going to be serious about any type of colour correction either in stills or in video then you are going to need to calibrate your monitor. Proper monitor calibration will require a specialist tool. These can be had for as little as a $100 or up to the 1000’s. You don’t need the most expensive model, a basic model will do for most work.

Monitor calibrators are pretty much automated. You hang them from the top of your monitor, overlaying a coloured box. The software then changes the colour of the box and the calibrator reads and analyses it. 

The whole process takes around 5-minutes and should be done once every couple of weeks. You should also calibrate the monitor in the environment that you work in. If you work with fluorescent lights on, then calibrate with them on. If possible, work with your monitors facing away from natural daylight. As this can change through the day, it can change your colour perception. 

video, editing, grading, color, correction.

A calibrated monitor is vital. Photo by Nate Grant 

Video Color Correcting Tools

One of the reasons we can learn so much from grading footage is that video editing suites generally have more options and tools. In image correction, we tend to only have the histogram and the clipping indicators with which to work. To correct colour we can use the RGB channels on the histogram but that’s about the limit of the visual aids we have.

In video grading, we have more visual tools to help us correct our footage. By watching how these tools react to our corrections we can learn so much about correcting still images. These are the primary visual aids most video editing suites have.

  • Histogram. The tool we are all familiar with but in most editing suites you can choose to show just the luma, individual RGB channel, RGB channels overlaid plus more.
  • Vectorscope. This is a very useful tool that shows the distribution of colour through an image. In particular, it shows the saturation of colours. It is a circular scope with the colours around the outside.
  • Waveform. In video editing, this is used more than the histogram. It works in a similar way but presents much more detail. It runs on a scale from -20 to 120. Zero on the scale is absolute black and 100 is pure white.
  • Colour Wheels. There is usually a wheel to cover the overall image, plus ones for shadows, midtones, and highlights and are used to correct the colour in each of those tonal ranges.
video, editing, grading, color, correction.

The histogram is a tool most of us are familiar with

Colour Correcting Footage: The Waveform Scope

When we correct footage, like with images, we start with the exposure. Editors generally use the Waveform for this. They tend to start by getting the overall exposure correct, then bring the blacks down to 0, the whites to the 100 mark. Then if needed they lower or raise the midtones.

This is not dissimilar to exposure correction in images except the waveform gives us a much better visual representation of the correction and the way the tones are spread throughout the footage.

It gets more interesting when we come to correcting colour. To start a colour correction, we can use the RGB parade in the waveform scope. This shows us the three primary colour channels. The left of each channel is the highlights and the right, the shadows.

The beauty of the waveform scope is that when, for example, we drag the highlights colour wheel towards the red, not only do we see the red parade increase, but also the green and blue channels decrease.

More often than not, that decrease is in the midtone and shadow areas, in other words, you are by adding red to the highlights you are removing green and blue from mid and dark tones. This could lead to a cast in the shadows.

This is a very important consideration when colour correcting images in, for example, Lightroom. The visuals tools we have do not give us such an obvious representation of how moving one colour in one tonal range can affect other colours in other tonal ranges. The waveform scope demonstrates much better, the cause and effect of colour correction.

video, editing, grading, color, correction.

The waveform scope would make a great addition to stills software.

Colour Correcting Footage: The Vectorscope

To determine where any colour hue and saturation, we use the vectorscope. This tool is a circle surrounded by a gradient of colours, primaries, and secondaries. In the centre is a white smear, for want of a better word.

If we had a perfectly colour corrected clip of a grey card, that white smear would be perfectly circular. That would represent equal amounts of colour and saturation in each channel.

For a regular video clip, the smear will often be an oblong shape pointing out towards one of the colours at the edges of the circle. 

The further the white smear is towards a colour, the more saturated that colour is. If the overall smear veers away from the centre, towards a particular colour, that may indicate a colour cast or also a clip with a predominance of one colour such as a sunset. 

video, editing, grading, color, correction.

The vectorscope is a very powerful tool for determining saturation in individual colors.

Again we can use the colour wheels in combination with the vectorscope to help set the right level of saturation. Playing around with this visual aid can be a great way to see how changing saturation in one colour can affect others. 

video, editing, grading, color, correction.

Color wheels are a very precise way to modify colour in various tonal ranges.

Although not intended to be a tutorial on colour grading footage, we hope that by understanding and using the tools available to video editors, you may get a better understanding of how colour correction works overall and in particular with stills.

Whilst you may not have the budget to buy a high-level video editing suite, you can get a truly professional suite for free. It’s called DaVinci Resolve and it is used by top end editors on Hollywood movies. The learning curve is steep, but there are plenty of great tutorials on Youtube, in particular for colour correcting. Resolve was originally designed purely as a colour grading tool and so has all and more of the tools we discussed above. It is a great app for getting to grips with and understanding the nuances of colour correction and grading.

Get a good grip of correcting your footage and you will find it opens up all sorts of possibilities with your still images. 

Let's block ads! (Why?)


Light Stalking https://ift.tt/2uymbDb

Sourced by Time Trap Photography sharing the best photography tips, news and tricks throughout the industry. Time Trap Photography is dedicated to freezing those special moments in life that can be revisited and admired for generations to come. - Shannon Bourque
Please visit our main site for booking availability and rates.


"Time


Receive valuable industry knowledge delivered free to your email each day.


"Time

4 Reasons Why You Should Use Props In Portraiture

5:03:00 AM

Props can be an important part of portraiture, product, and even landscape photography if you know how to use them properly. The main function of props is pretty much straightforward – they should improve the composition and add a certain visual interest to the main subject.

Many professional studios have typical props such as stools, pedestals, costume props, potted plants, blankets, hats and so on. However, you should know that almost any object can be a prop – you don’t have to buy specialized props for studio photography. Even everyday objects such as lamps, books, balloons or pillows can make your images more dynamic and contribute to the storytelling potential of your photo shoots.

The following tips will help you understand why it’s useful to include props in your photo shoots!

chair prop

Photo by Randy Fath

1. Props Can Make A Posing Routine Easier

One of the most common issues in portraiture is not being able to make your model look and feel relaxed. Especially if your model gazes straight towards the camera in a formal pose, chances are the photo will look tense and overly posed.

In order to pose your subject in a more natural way, you can use props such as stools, tables, books, or flowers.  These objects can give your models something to focus on, which will make them less fidgety and easier to shoot. Using props is also very helpful when you have shy models – they will be less conscious of the camera if they have something to do (hold a book, sit on a stool and so on).

Of course, don’t include props if they aren’t necessary – certain photographs will definitely look more effective and more powerful without any distractions.

flower prop

Photo by Henri Meilhac

2. Props Can Impact The Overall Mood

Another important thing to remember is that props can affect the overall mood of your images.  The placement, color, and function of props you use can be as powerful as body posture or facial expressions of your model. For instance, a model that is surrounded by bright or colorful flowers can make the viewer feel cheerful and happy, while old furniture and dusty books can enhance a nostalgic atmosphere.

You can also create a quirky and whimsical mood with unusual props, such as large hats or flamboyant glasses. Don’t forget that the props you choose should enhance your model’s look. For instance, if your model has green eyes, a green-colored prop (such as a green chair or a green balloon) can emphasize this feature.

You can also use a light source as a prop by including it in the composition. This can work beautifully especially if you have an artsy looking table lamp.

stool prop

Photo by Matt Collamer

3. Props Can Help You With Storytelling

There are two different approaches when it comes to enhancing storytelling with props. You can use obvious props for costume-themed and holiday-themed photo shoots, such as Santa’s white beard,  witch hat or angel’s wings. These are ideal props for kids – they will love them!

On the other hand, props can also be more subtly used to tell a story of your model’s job, interests and hobbies. In this case, you can include a musical instrument, headphones, ball, empty canvas and so on.

headphones prop

Photo by Bruce Mars

4. Props Can Make Regular Backdrops More Engaging

If you plan to use a backdrop in your photo shoot, it’s a great idea to coordinate your props with your backdrops.  For instance, you can use an assortment of white balloons in front of a white backdrop – this will create an ethereal and soothing atmosphere. On the other hand, for more dramatic effects, you can use blue chairs on a yellow backdrop – this will add a powerful visual weight to your photograph.

Always remember to choose your props wisely – the bigger they are, the more distracting they may become. The same goes for colors. You probably don’t want your props to be more important than the model, so make sure you don't overuse vibrant, highly saturated, colors in your props.

props in portraiture

Photo by Averie Woodard

Since props should be optional fun elements in your photography, feel free to experiment, improvise, and be imaginative with them.  You will learn that there are many ways you can use an ordinary object as an engaging prop for your model.

In case you want to learn more about portraiture, feel free to check out the following links!

Further Resources:

  1. Bite Size Tips – Capturing Classic Portraiture Compositions
  2. Bite Size Tips: 3 Free Ebooks That Will Bring Your Portraiture Up To Scratch
  3. Take These 4 Steps To Successful Available Light Portraiture
  4. How to Boost Your Creativity By Including Props In Your Photography
  5. Top 3 Props Portrait Photographers Should Have
  6. Shooting Portraits With Weird And Wonderful Props

Let's block ads! (Why?)


Light Stalking https://ift.tt/2VacR4g

Sourced by Time Trap Photography sharing the best photography tips, news and tricks throughout the industry. Time Trap Photography is dedicated to freezing those special moments in life that can be revisited and admired for generations to come. - Shannon Bourque
Please visit our main site for booking availability and rates.


"Time


Receive valuable industry knowledge delivered free to your email each day.


"Time

30. März 2019

5:03:00 AM

Das Bild des Tages von: Benjamin Stark


kwerfeldein – Magazin für Fotografie https://ift.tt/2YDtUxt

Sourced by Time Trap Photography sharing the best photography tips, news and tricks throughout the industry. Time Trap Photography is dedicated to freezing those special moments in life that can be revisited and admired for generations to come. - Shannon Bourque
Please visit our main site for booking availability and rates.


"Time


Receive valuable industry knowledge delivered free to your email each day.


"Time

Friday, March 29, 2019

35 Photographs of Light Bulbs That Will Illuminate And Inspire

8:03:00 AM

Light bulbs are perhaps the most basic yet poetic artificial light source in the world. Beyond their importance, they are quite photogenic as simple objects, and today we want to give these little warm fellows a special place in our photography world.

Today we bring you a curated collection of 35 beautiful looking light bulbs that we hope will illuminate and inspire your photography.

Photo by Sean Patrick Murphy

Photo by Riccardo Annandale

Advanced Composition – will ensure you create images that pop. You'll get more out of your photography and start taking images that will truly capture your creative vision. If you’d like to improve your composition skills and learn concepts that go beyond the ‘rule of thirds’, do take a look at Kent DuFault’s guide Advanced Composition

Photo by Eberhard Grossgasteiger

Photo by Thomas Martinsen

We hope that this gallery of light bulbs has inspired you to find beauty in simple things that you may take for granted every day.

If you are looking to improve your photography composition and learn concepts that go beyond the ‘rule of thirds’, do take a look at Kent DuFault’s guide Advanced Composition. With this guide, you will learn all about:

Let's block ads! (Why?)


Light Stalking https://ift.tt/2FHO6pA

Sourced by Time Trap Photography sharing the best photography tips, news and tricks throughout the industry. Time Trap Photography is dedicated to freezing those special moments in life that can be revisited and admired for generations to come. - Shannon Bourque
Please visit our main site for booking availability and rates.


"Time


Receive valuable industry knowledge delivered free to your email each day.


"Time

Butterfly And Loop Portrait Lighting Setup

5:04:00 AM

There are a few rather effective but simple ways to take stunning portraits with one light. This means that even if you are an amateur photographer, you can take great portraits without spending a fortune on expensive lighting equipment.

We have already covered Rembrandt lighting in one of our previous articles  – now we’re going to focus on butterfly and loop lighting. These two lighting setups are less dramatic than Rembrandt lighting and you can use them to achieve simple yet flattering portraits.

The Equipment For Loop And Butterfly Setups

Since you’ll be shooting with a single light source,  all you need is a minimal gear kit!

  • Camera (with portrait lens)
  • Off camera light source  (either flash or continuous lighting)
  • Light stand (1 or 2)
  • Reflector (32” or  42”) – this is optional

Even if you don’t have a reflector, you can still achieve pretty good results!  Of course, if you prefer the softer quality of light and less noticeable shadows, you should definitely obtain a reflector since they are not expensive but they can definitely improve your portraits.

loop lighting

Photo by Olga Guryanova (loop lighting)

Butterfly Lighting

Butterfly lighting is one of the most popular and most versatile lighting setups.  It’s rather simple – it consists of a soft light that hits the subject from above. It is called butterfly lighting because it creates a small shadow (in the shape of a butterfly) underneath the nose and chin.

This type of lighting illuminates both eyes and both sides of the face equally and it creates a balanced and flattering look. An off-camera light used for butterfly setup should be placed directly behind the camera and slightly above the subject’s head. The light should be pointed down towards the model at about a 45-degree angle.

Butterfly lighting setup

When To Use It

This portrait lighting setup can emphasize the jawline and the cheekbones, which makes it a great choice for fashion and glamour photography. It also makes wrinkles and uneven skin texture less pronounced. If you want to make an older subject appear more youthful, you should definitely give butterfly lighting a try!

It’s relatively easy to modify butterfly lighting with reflectors. The use of reflectors will allow for more variations in this kind of lighting – anything from simple to glamorous is possible!

Butterfly lighting was most popular in the 1950s fashion shoots, so you can use it to mimic this style of fashion photography.

glam lighting

Photo by Dmytro Tolokonov

Loop Lighting

Loop lighting is somewhere in between butterfly and Rembrandt lighting – it’s not perfectly balanced but it’s not overly dramatic either.  A larger part of the model’s face is still well lit, but since a key light is off to the side of the camera, shadows are clearly visible on one side of the face.

It’s easy to recognize this type of lighting – it forms a short, rounded shadow in one corner of the subject’s nose. Technically speaking, loop lighting is a butterfly lighting moved to one side of the subject.  In order to set it up, you just need to place an off-camera light next to the camera and off to the side, up to a 45-degree angle from the model.

Just like in the case of butterfly lighting, the light should be taller than the subject but angled down at them.

It might be tricky to find the perfect distance between the light and the camera, but you should definitely feel free to experiment with this distance. The light should be far enough from the camera to create shadows on one side of the face, but also close enough to the camera that both sides of the face are well lit.

Loop lighting setup

When To Use It

You should use loop lighting when you want to give a bit of an edge to a regular portrait. Loop lighting is as flattering as butterfly lighting, but at the same time, it provides more visual interest and more dimension. It represents a great cross between soft and dramatic lighting.

loop lighting

Photo by Jurica Koletic

No matter what kind of portraits you like to shoot, always bear in mind that lighting can create a more flattering portrait, add drama and help the subject’s best features look even more stunning! Luckily, you don’t need lots of gear to create a variety of beautiful and meaningful lighting effects.

In case you want to learn more about lighting in portraiture, feel free to check out the following links!

Further Resources:

  1. Improve Your Portraits With Rembrandt Lighting Technique
  2. 5 Free E-Books to Help You Get Better at Lighting in Photography
  3. Bite Size Tips: 3 Wonderful Lighting Conditions For Portraits
  4. 10 Stunning Portrait Lighting Patterns Using Just One Light
  5. The 5 Fundamental Portrait Lighting Techniques
  6. Portrait Lighting Essentials

Further Learning:

We hope you found this article on portrait lighting useful and inspiring. If you are looking to make beautiful portraits and are struggling with lighting, here is your chance to truly master light and produce amazing and inspiring images of your own. Understanding Light Book One is the first step towards your full comprehension on the subject of light, and how to make it work in your photography.

In this guide you'll discover:

  • The exercises that will teach you how to light shapes for dynamite images
  • What Reflectance and Refraction is
  • How light bounces and how the surface you’re bouncing it from can vastly affect your photograph
  • These five tips on lighting will help you get a perfect shot every time
  • The relationship between “Camera point-of-view” and the Light Source.
  • And so much more!

Discover the secrets to controlling and manipulating light in Understanding Light Book One today

Shareable Images for Pinterest

Let's block ads! (Why?)


Light Stalking https://ift.tt/2UjxIor

Sourced by Time Trap Photography sharing the best photography tips, news and tricks throughout the industry. Time Trap Photography is dedicated to freezing those special moments in life that can be revisited and admired for generations to come. - Shannon Bourque
Please visit our main site for booking availability and rates.


"Time


Receive valuable industry knowledge delivered free to your email each day.


"Time

29. März 2019

5:01:00 AM

Das Bild des Tages von: flu bu


kwerfeldein – Magazin für Fotografie https://ift.tt/2WvSBdu

Sourced by Time Trap Photography sharing the best photography tips, news and tricks throughout the industry. Time Trap Photography is dedicated to freezing those special moments in life that can be revisited and admired for generations to come. - Shannon Bourque
Please visit our main site for booking availability and rates.


"Time


Receive valuable industry knowledge delivered free to your email each day.


"Time

5 Secrets for Gorgeous Macro Photography Compositions

4:01:00 AM

Composition is one of the most important elements of macro photography. If you don’t compose your macro photos carefully, then they’ll lack power. They’ll lack impact. And ultimately? They won’t stun the viewer.

Fortunately, creating gorgeous macro photography compositions isn’t difficult. You just have to know a few composition tricks which I’ll share with you in this post. Are you ready to take your macro photography to the next level?

Then let’s get started.

1. Every Macro Photo Must Have a Subject

This is it. The number one rule of macro composition: Every photo must have a subject.

Macro photography example with a simple subject

Macro photography example with a simple subject: Flowers

What do I mean by this?

Every single macro photo you take must have a point of focus. Something that the viewer’s eyes go to. Something that stands out. If your macro photo doesn’t have a subject, the viewer will feel lost. The photo will seem aimless. And the image just won’t work.

Now, finding a subject doesn’t have to be hard. Just think of what drew you to the scene in the first place. In a flower photograph, the subject can be the flower. In a butterfly photograph, the subject can be a butterfly.

The important thing is to make sure the subject is noticeable.

It’s worth noting: Macro photos occasionally do seem to lack subjects. For instance, an abstract photo of leaves doesn’t have anything that stands out. But in that case, it’s the pattern that is the subject–the repeating shape of leaves in the frame.

So remember: Always include a subject in your macro photography.

Macro photography example of subject that stand out

Macro photography example of subject that stand out

2. Start With the Rule of Thirds for Stunning Macro Photography

If you want to take incredible macro photos, you have to know the rule of thirds. And you have to use it–repeatedly. You have to ingrain it in your mind.

Why? Because the rule of thirds is one of the main building blocks of composition. It’s the bread and butter of macro photography.

Here’s what the rule of thirds states: The best photos place their subject a third of the way into the frame.

If that seems a bit confusing, don’t worry. The rule of thirds comes with a helpful set of grid lines, like this:

  • Rule of thirds Example with a macro photography subject

    Rule of thirds Example with a macro photography subject

  • Grid lines to demonstrate the rule of thirds example with a macro photography subject.

    Gridlines to demonstrate the rule of thirds example with a macro photography subject.

When you’re composing your macro photos, place your subject along the rule of thirds gridlines. For instance, you can place flower stems along one of the vertical gridlines. And you can place the flower head at the intersection of two gridlines (called ‘power points’).

Rule of thirds example with a macro photography subject.

Rule of thirds example with a macro photography subject.

See, the rule of thirds will help you balance your compositions. It will make your photos feel nice and satisfying. Most beginners center their compositions. They put the subject smack-dab in the middle of the frame. And this generally doesn’t work. In fact, if you’re a beginner, I recommend you use the rule of thirds almost exclusively. Your images will look far more pleasing.

But as you start to grow more experienced, you can learn to break the rule of thirds. Which brings me to my next tip…

3. Use Symmetry to Create Bold Macro Photography Compositions

According to the rule of thirds, you shouldn’t center your subject. And this is generally true. Centering your subject often looks bad. And it frequently results in static photos.

But there are occasional exceptions.

And one of these exceptions? When your subject has clear symmetry. Then you can center your subject–and it’ll make for a powerful photograph. Fortunately, in macro photography, you can often find symmetry.

For instance, flowers offer lots of symmetrical compositions. You can shoot the middle of a flower–and center the photo for a great result.

Example of breaking the rule of the thirds to perverse symmetry for your macro photos.

Example of breaking the rule of the thirds to perverse symmetry for your macro photos.

You can also shoot a flower from an upright angle, and still manage to capture some symmetrical compositions.

Now, I love the rule of thirds. But I’m also a huge fan of symmetrical compositions. Because symmetry is often impactful in a way that the rule of thirds isn’t.

Example of breaking the rule of the thirds to perverse symmetry for your macro photos.

Example of breaking the rule of the thirds to perverse symmetry for your macro photos.

The rule of thirds is subtle. But symmetry is an in-your-face type of composition.

Bottom line? If you come across symmetry, I recommend taking a few centered shots. But then take a few more using the rule of thirds. You don’t want to miss out on a great opportunity!

4. Fill the Frame With Your Subject

Using symmetry can be a great way to take impactful photos. But there’s another way to create impact with your macro compositions.

Here’s what I suggest: When you find a subject that you want to photograph, don’t just settle for a basic snapshot. Instead, push your lens to its maximum magnification.

Get in close. And fill the frame with your subject.

Macro photography example of getting close to your subject

Macro photography example of getting close to your subject.

If you do this, you have to be thorough. You must make sure that none of the background is peeking out. Because little bits of the background will distract. They’ll take away from the shot.

Now, when you fill the frame with your subject, make sure that there’s still something of interest in the photo. Remember tip number one: Make sure your photo has a clear subject!

When I photograph flowers, I like to focus on the lines and curves of the petals. This adds interest–but doesn’t require that I show anything more than my subject.

Example of getting up close to your macro photography subject

Getting up close to your macro photography subject.

In fact, I suggest you use your lens’s maximum magnification to find original compositions–compositions that you wouldn’t have otherwise considered.

But…What if you want to include the background in your photo? What then?

5. Include a Uniform Background for Maximum Impact

If you decide to include a background in your macro photos, I urge you to choose it carefully.

You need to select a background that makes the subject stand out. And you need to select a background that won’t distract from the subject. In fact, the best macro photography backgrounds do something really well: They complement the subject. They add something to the photo.

Example of uniform background for macro photography subject

Uniform background will make your macro photography subject stand out.

How do you do this?

I recommend you start by making your background uniform. It can be a uniform yellow, a uniform white, a uniform black, etc. The key is to find a background that is simple–and won’t take away from your subject.

Here, a wide aperture is your friend. I often shoot in the f/3.2 to f/5.6 range, because I want the smoothest background possible. And I suggest that you at least experiment with doing the same.

Macro photography example created with shallow DOF

Macro photography example created with shallow DOF (Large Aperture)

Because at f/3.2, a stand of autumn trees becomes a nice yellow blur. Which is perfect for macro photography!

Another tip is to keep a large distance between the subject and the background. Because the farther your background is from your subject, the better your background bokeh will be.

And finally if you can’t find a good background, get down low–and put the sky behind your subject. This works especially well on cloudy days. When you do this, you’ll capture a smooth white background–one that helps make the subject stand out.

Now, I like basically all uniform backgrounds. But here’s the thing: Uniform backgrounds aren’t created equal. Some uniform backgrounds are more beautiful than others.

Specifically, I like white backgrounds, black backgrounds, and golden/yellow backgrounds. I’m less fond of green backgrounds and brown backgrounds. Why? Green and brown backgrounds often feel muddy. And they tend to weight photos down–rather than enhancing them.

Regardless, I suggest you begin by making your backgrounds uniform (in any way you can). Then you can start experimenting with different options, like colorful backgrounds.

Example uniform background heavy background that does not complement your macro photography subject.

Uniform background heavy background that does not complement your macro photography subject.

Let me reiterate: You have to choose your background carefully. Because beautiful backgrounds are the ‘secret sauce’ of macro photography composition. They’ll take your macro photos to the next level–and then some.

Next Steps

Now you know how to create gorgeous macro photography compositions. Because you know how to find a subject–and make them the center of attention.

  • Macro photography example with uniform background

    Macro photography example with uniform background

  • Macro Flower Photography Example.

    Macro Flower Photography Example.

You know how to use the rule of thirds to create balanced compositions. You know how to use symmetry (and fill the frame) for impactful photos. And you know how to find gorgeous backgrounds when you need to.

So the next step is to get out and shoot!

Have any other macro photography composition tips? Share them in the comments!

About Author Jaymes Dempsey

Jaymes is a nature photographer from Ann Arbor, MI. To learn how to take stunning nature photos, check out his free eBook: website and his blog!

Let's block ads! (Why?)


Visual Wilderness https://ift.tt/2UlubWD

Sourced by Time Trap Photography sharing the best photography tips, news and tricks throughout the industry. Time Trap Photography is dedicated to freezing those special moments in life that can be revisited and admired for generations to come. - Shannon Bourque
Please visit our main site for booking availability and rates.


"Time


Receive valuable industry knowledge delivered free to your email each day.


"Time

About Us

Time Trap Photography is dedicated to freezing those special moments in life that can be revisited and admired for generations to come. - Shannon Bourque

The lens in focus

“Life is like a camera. Just focus on what’s important and capture the good times, develop from the negatives and if things don’t work out, just take another shot.” — Unknown

TIME TRAP PHOTOGRAPHY COPYRIGHT 2016