Friday, January 31, 2020

52 Wochen – Ergebnisse: Pareidolie

10:14:00 PM

Pareidolie war unser drittes Thema und ich dachte wirklich, die Aufgabe sei einfach. Aber wie sich herausstellte, lag ich falsch. Viele von Euch berichteten, dass sie sonst überall Gesichter in Dingen sehen, aber als sie danach suchten, versteckten sie sich wohl.

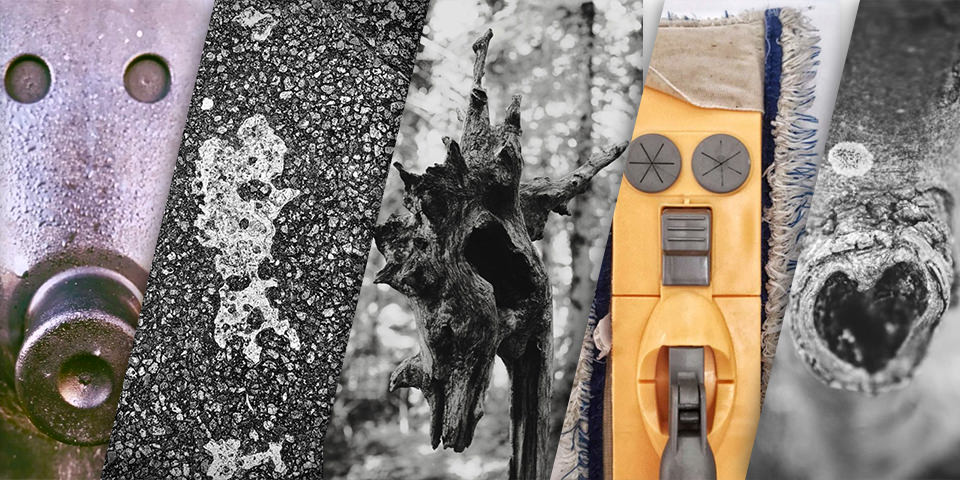
Einige hatten mehr Glück, kannten das Phänomen vorher nicht und sahen plötzlich überall kleine Monster. Am Ende gab es zum Glück genügend Entdeckungen und wieder über 60 Einreichungen! Tatsächlich waren die Fotos dieses Mal nicht ganz so vielfältig und beschränkten sich vor allem auf Hauswände und Bäume. Aber schön anzusehen sind die kleinen Holz- und Steinmännchen auf jeden Fall.

Dachfenster

© Sophia Hegewald

Ein Gesicht zu entdecken ist doch bestimmt nicht schwer – dachte ich und zog mit meiner Kamera los. Aber wenn man etwas Spezielles sucht, findet man es meistens nicht. Irgendwann saß ich dann am Schreibtisch und plötzlich sahen mich diese beiden Smileys aus ihren dunklen Fensteraugen an, die ich vorher schon tausende Male betrachtet habe, ohne ein Gesicht zu sehen. Nun beobachten mich also diese beiden Gesichter immer beim Arbeiten.

Baustelle mit Pareidolien

© Doro

Ich hatte erst keinen Blick dafür, aber dann begegneten mir überall zornig verzerrte Masken auf Wegen, strahlende Mimiken auf Straßen, Häuser die Zwinkern und sympathische Helfer. Nun haben es diese hier geschafft: zwei schwere Jungs oder Bob der Baumeister hoch zwei.

Wenn man mit offenen Augen durch die Gegend radelt, dann sieht man irgendwie überall Pareidolien; sie dann aber – für meinen Geschmack – richtig in Szene zu setzen, wird schon schwieriger. Gestern habe ich mich plötzlich unerwartet und sofort unsterblich in Hermann verliebt.

Hermann ist ein Nasenbär, noch etwas verschlafen im morgendlichen Tau. Er gehört zur Gattung der großen Kunststoff-Mülltonnen und wird oft an bestimmten Tagen in Rudeln in einigen Stadtteilen angetroffen. Ich habe Hermann bei seinen Artgenossen gelassen und schicke Euch hier ein Bild von ihm.

Auf dem Weg zur Arbeit halte ich fast jeden Morgen an einer Ampel vor einem Landgasthof. Links von mir ist ein bemalter Stromkasten, klassisches Landmotiv: Bauernhof mit Wolkenhimmel. Im Wolkenhimmel ist das Gesicht zu erkennen, das ich dort jeden Morgen in Gedanken grüße. Das Wochenthema kam mir also wie gerufen. Als ich letzten Freitag auf dem Heimweg dort anhielt, um den Stromkasten zu fotografieren, musste ich an einer rissigen Hausfassade vorbei. Tja – und da traf ich dann auf das „Antlitz des Alltags“.

Ein sehr spannendes Thema, wenn man sich dafür öffnet. In der Mittagspause habe ich mir die Kamera geschnappt und bin aktiv auf die Suche gegangen. Plötzlich sah ich sie überall, die Gesichter! Und ich hatte schon meinen Favoriten ausgewählt, doch dann ging ich an einer Laterne vorbei, drehte mich um und dann sah ich ihn. Er hat mich sofort gefangen: „Der traurige Mann…“

Cappuccinotasse mit Gesicht

© Maike Lehmann

Ich habe heute kurzerhand die Küche umfunktioniert und einen Gute-Laune-Cappuccino kreiert. Nach mehreren Versuchen mit Schaum und Wasserstrudeln in der Spüle, die ein Auge erzeugen sollten, habe ich diese erste Idee etwas frustriert aufgegeben und mich dann auf die Produktion von Cappuccino konzentriert. Ich denke, ich gehe von jetzt an sonntags zum Frühstück in die erweiterte Produktion!

Zugegeben keine echte Pareidolie, sondern ein Photoshop-Trick. Aber meine Fantasie spielt mir auch so oft Streiche und ich sehe in Schatten Dinge, die es so nicht gibt.

Bemooster Stein mit Gesicht

© Francis

Hauswand mit Pareidolie-Gesicht

© Falk

Schrubber mit Pareidolie-Gesicht

© Eric Mazath

Straße

© Benny

Kamera und Kameratasche

© Guido

Baumstämme

© Micaela Lucas

Ich hoffe, nach diesem Beitrag verfolgen Euch all die Gesichter auch mit ihren Blicken und Ihr entdeckt vermehrt kleine Monster. Wenn Ihr die Aufgabe verpasst habt, kein Problem. Das nächste Thema wartet bereits: „Versteckspiel“. Macht gern mit! Ihr könnt jederzeit in unsere 52-Wochen-Aufgaben einsteigen. Jeden Montag wird das neue Thema bekanntgegeben.


kwerfeldein – Magazin für Fotografie https://ift.tt/2S95hX5

Sourced by Time Trap Photography sharing the best photography tips, news and tricks throughout the industry. Time Trap Photography is dedicated to freezing those special moments in life that can be revisited and admired for generations to come. - Shannon Bourque
Please visit our main site for booking availability and rates.


"Time


Receive valuable industry knowledge delivered free to your email each day.


"Time

X-Peditions' 2020 Trips Announcement

8:17:00 AM

Just a quick note to announce that X-Peditions' 2020 season has opened. Seats are going very quickly, and we expect both trips to fill shortly.

X-Peditions is a collaborative project between Strobist.com and Washington DC-based Focus on the Story. You can learn more about this year's classes, or our program in general, at X-Peditions.com.

Let's block ads! (Why?)


Strobist https://ift.tt/2RITtvO

Sourced by Time Trap Photography sharing the best photography tips, news and tricks throughout the industry. Time Trap Photography is dedicated to freezing those special moments in life that can be revisited and admired for generations to come. - Shannon Bourque
Please visit our main site for booking availability and rates.


"Time


Receive valuable industry knowledge delivered free to your email each day.


"Time

In-depth Night Photography Tutorial to capture Moonbows

5:32:00 AM

Rainbows are beautiful things to behold and are generally quite rare. But there is a rainbow so elusive that many do not know it exists and most have never actually seen one. This rainbow can only be captured by the light of the moon… it’s a moonbow or lunar rainbow. This particular rainbow is a perfect subject for night photography. It is visible to the naked eye but can be vividly captured on a film or digital camera using a long exposure. This is one of those night photography phenomena where the camera can out-perform the human eye. On a really bright night, your eyes see a silver band with maybe the faintest color. Depending on how bright the night is, the camera can capture almost all the rainbow’s colors.

Night Photography at Halema‘uma‘u Crater, Volcanoes National Park, Hawaii by CJ Kale

Night photography with moonbow in Halema‘uma‘u Crater, Volcanoes National Park, Hawaii

Timing

First, how do you even find a lunar rainbow? Think of how many rainbows you see in the course of a 30-day month. Now consider that you only have roughly 8 to 10 days to see a lunar rainbow in that same period of time. This is a very short window. Also, just like with daytime rainbows, lunar rainbows require certain conditions. The sun or moon must be bright and unobstructed and at a 45-degree angle to moisture in the sky for a rainbow to appear. The moon is only bright enough to produce a good rainbow 8 to 10 days a month. Rainbows are hard enough to find in the daytime but at night, it’s even more difficult.

When selecting on a location, first determine at what time the moon rises or sets. Second, determine the direction that it rises or sets in order to set your composition accurately. Finally, considering that you’ll be shooting close to a full moon, determine at what time the sun rises or sets. It’s simple to gain this information using apps, our phones, or websites. When shooting a lunar rainbow, the moon will be behind you and the sun will be preparing to rise in front of you. Obviously if the light coming over the horizon from the sun gets too bright, you’ll lose your moonbow.

Night photography with Moonbow by CJ Kale

Halema‘uma‘u Crater, Volcanoes National Park, Hawaii

A more difficult way to find a moonbow that can produce some amazing results is to search for one at the edge of a rainstorm. If you’re shooting after the sun sets and the moon rises, you’ll be looking for compositions where the rain is in the west and it’s clear in the east. As it gets darker, it’s harder to tell where there is clear weather but look for stars or, when the moon comes up, its light can also help. If you are shooting at moonset, this is reversed. You are looking for clear skies in the west with moisture in the east. This procedure is difficult because it requires moving and composing on the fly in whichever location you encounter a rainbow.

Location

I suggest scouting during the days for possible locations along a road you may be traveling and then do some nighttime scouting to determine whether or not there’s too much light pollution. City lights that are too bright will blow out your sky before you can expose for the moonbow. A good way to test for light pollution is to go out on a moonlit night and expose for the landscape by moonlight. If the landscape can be captured brightly and you don’t notice major light pollution, the location should be okay.

Star trails and moonbow at Yosemite Falls, Yosemite National Park, California

Star trails and moonbow at Yosemite Falls, Yosemite National Park, California

We’ve probably all heard the phrase “No rain, no rainbows”. Without trying to be a “negative Nancy” on such a positive outlook on life, let me say that phrase is a lie. Living in Hawaii (the land of rainbows), I can tell you that rainbows do occur without rain. You just need to find a waterfall. This makes hunting for moonbows quite easy. Find a waterfall that creates enough mist that is orientated in the right direction, show up at the right time on a clear night, and you’ve got your moonbow. There are many famous waterfalls around the world that have already been found to have moonbows… such as the majestic Yosemite falls in spring under the full moon.

Equipment & Exposure

Ok… so now you’ve found a lunar rainbow. What equipment do you need to capture it? The most important tools are a wide lens, a tripod, and your camera. The cool thing about shooting under moonlight is that you don’t need the best low-light camera or the fastest wide-angle lens. I personally like to use a camera lens that is 16mm or wider; 14mm is ideal and a 14mm/2.8 is a dream.

Moonbow panorama by CJ Kale

Moonbow panorama Volcanoes National Park, Hawaii

Camera exposure times for these rainbows are shorter than when shooting for the stars; ISO is also not as high. For example, I sometimes shoot at f3.5/10Sec. @ ISO 800. These exposure settings can be achieved pretty noise free on most digital SLR’s. Also, if shooting film, push the film to 400 ISO and increase the exposure time remembering to calculate for reciprocity failure for the duration of your exposure and you’ll have a completely noise-free image. Many films push two stops from ISO 100 to ISO 400 without much effect to the image grain.

Some more optional photography accessories that I always like to have are a cable release camera to avoid camera shake and a circular polarizer to intensify the rainbow (or drive you mad trying to figure out why you’re not getting the rainbow in your shot).

Focus Setting

How do you actually achieve the shot? First, I set up and get my camera focused. I use hyperfocal distance for the camera lens at the aperture I am shooting to get the sharpest image (there are field calculator apps that can help with this). Make sure everything in your night photo is in sharp focus by capturing a test exposure and zooming, If necessary make adjustments to your focus settings as needed.

Moonbow at Volcanoes National Park, Hawaii

Moonbow at Volcanoes National Park, Hawaii

Photography Composition

My next step is to refine my photography composition for night photography. To do this, I raise the ISO high enough to capture noisy one-second exposures as aids to check my photography composition. I shoot, look at the screen, and then recompose as needed. This allows me to see things that I may not have with my eyes in the dim conditions. Once I work out my night photography composition, I drop the ISO to around 800 to 1600 and make any adjustments I need to get proper exposure. Remember, unlike the sun, the moon’s exposure values will vary from night to night. The the camera exposure settings you used for night photography on one night may not work the same for the following night.

Night photographer with double moonbow

Double Moonbow at Big Island, Hawaii

Get Your Circular Polarizer ON

Finally, after completely all of these steps, now comes the potentially mind-numbing part. I put a circular polarizer on my lens. If the circular polarizer is set wrong, the rainbow completely disappears or is only half visible in the shot. If this happens to you, don’t panic; just turn the circular polarizer. If the rainbow is completely gone in your frame, turn the circular polarizer 180 degrees and it will likely be close enough to perfect. Otherwise, the best way to dial it in is to turn it a ¼ turn at a time, then expose until it is at its best polarization for the rainbow.

Note that the polarizer, on average, causes the loss of about 1.5 stops of light. You’ll need to compensate for this by increasing your exposure time, increasing your ISO, or opening up your aperture. Increasing the exposure or ISO causes more noise (not a problem with a good low light camera that can handle 6400 ISO without noise). Opening the aperture causes a few other issues:

  • You’ll need to rest your hyperfocal distance (if you are as picky as I am to get it right in camera).
  • If your camera lens is not fast enough, opening the aperture is not an option.
  • Depending on the camera lens, this opening up can cause overall softness and bad corners.

I personally take all in-camera decisions for night photography very seriously as I do not settle for less than a great shot. I like the challenge of getting it right in my camera rather than making it right on the computer during post-processing. If you find that the benefit you’re getting from the circular polarizer causes you to gain noise or lose sharpness, you’ll need to decide what benefits your final frame the most… the polarization or the extra stops of light. If you need the extra light due to a slow lens or a camera that does not perform as well in low light, don’t be afraid to lose the circular polarizer. These are decisions that night photographers in search of one amazing photos must make.

Moonbow Yosemite National Park, CA by CJ Kale

Moonbow at Yosemite National Park, CA

The amazing thing about lunar bows is how unique and mind-blowing of a shot you can get right in-camera in one frame with no composite. You can take pride in a pure photo that is so amazing that people think it was created on a computer.

Now… put the mouse down, the laptops away, and grab your cameras and tripods and go capture some amazing shots straight from the night photographer’s main tool… the camera.

About Author CJ Kale

Deemed a "daredevil photographer", in 2011 CJ feel into a lava tube 20ft while shooting the Kilauea Volcano and shattered his ankle. Even this was not enough to deter CJ, as only a few months later we was back in the surf and lava fields doing what he does best.

CJ's photography has been featured in new articles worldwide such as Natures best, National Geographic, Professional Photography Monthly, Surfer Magazine, UK Daily Mail, New York times, BBC, Ocean views, and One World One Ocean, and has won numerous awards and has even had his work displayed in the Smithsonian Museum.

Let's block ads! (Why?)


Visual Wilderness https://ift.tt/3aVJf2B

Sourced by Time Trap Photography sharing the best photography tips, news and tricks throughout the industry. Time Trap Photography is dedicated to freezing those special moments in life that can be revisited and admired for generations to come. - Shannon Bourque
Please visit our main site for booking availability and rates.


"Time


Receive valuable industry knowledge delivered free to your email each day.


"Time

31. Januar 2020

4:14:00 AM

Das Bild des Tages von: Marat Mazepin


kwerfeldein – Magazin für Fotografie https://ift.tt/37K8Dqj

Sourced by Time Trap Photography sharing the best photography tips, news and tricks throughout the industry. Time Trap Photography is dedicated to freezing those special moments in life that can be revisited and admired for generations to come. - Shannon Bourque
Please visit our main site for booking availability and rates.


"Time


Receive valuable industry knowledge delivered free to your email each day.


"Time
12:54:00 AM

[unable to retrieve full-text content]


https://ift.tt/2n81Txi

Sourced by Time Trap Photography sharing the best photography tips, news and tricks throughout the industry. Time Trap Photography is dedicated to freezing those special moments in life that can be revisited and admired for generations to come. - Shannon Bourque
Please visit our main site for booking availability and rates.


"Time


Receive valuable industry knowledge delivered free to your email each day.


"Time

Thursday, January 30, 2020

Verletzlich sein und stärker werden

10:14:00 PM

drei Frauen mit bunten Blütenmasken

Ein Beitrag von: Fares Micue

Als ich anfing, zu fotografieren, war es einfach nur ein Medium, um „nette“ Bilder zu machen, aber als ich mich tiefergehend mit der Fotografie beschäftigte, unterschiedliche Stile und Arbeiten anderer studierte, stellte ich erst fest, wie sehr ich all das liebte.

Ich liebte es, die verschiedenen Ausdrucksweisen und Farben zu sehen. Ich konnte mich stundenlang in die Betrachtung von Bildern versenken und mir Geschichten zu dem ausdenken, was ich in ihnen sah – warum also nicht mit eigenen Bildern meine eigenen Geschichten erzählen?

Frauenkörper in blauen Blättern

Von diesem Moment ausgehend verfolgte ich einen neuen Ansatz, um meine Bilder zu kreieren. Noch bis heute ist die Fotografie ein Rückzugsort für mich, an dem ich ganz ich selbst sein kann. Wo ich all die Geschichten, die ich mir ausdenke, wahr werden lassen kann, wo ich das Unmögliche möglich werden lassen und meine Innenwelt mit anderen teilen kann.

Während ich die Fotografie für mich entdeckte, verliebte ich mich in die konzeptuelle Fotografie und den außergewöhnlichen Einsatz von Farben und Requisiten, um eindrucksvolle Bilder zu erschaffen und die Fotografie als Medium, um Geschichten zu erzählen. Deshalb beschloss ich, dieses Medium zu nutzen, um meine innere Welt, meine Ideen und die Art, wie ich das Leben sehe, zu teilen.

Frauenkörper in roten Blättern

Frau mit Glas über dem Kopf, gefüllt mit gelben BlütenFrau mit Glas über dem Kopf, gefüllt mit blauen Blüten

Mein Ziel ist es, Emotionen zu wecken und mit meinen Fotos Geschichten mit den Betrachter*innen zu teilen. Ich möchte, dass sie träumen, denken und eine ganze Bandbreite von Gefühlen verspüren, während sie meine Bilder ansehen, die mit Empfindungen wie Einsamkeit, Trauer, Hoffnung, Liebe oder Verzweiflung experimentieren und immer auch einen melancholischen oder romantischen Anklang haben.

Die Fotografie ermöglicht es mir, meine Seele zu teilen und den Betrachter*innen mit meinen Botschaften eine angenehme Erfahrung zu bereiten. Ich bin ein im höchsten Maße positiv eingestellter Mensch, was sich oft auch in meinen Arbeiten abzeichnet, wenn die Bilder starke Botschaften zu Themen wie persönliche Entwicklung, Selbstreflexion, Wertschätzung oder das Überwinden von Hürden senden.

Frau steht in blauem Gebüsch mit gelben Blüten

Frau in Kleid mit roten Ballons

Meine Arbeiten sind voller Symbolik, jedes Element meiner Kompositionen hat eine Bedeutung, von den Farben über die Requisiten bis hin zur Körpersprache. Und die Kombination all dieser Einzelteile ergibt schlussendlich das konzeptuelle Bild. Mein Ziel ist es, dass meine Arbeiten als Geschichten gesehen werden, die zu einem einzigen Bild verdichtet sind.

Grundsätzlich fühle ich mich von der Natur und dem Leben selbst inspiriert und versuche immer, meine Ideen mit Hilfe von Farben und Requisiten ganz simpel und geradeheraus auf den Punkt gebracht zu kommunizieren. Ich versuche immer, bei einer ganz klaren Ästhetik zu bleiben, auf unruhige Hintergründe und überflüssige Elemente zu verzichten.

Frau mit Maske aus pinken BlütenFrau mit Maske aus blauen Blättern

Frauenkörper in orangen Blättern

Der Ausgangspunkt für meine Bilder sind meine eigenen Ideen und Erfahrungen. Ich reflektiere gern tiefgehend über das Leben, menschliche Gefühle, meine Träume und wie ich das Leben sehe. Ich versenke mich selbst sehr tief in diese Gedanken und erforsche die dabei aufkeimenden Gefühle.

Oder ich verarbeite auch Beobachtungen meiner eigenen Person, etwa wie ich mit schwierigen Situationen umgehe. Manchmal fühlen sich unsere eigenen Gefühle, Ideen und Erfahrungen seltsam oder gar fremd an, sodass wir versuchen, unsere Realität von ihnen abzuspalten.

Frau steht in blauem Gebüsch

Frau in roter Blätterwand

Von diesen Gedanken und Gefühlen ausgehend entstehen Ideen, die ich aufschreibe, zusammen mit all den Bildern, die dieses Gefühl in mir heraufbeschwören. In einem Skizzenbuch mache ich kleine Zeichnungen davon, wie das Bild am Ende aussehen soll, dazu mache ich mir Notizen zu den Farben, zur angestrebten Bedeutung und zum geplanten Titel. Erst dann bin ich bereit, tatsächlich Aufnahmen zu machen.

Wenn ich draußen fotografieren möchte, muss ich erst einmal einen passenden Ort suchen. Ich muss mir auch darüber klar werden, wie viel des Bildes erst in der Nachbearbeitung entstehen wird, um mein Ziel zu erreichen. Ich versuche immer, so viel wie möglich bei der Aufnahme selbst schon zu realisieren.

Nach dem Fotografieren und Nachbearbeiten folgt mein liebster Moment – der, in dem ich endlich meine Idee realisiert außerhalb meiner eigenen Vorstellung sehen und sie mit der Welt teilen kann.

Frauenkörper in blauen Blüten

Frau mit Gestrüpp und BlütenFrau mit Kopf in Blüten und Blättern

Farben sind in meinen Arbeiten ein sehr wichtiges Element, weil sie mir dabei helfen, ein bestimmtes Gefühl zu erzeugen oder eine Empfindung zu vermitteln. Ich bin eine sehr empfindliche Person und in der Lage, mich sozusagen mit allem, was in meiner Umgebung passiert, zu synchronisieren. Farben gehören zu den Dingen, auf die ich besonders empfindlich reagiere.

Das Gleichgewicht zwischen kühlen und warmen Farben oder stimulierenden und beruhigenden Farben mag ich sehr. Für mich ist rot immer ein Fokuspunkt, zu dem es den Blick zieht; rot ist eine aufregende Farbe, voller Energie und Kraft, während etwa Blau- und Grüntöne den Augen einen Punkt zum Ausruhen bieten. Die verwendete Farbpalette hat viel Einfluss auf das fertige Bild, nur mit den Farben allein können wir verschiedenen Elementen schon unterschiedliche Bedeutungen geben oder Stimmungen erzeugen.

Daher wähle ich die Farben, die ich verwende, mit großem Bedacht darauf, welche Gefühle sie bei den Betrachter*innen auslösen werden. Ebenso beziehe ich die Komposition und den Freiraum mit in meine Überlegungen ein, da die Kombination aus all diesen Teilen zusammen ganz unterschiedliche Emotionen auslöst.

Frauenkörper mit gelben Blüten

Frau in blauem Gebüsch

In anderen Formen der Kunst wie Malerei, Film oder Literatur finde ich ebenfalls Inspiration. Ich liebe alle Formen der Kunst und ich liebe es auch, neue Künstler*innen zu entdecken, sei es bei den Klassikern oder im zeitgenössischen Bereich. Es sind auf jeden Fall zu viele, um alle aufzuzählen, aber ein paar meiner Lieblingskünstler*innen möchte ich nennen und was ich an ihnen liebe:

Agatha Christie ist mit Abstand meine Lieblingsschriftstellerin, ich liebe all ihre Bücher. Ich liebe es, wie sie alles beschreibt und kann vor meinem inneren Auge klar jede einzelne Szene sehen. Mein Lieblingsmaler ist Zdzisław Beksiński, ich kann mich stundenlang in der Betrachtung seiner verstörenden, aber doch so schönen Bilder versenken, die unzählige Geschichten in meiner Vorstellungskraft auslösen.

Wenn es um die fotografische Zunft geht, mag ich besonders die Klassiker, wie etwa Gregory Crewdson mit seinen sich unglaublich cineastisch anfühlenden und sehr detaillierten Geschichten; ich liebe allerdings auch zeitgenössische Fotokünstlerinnen wie Flora Borsi oder Brooke Shaden. Beide sind Autodidaktinnen und beide haben für sich sehr eigenständige und unverwechselbare Stile herausgearbeitet, die sie zu tollen Beispielen für alle (angehenden) Künstler*innen machen.

Frau steht in surrealer blau-violetter Landschaft

Frau mit blauen Blättern vorm GesichtFrau mit gelben Blättern vorm Gesicht

Man muss an sich selbst glauben und daran, dass man seine Träume auch erreichen kann. Danach muss man einfach üben, üben, üben. Man darf nicht aufhören zu lernen und neue Wege zu erforschen, um Geschichten zu erzählen und Ideen zu transportieren. Man sollte neuen Herausforderungen immer mit einer positiven Einstellung gegenübertreten und keine Angst davor haben, den eigenen Wohlfühlbereich zu verlassen.

Ich kann mir kein Leben ohne Kunst vorstellen – ich genieße Kunst in jeder möglichen Ausdrucksform. Für mich ist Kunst Freiheit, es ist der Ort, an dem ich ohne jegliche Schranken ganz ich selbst sein kann. Wo ich verletzlich sein und gleichzeitig stärker werden kann. Kunst ist eine universelle Sprache, eine Sprache der Seele.

Dieser Artikel wurde für Euch von Aileen Wessely aus dem Englischen ins Deutsche übersetzt.


kwerfeldein – Magazin für Fotografie https://ift.tt/2vxizoB

Sourced by Time Trap Photography sharing the best photography tips, news and tricks throughout the industry. Time Trap Photography is dedicated to freezing those special moments in life that can be revisited and admired for generations to come. - Shannon Bourque
Please visit our main site for booking availability and rates.


"Time


Receive valuable industry knowledge delivered free to your email each day.


"Time

Keeping the Dream Alive: Kodak Working with Studios to Keep Film in Use

8:34:00 PM

The changes that have swept over the photography and film world over the past thirty years is almost as monumental as the creation of the field itself.

Pretty much everything has changed but some creators and artists have a vested interest in keeping certain older formats alive.

Kodak also has this same interest and, to that end, they’ve penned a pretty bold agreement with five Hollywood studios who agreed to use film in future projects according to multiple reports.

The studios that agreed to continue purchasing film for the foreseeable future include Disney, NBCUniversal, Paramount, Sony, and Warner Bros.

PetaPixel notes that this is the continuation of a 2015 agreement the studios made with Kodak to purchase the film.

What isn’t clear is how much the studios bought in the past under the previous agreement nor how much they are going to buy under the new one.

In terms of information in this area, we have to go by what Kodak tells us and the company paints a picture of a segment that has seen increases in sales over the past several years and one for which they think demand will continue to rise.

If you’re skeptical of that, you’re not the only person, that’s for sure.

Nonetheless, there does seem to be a place for film in the movie industry and there are definitely more than a couple of proponents for its use.

What do you think?

Do you like to watch movies and television shows made on actual film or do you think digital is a superior format?

Tell us your opinion in the comments below if you like.

Also, don’t forget to check out some of our other photography news articles on Light Stalking by clicking this link here.

[PetaPixel]

Let's block ads! (Why?)


Light Stalking https://ift.tt/2uMq9eL

Sourced by Time Trap Photography sharing the best photography tips, news and tricks throughout the industry. Time Trap Photography is dedicated to freezing those special moments in life that can be revisited and admired for generations to come. - Shannon Bourque
Please visit our main site for booking availability and rates.


"Time


Receive valuable industry knowledge delivered free to your email each day.


"Time

The Rule of Equivalent Exposure (With Quick Quiz)

8:03:00 AM

The camera is a fascinating tool. It’s amazing how a camera can freeze a moment in the present and lets you savour it in the future. While it may seem pretty straightforward what a camera does, quite a lot happens inside the camera when you press the shutter release button to capture a photograph. When you are capturing an image, you are essentially making a properly exposed image on the sensor using settings for aperture, shutter speed and ISO which are the factors that form the exposure triangle.

The rule of equivalent exposure, in the simplest terms, allows you to make the exact same (or let’s say, equivalent) exposure using different settings for aperture, shutter speed and ISO. There are a number of combinations of aperture, shutter speed and ISO that can be used to achieve this equivalent exposure. The rule of equivalent exposure perfectly complements the Sunny 16 Rule.

To get a better understanding of the topic, it would be wise to take a look at how a camera functions and how an exposure is made. Feel free to jump to the last section to get straight to the rule of equivalent exposure.

How Does A Camera Record Images?

There are different kinds of cameras out there – DSLR, mirrorless, film, or the camera in your phone, for that matter. While they may differ in the technology they use, the principles of image-capturing is the same. A DSLR camera may be substantially different from the other types of cameras in its construction as it consists of a reflex mirror that allows it to feature a through-the-lens optical viewfinder. It doesn’t matter what type of camera it is, the process is fundamentally the same.

At the heart of your photography lies the image sensor (or a film, as the case may be). It’s where the photographs are created.

Light from your subject enters the lens, passes through an opening/hole (called aperture), hits the sensor and gets recorded for a fixed duration (called shutter speed) on the sensor that has a specific responsiveness or sensitivity (called ISO). This is, more or less, the sequence of events that occur when you press the shutter release button and after which you have captured an image, or let’s say – made an exposure. These three settings – aperture, shutter speed and ISO speed, constitute what is called as exposure triangle.

In most cameras, you can choose the value for each of the three settings before making an exposure. You can claim to have made a good exposure if the image seems acceptably bright and without any clipping in the shadows or the highlights (pixels are 100% black or 100% white as indicated by being pushed up against the left or the right of your histogram). The most commonly available values for each of the three settings are listed in the table below (the list is not exhaustive, of course).

Typical settings for aperture, shutter speed and ISO

Stops: What is it?

In photography, the term ‘stop’ represents a relative change in the brightness of light. For instance, if you start with a single bulb and add another bulb of same type and intensity, the light intensity will have increased by one stop. One stop represents the doubling or halving of light.

Taking the example further, if you added two more bulbs (i.e. four bulbs in total now), the light intensity increases by another stop. But it has changed by two stops in total. I think you get it now.

Likewise, light intensity can be changed when an exposure is made inside the camera. It can be accomplished by changing the aperture, shutter speed or the ISO.

Consider a photograph with these exposure settings for a well exposed image – f/8 and 1/125 sec at ISO 100. If you change the aperture to f/11, you have reduced the light reaching the sensor by half by making the aperture smaller i.e. you reduced the exposure by a stop.

To make a proper exposure with f/11 as the new aperture, you have to compensate by either using a slower shutter speed of 1/60 sec or by using a higher ISO of 200. Either of them increases the light recorded by the sensor by a stop thereby making the same exposure again. Now, let’s look at the table from before.

Adjacent values in each of the three tables are separated by a stop of light

As you move up in each of the rows, you are increasing the exposure by one stop each time. Similarly, by moving down, you are reducing the exposure by one stop each time.

Take a look at how each setting is affected as you move up or down.

Aperture:

Aperture lets in light through the lens into the camera to fall on to the sensor. The wider the aperture, more light enters the camera and reaches the sensor and the narrower the aperture, less light enters the camera and reaches the sensor.

As you move up the row by one step, you are opening up the ‘hole’ to allow double the light to enter the camera, which is to say, the exposure increases by one stop. Opening the aperture also blurs the background bringing emphasis or focus to the subject in the frame. By using the next smaller aperture (or higher f/number), you reduce the light reaching the sensor by half thereby reducing the exposure by a stop. This also deepens or increases the depth of field.

Shutter Speed:

Shutter speed is the length of time for which the shutter remains open so the sensor can be exposed to light. Freezing or capturing movements in an image is done by controlling or changing the shutter speed.

As you move up the row by one step, you keep the sensor exposed to light for double the duration, effectively increasing the exposure by a stop. Likewise, by using the next faster shutter speed, the sensor remains exposed for half the amount of time thereby reducing the exposure by a stop.

ISO:

ISO is a measure of the sensor's sensitivity to light. Higher the iso, the more sensitive it is, and more digital noise it will produce. It is always good to have the iso at base 100 so you get the best noise free images.

As you move up the row by one step, you are making the sensor doubly sensitive towards light. That is to say, you are increasing the exposure by one stop. In the same way, by using the next lower ISO value, the sensor becomes half as sensitive to light as before, which means you have reduced the exposure by a stop.

Note: If you are looking for noise free images you will be using lower ISO values. You can creatively combine and use aperture and shutter speed values depending on what you are looking to create. Aperture and shutter speed are inversely related which means if one value increases, the other decreases and this is called the reciprocity law in photography.

The Rule of Equivalent Exposure:

To be honest, now you can almost guess what this rule is. It tells you that you can obtain the same exposure at various different settings for aperture, shutter speed and ISO.

To be precise and in simple terms, equivalent exposure is several combinations of the three settings aperture, shutter speed and ISO that can produce the same exposure. By “same exposure” we mean that it is the same amount of light recorded by the sensor by adjusting the three values.

It is best explained with an example:

Consider an outdoor scene where you are photographing portraits. You choose to shoot in Manual Mode. You look through the viewfinder, compose a frame and half press the shutter release button to meter the scene.

You dial in some settings – say f/2.8, 1/250 s, and ISO 200 – to get the exposure level indicator at 0 (which means a ‘correct’ exposure based on your metering mode). You capture a photo but feel that you need a greater or deeper depth of field which you know can be obtained by using a smaller or narrow aperture. You choose f/5.6, which is two stops slower than f/2.8.

To get the same exposure, you can choose any of the following settings as all of the following are equivalent exposures to f/2.8, 1/250 sec and ISO 200. The equivalent exposures are obtained by balancing any increase or reduction in stops by making the opposite changes to keep the overall level of light the same.

Equivalent exposures for the original settings – f/2.8, 1/250 sec, ISO 200

There can be many combinations to obtain an equivalent exposure, so the above list is only representative and definitely not exhaustive.

The photographs obtained with any of the settings above will have the same equivalent exposure, i.e. they will look equally bright. The difference will either lie in their depth of field (due to different apertures), their capturing of motion (due to different shutter speeds), or the noise present in the image (due to different ISO settings). All you need to do to obtain the equivalent exposure is to balance the reduction in stops with increase in stops.

Let’s Practice!

Let’s wrap it up with an exercise. Fill in the blanks with the setting to make both exposures equivalent. The first one is provided as an example, just in case it wasn’t clear to you yet (The answers are at the end of the post)

1.  f/5.6, 1/30 sec, ISO 400 = f/16, _____, ISO 800

Answer: 1/8 sec

f/5.6 > f/8 > f/11 > f/16 = 3 stops reduction in light captured

ISO 400 > ISO 800 = 1 stop increase in light captured

Therefore, the net effect from aperture and ISO is 2 stops reduction in light. Now you need to increase the light captured by 2 stops to get the equivalent exposure. You can do that by using a shutter speed of 1/8 sec. 1/30 > 1/15 > 1/8 = 2 stops increase in light captured.

2.  f/2.8, 1/1000 sec, ISO 1600 = f/8, _____, ISO 400

3.  f/11, 1/8 sec, ISO 100 = _____, 1/250, ISO 3200

4. f/22, 1/2 sec, ISO 200 = f/5.6, 1/15 sec , _____

5. f/16, 1/125 sec, ISO 100 (the Sunny 16 Rule) = f/8, _____, ISO 200

Links to Additional Resources

Stops: The Unit of Exposure – It has an interactive chart that you can use to learn the concept of stops better.

Sunny 16 Rule – A recently published article on Light Stalking

F-number – An article on Wikipedia explaining aperture and f-stops

(Answers to the exercise – 2.  1/30 sec, 3.  f/11, 4.  ISO 100, 5. 1/1000 sec)

Let's block ads! (Why?)


Light Stalking https://ift.tt/2KNCjX6

Sourced by Time Trap Photography sharing the best photography tips, news and tricks throughout the industry. Time Trap Photography is dedicated to freezing those special moments in life that can be revisited and admired for generations to come. - Shannon Bourque
Please visit our main site for booking availability and rates.


"Time


Receive valuable industry knowledge delivered free to your email each day.


"Time

About Us

Time Trap Photography is dedicated to freezing those special moments in life that can be revisited and admired for generations to come. - Shannon Bourque

The lens in focus

“Life is like a camera. Just focus on what’s important and capture the good times, develop from the negatives and if things don’t work out, just take another shot.” — Unknown

TIME TRAP PHOTOGRAPHY COPYRIGHT 2016