Wednesday, October 31, 2018

Von der Idee zum Bild mit Lauren Parks

11:09:00 PM

Ein Beitrag von: Lauren Parks

Die Beziehung zwischen Männern und Frauen ist derzeit ein umstrittenes Thema. Die #Metoo-Bewegung, US-Politik, Hollywood-Skandale – all dies hat zu wichtigen öffentlichen Diskussionen über Gleichheit und die Rolle der Frau in der Welt geführt.

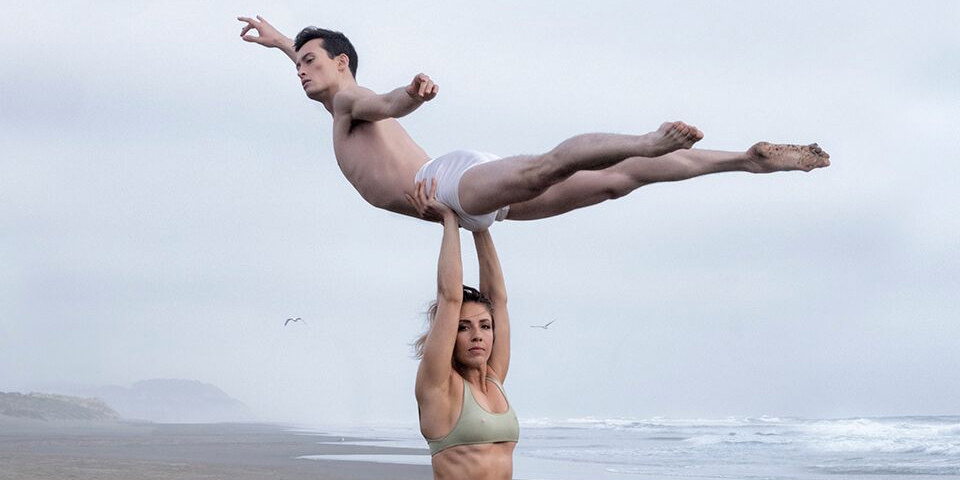
Durch mein Bild wollte ich zu dieser Konversation beitragen, indem ich zeige, dass Frauen stark sein können und jede Eigenschaft verkörpern können, die sie wollen, einschließlich Eigenschaften, die typischerweise mit Männern assoziiert werden.

Die Begriffe „männlich“ und „weiblich“ wurden traditionell verwendet, um zu definieren, was es bedeutet, ein Mann und eine Frau zu sein. In der modernen Kultur des 21. Jahrhunderts werden diese starren Konzepte entwurzelt und neu definiert. Eigenschaften, die typischerweise mit Männern assoziiert wurden, sind nicht länger nur auf das männliche Geschlecht beschränkt.

Während des letzten Jahres habe ich meinen Körper wieder aufgebaut, um Qualitäten und Stärke darzustellen, die typischerweise mit Männern assoziiert werden, um sie dann auf mich selbst zu verschieben. Ich habe fast ein Jahr lang trainiert, um erfolgreich einen Mann in der Luft halten zu können.

Eine Frau hält einen Mann über ihren Kopf

Ich trainierte für dieses Foto ungefähr ein Jahr lang fünf bis sechs Mal pro Woche. Hinzu kam eine strenge Diät, um meinen Körper physisch aufzubauen. Zu der Zeit, als das Foto aufgenommen wurde, wog ich zusätzlich 25 Pfund durch die Muskelmasse. Der Mann, den ich halte, ist Meistertänzer im San Francisco Ballet und wir haben das Ganze nur einmal zusammen geübt, bevor es mit einer Fuji GFX 50s zum Shooting an den Strand ging.

Das Hauptziel meines Fotos ist, Geschlechterstereotype aufzubrechen und zu zeigen, dass Transformation möglich ist. Ich benutzte mich selbst, weil ich denke, dass der effektivste Weg meine Botschaft zu vermitteln, ist, diese Körperumwandlung persönlich zu erleben.

Das Foto wurde nun in der vergangenen Woche in den sozialen Medien mehr als 14.000 Mal geteilt, und ich bin demütig und überwältigt von der Menschenmenge, die es berührt hat. Ich denke, dass sich so viele Menschen wegen des aktuell lautstarken Klimas um das Thema, wie Frauen behandelt werden, mit dem Foto identifiziert haben. Dies war meine Art, zu dieser Diskussion beizutragen und Frauen zu stärken.

Körperliche Transformationen sind ein allgegenwärtiges Thema in meiner Arbeit. Ich bin inspiriert und ermutigt vom positiven Feedback zu diesem Foto und arbeite an ein paar weiteren Arbeiten rund ums Thema Identität. Das aktuelle Foto wird derzeit in San Francisco in der Kunstgalerie DZINE ausgestellt.


kwerfeldein – Magazin für Fotografie https://ift.tt/2CU91Wo

Sourced by Time Trap Photography sharing the best photography tips, news and tricks throughout the industry. Time Trap Photography is dedicated to freezing those special moments in life that can be revisited and admired for generations to come. - Shannon Bourque
Please visit our main site for booking availability and rates.


"Time


Receive valuable industry knowledge delivered free to your email each day.


"Time

How to Take Better Winter Landscape Photos

8:41:00 PM

Winter is personally my least favorite time of year – it’s cold, it’s depressing, there’s barely any sun out. But one thing that even I have to admit is that winter landscapes make for positively fantastic photographs – if you know how to approach them.  There are a couple of issues that even amateur photographers will notice when they take their camera out in December with the goal of photographing a beautiful snowy landscape.  The lack of contrast, the awkward low angle of the sun, and often the inability to find anything that stands out – primarily since everything is covered with snow.

winter landscape 3 If you want to get some fantastic snow shots in, I have some advice that might come in handy.

Keep it Bright

Due to the lack of contrast, it’s sometimes difficult to find a colorful element to stand out in the photo. It might seem really counterintuitive to overexpose an image when there’s sunlight bouncing off all that snow, but it does help the photo gain new life to a certain extent. I’m not talking crazy overexposure, just a touch to keep the photo from seeming overly gray and non-colorful. The highlights are actually a good point of reference for this – if they’re clipped then you’ve gone overboard and you need to turn it down a notch or two.

winter landscape 2 Courtesy of Pixabay

Cool, Not Warm

Choosing the right white balance can make all the difference in photographing winter landscapes. It doesn’t matter if you do it on-site or in post-processing, but winter photos will generally benefit from a cool white balance. The shadows in winter are naturally cool, so it’s better to overemphasize this with the adequate balance instead of trying to capture something warm. Not only will this reinforce the actual mood of the photograph, but it will also make it seem much more realistic with very little additional effort. It’s definitely a move you don’t want to skip, even if it’s just in post-processing.

winter landscape 4 Courtesy of Boris Misevic, Unsplash

Find Contrast

As already mentioned, it’s sometimes difficult to find adequate contrast when everything around you is completely white and covered with snow. It can be a challenge to find an element that can stick out in the photograph, but the good news is that as soon as you find anything it will stand out perfectly. Whether it’s a lake, a house or just about any piece of scenery, it is instantly recognized by the eye so you don’t have to do any additional work to make it interesting. Don’t settle for photos without contrast because they will seem a bit boring – but remember that as soon as you find any, it’s probably all that you need.

winter landscape 6 Courtesy of Asgeir Pall Juliusson, Unsplash

Manual Focus

The final problem that makes taking winter landscape photos a challenge is the focus, or rather, your camera’s inability to obtain autofocus under certain conditions. This is also partly due to the issue of low contrast. The camera lens practically works like a human eye, and if you’ve ever been exposed to snow after being in a dark room for a certain amount of time you know how hard it is to see anything (this is actually a condition known as snow blindness). There’s so much light bouncing off the snow that the camera lens has no idea what to favor. This is why it’s best to keep your camera on manual focus and adjust as needed because otherwise, the lens will just probably focus on the falling snowflakes instead.

winter landscape 1 Courtesy of Pixabay

The Bottom Line

As you can see, there’s more to taking winter photos than necessarily meets the eye. Of course, there are plenty more things to be said about winter photography, but I have a feeling that these few practical tips will be enough for now.

winter landscape 5 Courtesy of Camille Kmile, Unsplash

To sum up, remember to find contrast wherever you can, overexpose the image if necessary, always use manual focus and favor a cool white balance. Taking winter landscape photos is challenging but very rewarding if you do it right, and with enough practice, I’m sure you’ll be able to nail it.

For more on landscape photography, take a look at this link.

Credits:

Main photo by Sven Scheuermeier on Unsplash

Let's block ads! (Why?)


Photodoto https://ift.tt/2QaLsMT

Sourced by Time Trap Photography sharing the best photography tips, news and tricks throughout the industry.
Time trap photography><br></a> <hr><a href=Time trap photography tweet
Sourced by the Time Trap Photography guys https://ift.tt/1LW7xnO
Time Trap Photography is dedicated to freezing those special moments in life that can be revisited and admired for generations to come.

Couple Dies After Falling Off of Same Cliff in Viral Yosemite Photo

7:11:00 PM

The Yosemite cliff that served as the location of a now-viral marriage proposal is now also the location of a tragedy involving photography: A selfie at the same cliff’s edge has led to the death of a young couple according to reports from the Associated Press.

Image via Pixabay from Pexels.com.

Husband and wife Vishnu Viswanath and Meenakshi Moorthy were visiting the same Yosemite cliff where a still-unknown couple proposed. The two tragically fell to their deaths after taking a series of selfies together and separately at the cliff’s edge.

A site popular with tourists, the Yosemite cliff has a 1000 feet or 300 meter drop and features no railing or guard whatsoever. The couple had set up a tripod to take some photos and fell off of the edge of the cliff as they were doing so according to witnesses present there on October 23.

Oddly, no one noticed them fall but one tourist may have captured Meenakshi Moorthy prior to her fall off of the cliff. Sean Matteson told the Associated Press, “She was very close to the edge, but it looked like she was enjoying herself…She gave me the willies. There aren’t any railings. I was not about to get that close to the edge. But she seemed comfortable. She didn’t seem like she was in distress or anything.”

The couple’s tripod was still at the site in the morning and tourists alerted authorities who began the search, scouring the area below the cliff's edge with high-powered binoculars. There, at about 800 feet below down the slope, the couple was found dead.

The couple were very active on social media according to PetaPixel and posted pictures from Yosemite on the day of their deaths.

Deaths by selfie and falling from high places while taking photos is unfortunately common according to research we told you about earlier this year. The phenomenon has even led to calls for more restrictive measures in places popular with photographers and tourists.

Let's block ads! (Why?)


Light Stalking https://ift.tt/2yRJ8nB

Sourced by Time Trap Photography sharing the best photography tips, news and tricks throughout the industry. Time Trap Photography is dedicated to freezing those special moments in life that can be revisited and admired for generations to come. - Shannon Bourque
Please visit our main site for booking availability and rates.


"Time


Receive valuable industry knowledge delivered free to your email each day.


"Time

It Lives! Panasonic’s New 8K Camera First Ever with Internal Organic Image Sensor

6:16:00 PM

If you want to see the future today, look towards what the big guys are developing for film and broadcast. The product of a recent partnership between Panasonic and Samsung gives us a small glimpse of that tech. And we could see it out in the field as soon as the next Olympic games.

Image via Panasonic.

Back in February, Panasonic announced it had developed an organic image sensor capable of taking 8K video at 60fps and which also featured a “global shutter.” Accomplished in coordination with Korean tech giant Samsung, the AK-SHB810 comes seven years after the tech underpinning it was first patented, according to DPReview.

The camera is a head unit that connects to an off board processing unit via fiber optic cable. The new device is expected to debut next year and, it is hoped, the new units will be ready for Tokyo 2020 when Japan hosts the Olympics. Not only is Panasonic positioning this as an ideal broadcasting tool but also the Olympics would be the perfect showcase for it. A press release referenced by DPReview also discussed using the camera for feature film production.

CMOS sensors work by using the silicone as the light sensitive medium with the readout rate determining the shutter speed, or, as DPReview succinctly puts it, “the separation of the light gathering function of the sensor from the readout process and its circuitry”. In organic image sensors these two processes are completely independent of one another. This prevents the “rolling shutter” effect that distorts images and makes it ideal for indoor sporting events without a lot of flash. The way the internal organic image sensor works, bright bands of light won’t occur because of the global shutter.

As you can imagine, being professional-grade equipment none of this is going to come cheap.

Let's block ads! (Why?)


Light Stalking https://ift.tt/2zlu7tm

Sourced by Time Trap Photography sharing the best photography tips, news and tricks throughout the industry. Time Trap Photography is dedicated to freezing those special moments in life that can be revisited and admired for generations to come. - Shannon Bourque
Please visit our main site for booking availability and rates.


"Time


Receive valuable industry knowledge delivered free to your email each day.


"Time

Yongnuo Joins Mirrorless Camera Wars

5:26:00 PM

It was only a matter of time before the Chinese manufacturers started throwing down the gauntlet when it came to releasing their own hardware.

And Yongnuo looks set to be among the first.

Image via Yongnuo Facebook.

The mirrorless camera wars are about to get that much more real with Chinese accessories manufacturer Yongnuo joining the fray. Known for their lenses for Nikon and Canon, Yongnuo’s entry into the mirrorless segment is not really that surprising when you look at how the company has steadily built its portfolio over the years. The optical accessories company even took to Facebook to post the announcement. The company is also holding a naming contest for the new model, so you could potentially name the next great mirrorless camera.

In a design that looks like a combination of a smartphone with a Yongnuo YN 14mm f/2.8 lens attached to the front of it, the company hopes to combine the convenience of a smartphone camera with the capabilities of standalone mirrorless. It’s an awkward look, to be sure, but if it works well then it could really be a preview of things to come. After all, few devices for consumers outside of a smartphone sport a touchscreen of that size.

The two names for the model on offer are 4G Camera and Smart Camera, neither of which are terribly inspired but, hey, at least consumers get a vote on the matter. Both describe the niche the new camera is aiming for but neither really stand out in an already crowded market. Thankfully, if you think you have something better, Yongnuo is open to suggestions according to PetaPixel.

You can find out what name made it across the finish line in January 2019 when the new device officially debuts. You might want to vote in the contest – doing so could win you a Yongnuo YN 50mm f/1.8 lens for Nikon and Canon cameras.

Click on the link above to head on over to Yongnuo's Facebook page to find out the details surrounding the naming contest.

Let's block ads! (Why?)


Light Stalking https://ift.tt/2CT7JuN

Sourced by Time Trap Photography sharing the best photography tips, news and tricks throughout the industry. Time Trap Photography is dedicated to freezing those special moments in life that can be revisited and admired for generations to come. - Shannon Bourque
Please visit our main site for booking availability and rates.


"Time


Receive valuable industry knowledge delivered free to your email each day.


"Time

A Spooky Photo Of The Week And A Flying Fish – Here’s What You May Have Missed On The Forums

1:06:00 PM

We got a lot of action this week in both the latest Mobile Monday Challenge and the Weekend Photography Challenge, we also got 115 new light stalking members that are willing to share their images and knowledge with us at the forums and our beloved shark tank!

We all have stories to share, even when some have little to do with photography too but are useful too.

So here is what you missed this week on Light Stalking

Photo Of The Week – October 29, 2018

Photo by David Chesterfield

The POTW for this week goes to David Chesterfield, who has been mastering light painting for quite some time now. This image was posted in the most recent Weekend Photography Challenge depicting spookiness (the first image there is really disturbing).

What I find really important about David's work is the careful use of light painting that doesn't feel like an improvisation at all. The light trails are were they need to be, and the color decision is fundamental for the story he wants to tell.

This is an important message for all the people out there starting in photography that feel drawn towards light painting. It has to have a meaning and a reason, otherwise is just a random assembly of light.

We hope to continue to see more spooky photographs during this last days of October, and thanks David for sharing such a high quality image with us!

What Are Our Members Up To?

Here are some great shots from the participants at the 405th-weekend photography challenge, Light and Shadows:

Photo by Dave W.

The colors in this image are extremely beautiful and everything in this photograph is well balanced, the shadows are so subtle that they even enhance the point of view and support the color scheme. This is almost beyond a photograph and very nearly a graphic design. An extremely strong image from Dave.

Photo by Pamela Winter

This image wouldn't be as great if it weren't for the long shadows projected by all the subjects in the frame. It has a sense of dynamism that draws our attention into the subject. The decision of leaving the sun in the frame feels pretty honest too.

Photo by Karenhy

This is quite a find, and the soft shadows give the image a very warm quality, even though it is an empty and stark environment.

Photo by Deborah

Nature is perfect and has always been an inspiration for architects. This staircase is an obvious Nautilus. The beautiful shadows are offset by the amazing yellow light in the center of the spiral. Strong composition also supports this beautiful, almost surreal, image.

Photo by Clive Eariss

The way the huge shadows hug the subject in this frame makes it a really interesting piece of storytelling. The glaringly modern scene is offset by the woman, who is simply going about her daily shopping. Great juxtaposition

Photo by Rob Eyers

Please feel free to join to our friendly photography community if you haven't done already, and if you are a member, please check out the latest Weekend Photography Challenge for this week, but be careful, the first image is going to give me nightmares for sure

Discussions You Shouldn't Miss From The Community

Lenny is up to something, don't really know what, but he is. I can pinpoint two different and extremely interesting things he is doing. The first one is a photobook (because he has been asking about mixing color and black and white photography in a book), and besides that, he is also gathering photographers near his place, which is always a great thing for photographers.

Have you ever seen a fish flying? Well, Paul captured a beautiful flying fish flying low (it can't get much higher after all is a fish). I wonder how many frames he shot to capture this splendid wild-life moment.

Photo by bucweet

Did you know that you can make your photographic workflow way easier with specialized controllers? This week Taisya raised a pretty good question about these controllers, and I remembered one that is in my wishlist for making Lightroom even better. We hope to hear more from that controller because other members commented as well, and it does look interesting.

We learn more and more with questions like this one. This week Dahlia had a thing tickling her mind, and asked about how crop factors affect the effectiveness of aperture values. In simpler words, how cropped sensors (1.5 or 1.6 APS-C) affect aperture value on lenses. A lot of valuable information can be found at this thread after her question, and we are sure that it will be helpful for many people out there because is something camera companies rarely talk about. And, did you know that cinema lenses don't have f value but a t value? That and more can be found there at that post.

We'd Love To Hear Your Thoughts

Help these photographers become even better and more passionate about photography. Share your experience, feedback, comments, and critique over at the Tank

This forum is separate from the General Photo Chit Chat because we believe that constructive criticism is one of the best ways any photographer can have in order to progress in less time. Extended comments are way more nurturing and healthy than mere likes!

Let's block ads! (Why?)


Light Stalking https://ift.tt/2EVarCK

Sourced by Time Trap Photography sharing the best photography tips, news and tricks throughout the industry. Time Trap Photography is dedicated to freezing those special moments in life that can be revisited and admired for generations to come. - Shannon Bourque
Please visit our main site for booking availability and rates.


"Time


Receive valuable industry knowledge delivered free to your email each day.


"Time

Colors in Landscape Photography: How to Get it Right

6:49:00 AM

When it comes to colors in nature, landscape photographers have a unique opportunity to get the colors right whether it’s in camera or in post processing. There are several ways to make sure we can achieve the proper colors in landscape photography that suits the image and has an overall pleasing effect that will enhance our scenes.

I personally love color photography. The colors are what speak to me while out in nature. Getting the colors right for my final image is important to me.

Getting it Right in Camera

There are a few ways you can photograph your nature scenes to get it right in camera. By doing so you may not have to do much in post processing to be happy with the results of your photograph.

1. Check the Weather – Weather & lighting play a very important part in nature photography. Depending on the scene involved with your photograph you have in mind, be sure and plan accordingly. I have found that even shooting trees during a recent rain on a cloudy day can really enhance the colors of the leaves.

Another example is if you are photographing waterfalls you may want to plan to shoot on an overcast or rainy day. Sometimes these are the best conditions to photograph waterfalls for bringing out the colors in the surrounding foliage.

Example of colors in landscape photography during overcast day

Toketee Falls within the Umpqua National Forest, Oregon.

2. Using Filters – Circular Polarizing filters can enhance the colors already in your scene. I use them for cutting glare particularly on water but also to bring out the colors more as it can make the colors richer.

3. Check Your Histogram – Make sure to check your histogram to properly expose your image. It can be difficult to bring out the colors you see in the scene if your image is too dark. Always have the histogram handy to view when setting up your photograph.

Getting Colors Right in Post Processing

Photographers hear it all the time, “Is that Photoshopped?” I believe we get this question all the time because the general public that doesn’t have experience with photographing nature. They take the picture with a point and shoot camera or their smart phones. Shooting like that means they are letting the camera determine what the colors should be. The photos often may look either too dark because the dynamic range in those cameras often are not great or the colors may look unrealistic. They have come a long way however over the years and some of them do a much better job than others.

Photographers often shoot in raw so they can manipulate the image if needed in programs like Lightroom and Photoshop during post processing. The raw image allows us to bring out those colors more like we saw while out shooting the scene. Sometimes it even means desaturation of the image as the colors may be way to brilliant to make an overall beautiful photo.

Here’s an example of a photo I took that was much more saturated out of camera than I liked. I had to tone down the colors for my liking. It was photographed on a very cloudy, rainy day so the colors just popped!

Fall colors in nature photographed in Oak Grove, Oregon

Oak grove in Oregon photographed on a raining, overcast day.

There are ways you can enhance your images during post processing which I will highlight below.

  1. Adjusting saturation and vibrancy – You could always move the sliders in Lightroom to achieve this. It may or may not be needed, but adding a little might just do it.
  2. Dodging or Burning – I sometimes do a little dodge or burning in Photoshop to make the colors a little more brilliant. More like what I saw with my eyes out in the field. When dodging or burning areas of your photograph, you don’t necessarily need to use the default black or white. You can use the color picker to choose a color within the photo to bring in more of less of a color within the scene.

To do this, open your photo in Photoshop. Create a layer to burn or dodge. I use Tony Kupyer’s TK Actions which is quick and easy. The black would be to burn, the white to dodge.

For this example, I’m choosing to burn. You will need to click on the foreground color arrow to switch it from black or white. Should default to black. If so you are set. To burn, click on the black square in the bottom left. This will bring up the Color Picker (Foreground Color).

  • Processing colors in your landscape photo with burn layer in Photoshop.

    An example of creating a burn layer in Photoshop.

  • Photoshop screenshot of color picker tool

    Photoshop example of the Color Picker.

  • Brush Tool in Photoshop where you can change the size and hardness.

    Brush Tool in Photoshop where you can change the size and hardness.

Use the dropper to choose a color from your image. You can then dial it in by moving it around within the Color Picker. Once a color is chosen, you can use the Brush Tool to paint onto your scene where you feel it’s appropriate. I wanted to bring out the colors more in my clouds that I remember happening at the time I took the photo. Move the brush in a circular motion. Choose the brush size, hardness, and opacity. You may need to open a couple of layers to get the desired effect you want.

Example of colors in a landscape photo after post processing

After Post Processing: Zion National Park, UT

  1. Color Temperature – Maybe the color isn’t exactly right on your screen, as you’ve remembered it in the field. You can adjust the color temperature in LR or Photoshop to bring it closer to what you’ve envisioned. I find that sometimes warming up or choosing to cool down the scene a bit can get me the desired effect I want with my colors.

I’m sure there are other ways to get your colors right in your nature photography images but I hope these few tips will get you started in thinking about ways to change them to your liking. As always comment below if you have any questions or would like to share what you do!

About Author Patricia Davidson

Patricia Davidson is an award-winning outdoor photographer, specializing in landscape, commercial and editorial assignments, and travel photography. Patricia has spent the last 20 years living on the beautiful Southern Oregon Coast where she developed her landscape photography skills. Currently, she and her husband live nomadically, traveling in their RV throughout the western United States. With a background in the visual arts and web development, she sets out to produce images that express her artistic vision and passion for photography, as well as her love of nature and the outdoors.

Let's block ads! (Why?)


Visual Wilderness https://ift.tt/2Js6Drl

Sourced by Time Trap Photography sharing the best photography tips, news and tricks throughout the industry. Time Trap Photography is dedicated to freezing those special moments in life that can be revisited and admired for generations to come. - Shannon Bourque
Please visit our main site for booking availability and rates.


"Time


Receive valuable industry knowledge delivered free to your email each day.


"Time

31. Oktober 2018

5:04:00 AM

Das Bild des Tages von: Catharina Rittmann


kwerfeldein – Magazin für Fotografie https://ift.tt/2P1EGfN

Sourced by Time Trap Photography sharing the best photography tips, news and tricks throughout the industry. Time Trap Photography is dedicated to freezing those special moments in life that can be revisited and admired for generations to come. - Shannon Bourque
Please visit our main site for booking availability and rates.


"Time


Receive valuable industry knowledge delivered free to your email each day.


"Time

How The Death Of Minolta Gave Rise To Sony Cameras

5:01:00 AM

Put your virtual hands up if you own a Sony camera.

Quite a few of you I'm betting.

Now keep those hands up if you remember Minolta cameras. Hmmm, quite a lot less. The thing is, that at the beating heart of your amazing Sony Alpha is the DNA of a great camera company, long since past, Minolta.

Minolta was never a giant like Nikon and Canon, they would probably be regarded as a level down from the two behemoths yet, significant amounts of the technology, not only in your Sonys but also pretty much any other modern DSLR or mirrorless camera comes from the innovation of Minolta through the 70’s, 80’s and 90’s.

Today we are going to look at how a failing film company lives on in one of the world’s most successful photographic brands. 

Minolta: The Film Days

PASM is an acronym many of us know. It stands for Program, Aperture Priority, Shutter Priority, and Manual. Despite its ubiquitousness on modern cameras, it has only been around for 40 years or so and it was Minolta that introduced it to the world.

The camera was the Minolta XD-7 (or XD-11 in the U.S.) and it was one of the best regarded and technologically advanced cameras of the time. Perhaps more than any other camera, it signaled, Minolta’s intent to innovate. 

The genesis for the PASM we know and love today. By Camerafiend CC 3.0

Another feature we take for granted today is autofocus and again it was Minolta that brought this to the photographic world. Although there had been autofocus before, these used specialized and expensive lenses with the autofocus function built into them. Here Minolta innovated and the Minolta 7000F integrated the autofocus into the camera body, leading to the lighter faster lenses we see today.

But that was not the only innovation of the 7000F. It also featured an integrated, motorized film advance into the camera body. Until then, cameras required an expensive and battery intensive attachment to power wind the film. The DNA of this Minolta innovation lives on in the continuous shooting modes that all digital cameras have today.

There is one other innovation that the 7000F introduced to the world, one that is still at the very heart of Sony cameras today, the A-mount system. It is the name that gave birth to the Sony Alpha system.

In-camera autofocus traces its roots back the Minolta 7000. By Montauk Public Domain

Minolta: Early Digital Days

Unlike some other big players in the photographic industry, Minolta was not caught unawares by the digital revolution. Indeed they launched their first digital camera way back in 1995, the 1.75mp Minolta RD-175. Not only was this a digital camera, but it was also a DLSR. It was not the first DSLR, that honor went to Kodak but it was the first DSLR that was hand portable and more importantly, affordable to the consumer market. 

The world's first affordable DSLR. By Rama CC 2.0

Even in the early days of digital, Minolta’s innovation could not be held back. Another feature commonly found on modern cameras is sensor based stabilization. This stems from Minolta’s Dimage A1, a 5mp bridge camera released in 2003.

Rather than use the more complex and expensive method of stabilizing elements within a lens, the A1 moved the camera sensor instead. Incidentally, the bridge camera is also a Minolta innovation, rising from the release of the DiMAGE 7. 

Being one of the smaller camera companies, Minolta struggled financially, to keep up with the big players. In 2003, in an attempt to boost funds, they merged with the much larger film company, Konica, becoming Konica Minolta Ltd.

However, Minolta’s earlier failed attempts to capture a segment of the professional film camera market signaled its eventual downfall. Minolta’s digital cameras were mainly aimed at the consumer market at a time when the big digital players realized it would be the professional market that would drive initial demand. 

 The Arrival Of Sony.

By the early years of the millennium, Sony was a massive, global electronic brand manufacturing a diverse range of products from audio to televisions. Their relatively small digital camera business was, like Minolta, focussed on the consumer market.

They did, however, recognize the wealth of innovation and engineering talent that Konica Minolta still possessed and in 2006 created a new partnership with them. Six months later, Konica took the decision to leave the camera business altogether and sold it to Sony. 

Sony had been looking to get into the DSLR market and Minolta was a perfect match and in particular Minolta’s technologically advanced Alpha mount. 

Within a year, Sony had their first DLSR ready for the market, the Alpha A100. It was a 10.2mp camera, very much built around an older Minolta design and featuring many of Minolta’s innovations. These included in-camera stabilization and eye start autofocus. 

Taking much of Minolta's design and technology, the A100 was Sony's first DLSR. By Holger Fink Public Domain

The A100 was the launch pad. Sony’s vast wealth allowed them to create an ambitious roadmap of camera releases. This culminated in 2008 with the announcement of a full frame DSLR with the largest pixel count yet seen, 24.6mp, the Alpha 900.

It signalled Sony’s intent to play with the big boys. 

Shots fired at the big boys. The a900. By Yorkfield CC v3.0

Using Minolta’s base technologies and their own innovations, Sony continued with their ambitious plans, releasing a wealth of well-received products both in the DSLR and compact markets. 

Realizing the potential of the emerging mirrorless market, Sony went all out on producing the world’s first full frame mirrorless camera, the Alpha 7. By now the fabled Minolta Alpha mount had been superseded by Sony’s own E-mount but, if you dig deep, you'll find a significant amount of the DNA of the Alpha 7 comes from the innovation of Minolta. 

The mirrorless revolution is being driven by Sony. By Jürgen Matern CC v3.0

Perhaps the moral of this story is that not all photographic companies that fail, end up in the dustbin of history. While there might not be very much left of companies like Kodak or Bronica, the innovation of Minolta lives on deep inside one of the most successful photographic brands of the modern era.

As someone who was a rare Minolta professional user in the 1990’s that brings a warm glow to my heart. 

As always, give us your thoughts in the comments below.

Let's block ads! (Why?)


Light Stalking https://ift.tt/2qjhHxZ

Sourced by Time Trap Photography sharing the best photography tips, news and tricks throughout the industry. Time Trap Photography is dedicated to freezing those special moments in life that can be revisited and admired for generations to come. - Shannon Bourque
Please visit our main site for booking availability and rates.


"Time


Receive valuable industry knowledge delivered free to your email each day.


"Time

Tuesday, October 30, 2018

Mein liebstes Tool: Die Tonwertkorrektur

11:09:00 PM

Sicht auf Landschaft.

In unserer Artikelserie „Mein liebstes Tool“ stellen verschiedene Fotograf*innen ihr liebstes Werkzeug im Prozess der Bildbearbeitung vor. Es mag banal erscheinen, wenn ich hier die Tonwertkorrektur erwähne – aber sie ist mir wirklich behilflich im Workflow.

Die Tonwertkorrektur ist bei vielen Bildern häufig das erste und einzige Tool in Photoshop, dem Werkzeugkasten meiner Wahl, das zum Einsatz kommt. Aber statt ein Bild insgesamt heller oder dunkler zu regeln, habe ich dabei ein anderes Ziel: Farbschleier entfernen. Die meisten Fotografien erleiden auf dem Weg durch Objektiv und Film oder Speicherkarte weiter auf den PC oder Laptop Übersetzungsschwächen in der originalgetreuen Farbwiedergabe. Und auf die habe ich es dann mit meinem liebsten Werkzeug abgesehen.

Ansicht einer Bildschirmoberfläche innerhalb eines Programmes.

Erblicken wir die Abbildung der Tonwertkorrektur, ist vielleicht die Idealdarstellung nach richtig eingestelltem Fotografieren bekannt, die ein wenig an den kleinen Prinzen erinnert: Eine Schlange, die einen Elefanten verschluckt hat. Eine ausgewogene Ansicht mit ausgeprägten Mitteltönen und reinem Schwarz (links) sowie reinem Weiß (rechts).

Schaut man nun genauer hin, fällt bei einigen Bildern auf, dass der Regler rechts und links teilweise gar keine Informationen enthält beziehungsweise anzeigt, sondern diese erst wieder im Bereich der Mitten auftauchen. Nun folgt der minimale Einsatz meines liebsten Werkzeugs.

Ansicht einer Bildschirmoberfläche innerhalb eines Programmes.

Ansicht einer Bildschirmoberfläche innerhalb eines Programmes.

Unterhalb der Darstellung Eurer Bearbeitungsebenen wählt Ihr mit dem Symbol des halb weißen und halb schwarzen Kreises eine neue Misch- bzw. Einstellungsebene „Tonwertkorrektur“ aus. Dies hat den Vorteil, dass Ihr gegebenenfalls durch diese überlagerte Ebene punktuell Korrekturen vornehmen könnt.

Ansicht einer Bildschirmoberfläche innerhalb eines Programmes.

Durch die zusätzliche Einstellungsebene könnt Ihr beispielsweise nur den Himmel durch Schwärzen des Bereichs in der ausgewählten Ebene von der Bearbeitung wieder ausnehmen.

In den jeweils einzelnen Kanälen (oben ist insgesamt als Standard RGB angezeigt, mit einem Klick kann man dort die einzelnen Kanälen auswählen), bewegt man die Regler nun jeweils bis an den Beginn der abgebildeten Informationen (siehe Bild). Hierbei verschieben sich die Farben in der Abbildung, was mitunter sonderbar aussehen mag, da es Farbstiche ergibt, diese relativieren sich aber in der Regel, wenn man alle Kanäle bearbeitet hat. Das Ergebnis ist dann, dass insgesamt die Abbildung brillanter in ihrer Farbwiedergabe ist und so etwas wie ein leichter Grauschleicher vom Bild verschwunden ist. Die Farben sind aber nicht nur brillanter, sondern meist auch deutlich realistischer.

Ansicht einer Bildschirmoberfläche innerhalb eines Programmes.

Dieser Farbstich ist nach abgeschlossener Bearbeitung aller Kanäle nicht mehr vorhanden.

Schwierig wird es teilweise bei gewagten Mischlichtsituationen. Da kann es teilweise helfen, an den Reglern zu drehen, bis das Ergebnis der aufgenommenen Situation entspricht. Es gab jedoch auch schon Bilder, bei denen ich nicht zu 100 % überzeugt war von der Tonwertkorrektur in ihrer vollen Gänze. Hier kann es manchmal helfen, einfach die Intensität zu verringern, indem man die Bearbeitungsebene auf zum Beispiel 50 % Sichtbarkeit durch die Deckkraftoption der Bearbeitungsebene reduziert.

In Kombination mit der Gradationskurve bedarf es für viele meiner Bilder keiner weiteren Bearbeitung. Zu meinem Standardprozedere gehört bei digitalen sowie eingescannten Bildern mittlerweile die Reihenfolge Ausschnitt korrigieren/festlegen, Tonwertkorrektur, Gradationskurve und gegebenenfalls Staub wegstempeln. That’s it! Probiert es gern aus und berichtet von Erfolgen (gern mit Bild), Problemen oder weiteren Erkenntnissen!


kwerfeldein – Magazin für Fotografie https://ift.tt/2Rt9WBn

Sourced by Time Trap Photography sharing the best photography tips, news and tricks throughout the industry. Time Trap Photography is dedicated to freezing those special moments in life that can be revisited and admired for generations to come. - Shannon Bourque
Please visit our main site for booking availability and rates.


"Time


Receive valuable industry knowledge delivered free to your email each day.


"Time

Apple iPad Pro Tackles Massive Files in Adobe Photoshop Product Demo

7:23:00 PM

Word that Adobe was bringing the full-flavor version of Photoshop to the iPad line was a welcome bit of news for creatives everywhere that use Apple and Creative Suite products, but many were still skeptical that the tablet would have the chops to compete with the desktop, Creative Cloud-powered version.

Image via Apple.

Not only is the new Photoshop app up to almost any task you could throw at it, but Apple showed it editing a 3GB .PSD file like there was nothing unique about the whole setup. Part and parcel with the unveiling of the new iPad Pros was the reveal of the next-gen Apple Pencil that magnetically attaches to the iPad Pro and recharges wirelessly. There is also a next-gen Smart Keyboard Folio that provides a full-sized keyboard for the new iPad Pros. Aimed at productivity consumers, the keyboards are not only the same size as most desktop computers but also never need recharging.

Alongside the announcement of two screen sizes for their vaunted iPad Pro line, an 11” and 12.9” screen respectively, Apple also showed off edge-to-edge retina displays with the A12X bionic chip powering it all. For all of their new features, the Cupertino company still found a way to make the tablets even thinner than their predecessors. The new iPad Pro will have up to 1TB of storage and 10 hours of battery life according to PetaPixel’s report on the unveiling. The 11 inch and 12.9 inch tablets can sport hard drives of 64GB, 256GB, 512GB, and 1TB in a silver or gray finish.

Apple got rid of the old lightning ports on the new iPad Pro models in favor of a USB-C connector that is capable of handling large data transfer loads as well as outputting to a 5K display. Like the smaller iPhone models, the new iPad Pros come with a 12MP camera for Smart HDR photos as well as 4K video. The new models also have a True Depth camera for selfie shots.

Prices will start at $749 with the Apple Pencil registering at $129 and the Smart Keyboard Folio for $179 and $199. The new iPad Pro should be available at retail beginning November 7.

You can watch an unveiling of the new iPad Pro lineups here on YouTube.

Image via Apple.

Let's block ads! (Why?)


Light Stalking https://ift.tt/2zeTnBI

Sourced by Time Trap Photography sharing the best photography tips, news and tricks throughout the industry. Time Trap Photography is dedicated to freezing those special moments in life that can be revisited and admired for generations to come. - Shannon Bourque
Please visit our main site for booking availability and rates.


"Time


Receive valuable industry knowledge delivered free to your email each day.


"Time

Time Trap Portrait Instagram Photo - October 30, 2018 at 04:47PM

5:19:00 PM


Shared by Time Trap Photography Instagram page. I'm dedicated to freezing those special moments in life that can be revisited and admired for generations to come. - Shannon Bourque
Please visit our main site by clicking on the logo below for booking, availability, and rates.  


"Time


Receive valuable industry knowledge delivered free to your email each day.
"Time

6 Fundamental Composition Techniques That Will Improve Your Portraits

5:03:00 AM

Humans can be one of the most interesting subjects to photograph because of their varied character and personality and when creating a portrait, just like any other genre of photography, you will need to give importance to composition in order to create visual impact and connection with the viewer.

A portrait needs to convey the character and mood of the person and composing a portrait can be a bit tougher than you might think.

In order to create engaging portraits and not snapshots, you need to have the skills and technical knowledge in making portraits.  Here are six composition techniques that can be used to improve your portraits.

1. Place the Eyes on the Upper Third:

You may all have heard about the basic rule that most photographers start with – the rule of thirds. In order to create a visual impact in your portraits, when shooting in portrait mode, it is best to have the eyes of the subject on the upper third of the frame.

If you are shooting in landscape mode, then going by the rule of thirds, it is good to have the dominant eye of the subject on or near one of the vertical lines of the rule of thirds grid.

2. Fill the Frame:

When making a portrait, you are capturing the character and features of the person. So do not hesitate to get close and fill the frame with your subject’s face. Do not limit yourself to just the headshots, but try filling the frame when you do head and shoulders shots, medium shots or three-quarter shots.

3. Frame your Subject With Frames Within the Frame:

When making portraits, you do not have to eliminate or blur the background, instead use the elements like doors, windows, lines, etc. to frame the subject to keep the viewer's attention on your subject.

You can also use elements like windows, doors, arches or any other natural or manmade structures in the foreground to frame your subject to create visually interesting images.

4. Use Lines to Lead the Viewer to your Subject:

Lines are another interesting feature when it comes to composition for any genre of photography. They can be so powerful and be used to lead the viewer into the frame to your subject.

5. Leave Space in Front of the Subject:

This is a very important technique that needs to be taken care of. If you are making a portrait where the subject is looking to one direction, then, always leave space in the direction your subject is looking into (in front of them)  just like how you would leave space in the direction of movement of your subject.

6. Use a Different Angle or Perspective:

Do not stop with just straight up shots at eye level, but change angles to show your subject from a totally different perspective. You can get higher or lower or move to the left or right of your subject to get the right composition and personality of your subject. It also helps avoid certain distracting elements behind or around your subject.

These are some of the many composition techniques required to create stunning portraits, but with the techniques mentioned here, you can create beautiful well-composed portraits. Once you master these techniques, do not hesitate to break these techniques in a creative way.

Further Resources:

  1. 6 Tips To Capturing Better Eyes in Portrait Photography
  2. 5 Mistakes Beginners Make In Portrait Photography And How To Avoid Them
  3. 5 Surprisingly Simple Tips For Stunning Black And White Portraits
  4. 5 Free E-Books on Photographing Candid Portraits
  5. Bite Size Tips – Capturing Classic Portraiture Compositions

Let's block ads! (Why?)


Light Stalking https://ift.tt/2RrrE8n

Sourced by Time Trap Photography sharing the best photography tips, news and tricks throughout the industry. Time Trap Photography is dedicated to freezing those special moments in life that can be revisited and admired for generations to come. - Shannon Bourque
Please visit our main site for booking availability and rates.


"Time


Receive valuable industry knowledge delivered free to your email each day.


"Time

About Us

Time Trap Photography is dedicated to freezing those special moments in life that can be revisited and admired for generations to come. - Shannon Bourque

The lens in focus

“Life is like a camera. Just focus on what’s important and capture the good times, develop from the negatives and if things don’t work out, just take another shot.” — Unknown

TIME TRAP PHOTOGRAPHY COPYRIGHT 2016