Sunday, June 30, 2019

Day to Night: 24 Stunden in einem Bild

10:07:00 PM

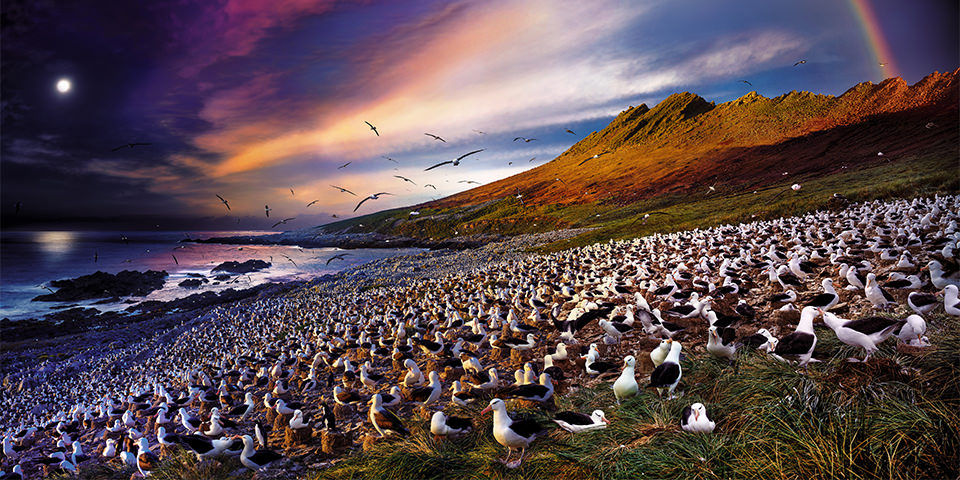
Euch verwirren die Bilder von Stephen Wilkes? Das ist nur natürlich, denn die gezeigten Momente sind nicht real. Er rafft die Zeit eines ganzen Tages in ein einzelnes Bild. Dafür nimmt er etwa 1.500 Fotos aus derselben Perspektive auf und wählt die schönsten Momente des Tages und der Nacht aus. Mit der Zeit als Leitfaden lässt er dann all diese Momente nahtlos zu einem einzigen Foto verschmelzen.

Seit Jahren reist er für seine ungewöhnlichen Zeitraffer rund um die Welt. Er konzentriert sich dabei auf diese ikonischen Wahrzeichen, die er buchstäblich in ein anderes Licht rückt: Zu sehen sind der Palio di Siena, das Kumbh Mela in Indien, der Grand Canyon, der Markusturm in Venedig, die Tulpen von Amsterdam und viele mehr.

Seine besten Aufnahmen werden nun im Buch „Day to Night“ im Verlag Taschen veröffentlicht. Hier findet man auch Detailansichten der Bilder, denn gerade in den Details verstecken sich die besonderen Geschichten. So entdeckt man erst beim ganz genauen Betrachten das glückliche Mädchen mit einzelner Tulpe im riesigen Tulpenfeld, die mittelalterlichen Gewänder der Menschen bei Stonehenge oder das Brautpaar bei einer Fotosession im Park.

Der Monitor ist deshalb nicht wirklich das richtige Medium für Stephens Arbeiten, aber ich hoffe, Ihr bekommt dennoch einen ersten kleinen Eindruck dieser gewaltigen Panoramen. Vielleicht haben wir ja mal Glück mit einer Ausstellung in Deutschland. Man kann sicher sehr lange vor einem Bild stehen, bis man wirklich alles erfasst hat!

Wasserloch mit Tieren

Nationalpark Serengeti, Tansania, 2015.

Brooklyn Bridge Park

Brooklyn Bridge Park, New York City, 2016.

Paris

Champs de Mars, Paris, 2014.

Verschneiter Park

Central Park, New York City, 2010, nach einem Schneesturm.

Grand Canyon

Südrand des Grand Canyon vom 70 ft hohen Desert View Watchtower aus gesehen, Arizona, 2015.

Ein Platz voller Menschen

Ein Paar umarmt sich im Strom der Fußgänger auf dem Londoner Trafalgar Square, 2013.

Moonfeld

Bergen, Niederlande, 2016.

Steinkreis

Stonehenge, England, 2016.

Kanal mit Gondeln

Gondolieri befahren den Canal Grande in Booten und Gewändern im Stil des 16. Jahrhunderts für die jährliche Regata Storica in Venedig, 2015.

Noch nicht genug? Dann schaut Euch unbedingt den TED-Talk an, in dem Stephen noch genauer auf seine Intention und die Vorgehensweise eingeht:

Informationen zum Buch

„Day to Night“ von Stephen Wilkes
Sprachen: Deutsch, Englisch, Französisch
Einband: Hardcover
Seiten: 260
Maße: 33 x 41,9 cm
Verlag: Taschen
Preis: 100 €


kwerfeldein – Magazin für Fotografie https://ift.tt/2XallIM

Sourced by Time Trap Photography sharing the best photography tips, news and tricks throughout the industry. Time Trap Photography is dedicated to freezing those special moments in life that can be revisited and admired for generations to come. - Shannon Bourque
Please visit our main site for booking availability and rates.


"Time


Receive valuable industry knowledge delivered free to your email each day.


"Time

The Circle of Confusion Doesn't Deserve That Name

8:20:00 PM

The Circle of Confusion Doesn't Deserve That Name

There's a specific term used in photography that causes a great deal of confusion. Photographers young and old run in fear when they hear its name. Oh, did I forget to mention? That term is none other than the "circle of confusion."

Somewhere along the way, most photographers have heard of the circle of confusion. They were forced to because it was somehow important. It's just that they'd rather not talk about it for fear of letting on that they still don't understand what it is. The first rule of the circle of confusion seems to be not mentioning the circle of confusion.

But the circle of confusion doesn't really need to be confusing. This circle thing is actually a lot simpler than its confusing moniker implies. The truth is, the circle of confusion doesn't deserve such a bad rap.

By way of explanation, allow me to start with a consideration of the night sky. Specifically, the appearance of stars in the night sky. As is our own sun, each star is quite large but since it's also quite far away, it appears to us here on earth as a pinpoint of light. Some stars are bright and some more dim, but they all look basically as dots in a sea of black.

If we now take a photo of the sky, we would expect to see those same points of white in a sea of black. If instead, we see a photo with nothing but fuzzy blobs and splotches in place of stars, we know that we goofed and forgot to focus our camera before firing the shutter release. Hey, it can happen. Oops, those look more like fuzzy discs instead of sharp points. Like it's never happened.

Now let's instead suppose we take a look at our results and find it hard to make a judgement. Somewhere between the extremes of sharp points of light and blurred, out of focus blobs of light it stands to reason there must be some point where we really can't say if things look sharp to us or not. A little bit further one way and we're certain our results look sharp. A little bit further the other way and we're equally certain it's a blob. But there's no clear-cut dividing line between sharp and unsharp. Somewhere in the middle, try as we might, we simply find ourselves unable to say one way or the other as to sharpness or lack thereof. Somewhere between the two ends of certainty lies uncertainty. Or to put another way, at the cross-over between certain sharpness and certain blur we pass through a stage of confusion.

At one extreme, we see tiny points. At the opposite extreme, we see fuzzy discs that are clearly larger than points. The diameter of disc at which we can't help but be confused as to whether we see sharp points or not is the circle of confusion, often abbreviated as CoC. A circle with a diameter smaller than this will still look like a point. A circle with a large diameter won't. Somewhere in between, well, we'd have to admit to being confused on the matter.

Any given lens can achieve exact focus at only a single distance at a time. You can focus closer (up to a certain point) or further away (to the horizon also known as infinity focus), but whatever distance you choose will be the only distance that is technically one hundred percent in focus. But objects at distances close to that focus point will appear sharp because they aren't sufficiently blurred to cause any confusion. Any distinct points on that object will still appear sharp so long as they fall within a range of distances near the actual focus point, thanks to our friend, the circle of confusion. Anything that lies within this depth of field will still appear to us as sharp. Things beyond this range will increasingly look blurry.

When you look at something right at the limit of acceptable sharpness for the current depth of field, you'll be a bit confused, unable to say whether they are sharp or not. If you just look casually or from a distance, you might be willing to say something looks sharp. If you examine it close up though, you may be more apt to say it doesn't. And this is the thing with the circle of confusion. It depends on how close you look and how picky you want to be as to what you would consider sharp, blurry, or confusing. And it's for this reason that you will see some disagreement (dare I say "confusion?") as to what value is acceptable to use for the circle of confusion when creating all those depth of field and focus calculators all over the internet. That is to say, some people feel a need to hold sharpness to a closer standard than do others. When it comes right down to it, it depends on how large the final viewed print will be, and from what distance will people be looking at it. An image for a billboard can be surprisingly soft if viewed up close. Luckily for the advertiser (and photographer) billboards are generally viewed from distances sufficient to make many such issues irrelevant. There's no need to hold them to the same standard as a magazine cover or typical print hung on the wall that has different viewing expectations and circumstances.

From all this it should be clear that any depth-of-field or sharpness calculation is predicated on the assumptions made in the choice of circle of confusion. But there's more. Circle of confusion values are generally quoted in terms of sizes on the recording sensor or medium. And since an image shot on a smaller sensor will require a greater degree of enlargement to reach any given final print size than would one shot on a larger sensor, a different standard for CoC will be called for in one expects the resulting images to be equally sharp, regardless of sensor. For sensors somewhere around the 35mm "full frame" format, typical CoC values will be somewhere around 0.025mm, give or take. It's a little confusing.

If at this point, you're starting to wonder if you understand this whole "circle of confusion" confusion but aren't really quite sure one way or the other, congratulations. Welcome to the circle of confusion – that place where you just can't tell if you understand the "circle of confusion" or not. Maybe we'd better just agree not talk about it.

Let's block ads! (Why?)


Earthbound Light Photography Tips https://ift.tt/2Xd2Kvu

Sourced by Time Trap Photography sharing the best photography tips, news and tricks throughout the industry. Time Trap Photography is dedicated to freezing those special moments in life that can be revisited and admired for generations to come. - Shannon Bourque
Please visit our main site for booking availability and rates.


"Time


Receive valuable industry knowledge delivered free to your email each day.


"Time

SLC-2L-07: Journalist Hope Kahn

2:02:00 PM

Hope Kahn is a Maryland-based journalist who is doing all of the sorts of things I was doing at her age: honing her writing and reporting skills, putting out a student newspaper, and always scrambling to find a good local story.

Over the last couple of years she's been punching above her weight class, having been published in national outlets such as Ms. and The New York Times. Suffice to say those are not exactly things I had accomplished before graduating high school.

Her work in the #SinceParkland project is a fantastic example of a product of Generation Lockdown working to effect real change.

Recently we did some head shots that will hopefully allow her to start visually branding herself as the serious, thoughtful journalist she is fast becoming. The setup we used was classic Lighting 101 head-shot-in-a-corner fare, with an L102 and L103 twist.
__________

L101: Corner = Backdrop and a Reflector

The first level of the lighting in this photo is how manipulating the environment contributes to the look. For a corner headshot, you are using the back wall as a backdrop and the side wall as a reflector.

You can control the darkness of the backdrop by adjusting the ratio of the distance of light-to-subject vs. light-to-backdrop. In this case, the lights are very close to Hope, which will tame that wall behind her even though she is only a couple feet away from it. At this working distance, we were able to tame the cream-colored wall and take it down closer to a medium gray.

And we are also 2-3 feet away from the camera right wall, AKA our reflector. So that will provide modest legibility in the camera-right shadows.

L102: Apparent Light Size

There are a few things going on here. If we look at a pullback, you can see we are using two of the $33 soft boxes that we talked about earlier in Lighting Cookbook.

One, they are pretty close. So they are going to create soft shadows, a nice highlight-to-shadow transition and soft specular highlights.

Two, when stacked they affectively make one big light source. But because of the orientation of the lights (key light pointing down and fill pointing up) the light is going to hit her face from more angles than would a planar light from a single, 2x6-foot strip. Thus, two 2x3-foot boxes are going to appear softer than the equivalent double-sized light source.

This effective light source is spread across many square inches. And since it is so close, the apparent size of the ganged source looks huge when viewed from the position of Hope's face. This makes for soft and understated catch lights in her eyes, because the per-square-inch lumen density is so low.

Check a bigger version of the photo to see what I mean. Bonus: were she wearing glasses, a light source reflection that subtle would fill up the glass, and allow you to see right through it to her eyes without distraction.

That muted catch light is a proxy for the type of speculars you can expect on a person's skin, as mentioned above. In this case it's the difference between shiny, and glow.

Three, this curved, ganged setup is better than a big strip light in that it is not only articulated but the fill is pulled over a little bit to camera right. This lets me reach in and fill those shadows on her face at camera-right.

L103: Chromatically Complex

Lastly, if you look at the pullback you'll see (where the flashes meet the soft boxes) that I am pushing warm light through the key and cool light through the fill. It's not much: a Rosco 08 up top and a 1/2 CTB on bottom.

Having all but sworn off white light, that's about the minimum I would use on a person. Honestly, it is all but invisible. The light and skin tones just look more "real," as compared to the sterile, unrealistic look of white light.

And while it is subtle, you would certainly notice its absence by comparison. For those who normally use a 1/4 CTO as a standard warming gel, the Rosco 08 is similar but with a little less red. The color family is called straw. An R09 is the same, but a bit stronger.
__________

[BTS / 360]

It's kind of cool how what is essentially a simple head shot also mirrors the evolution of the lighting on this site—and by extension the evolution of my own lighting journey.

But just as important — more important, really — is why a head shot like this happens in the first place. While my kids Ben and Emily were still at Wilde Lake High School, much of my spare shooting bandwidth gravitated towards the things they were involved with: band, soccer, theatre, STEM competitions, etc. And if your own kids are in high school and you are not doing this, you're missing out in so many ways.

And having also been shooting for the Howard County Arts Council for the past ten years, I have really grown to enjoy photographing young people at transitional points in their lives. Specifically, young people who have already become dedicated to something.

I have watched the HCAC young artists move on to some amazing careers. And it's been wonderful to have worked with them at a time when visual assets could help them to shape young emerging brands.

So even though my own kids are moving on, I want to keep on the lookout for people in this age group who are showing both dedication and promise in their fields. This is an exciting time as they prepare to jump into the deep end. My hope is that photos, done now, can help to nudge some arcs in little ways at the right time to help to shape their futures.

For those of you looking for your own ongoing projects, I would very much recommend giving thought to what is important to you, and how you might start to shape and affect those things as a photographer.

FROM: Strobist Lighting Cookbook

Let's block ads! (Why?)


Strobist https://ift.tt/2KNjwQj

Sourced by Time Trap Photography sharing the best photography tips, news and tricks throughout the industry. Time Trap Photography is dedicated to freezing those special moments in life that can be revisited and admired for generations to come. - Shannon Bourque
Please visit our main site for booking availability and rates.


"Time


Receive valuable industry knowledge delivered free to your email each day.


"Time

4 Ways To Use Symmetry For More Interesting Images

8:05:00 AM

Symmetry is defined as “the quality of being made up of exactly similar parts facing each other or around an axis.” Or “correct or pleasing proportion of the parts of a thing.” Or “similarity or exact correspondence between different things.”

The fact that symmetry provides a sense of balance and harmony is primarily why humans are drawn to this particular geometric characteristic.

4 Ways To Use Symmetry For More Interesting Images
  • Claim Your Free Camera Craft Cheat Sheet

Print it out and keep it for when you really need it - when you're out shooting!

Now that you know the potential visual impact that symmetry delivers, here are 4 easy yet effective ways to incorporate symmetry into your photos.

Horizontal Symmetry

Horizontal symmetry lends itself perfectly to scenes in which a body of water is present. Taking a cue from the rule of thirds, create an imaginary line across the frame (upper or lower third or in the center).

Your subject will appear on one side of the line, and the reflection will appear on the other.

Keep in mind that this reflective symmetry is simply a kind of horizontal symmetry. There are many ways to achieve horizontal symmetry that doesn’t involve a reflection, but the basic principle of having identical (or similar) objects on either side of a horizontal axis remain.

4 Ways To Use Symmetry For More Interesting Images

Vertical Symmetry

Buildings, roads and columns are fantastic facilitators of vertical symmetry.

In practical terms, vertical symmetry is probably a bit simpler than horizontal symmetry, as you’re usually looking to just split the frame in half from top to bottom and have each side “match.”

This is a commonly used technique with architectural elements, but vertical symmetry can be applied to just about anything, including landscapes, still life and group portraits.

4 Ways To Use Symmetry For More Interesting Images

Radial Symmetry

This refers to anything that radiates outward from a central point — water ripples, the spokes of a bike tire, domes, succulent plants, etc.

Radial symmetry tends to invoke a sense of spiralling or inward/outward motion. So, in addition to the balance created by the overall symmetry, you can also play to the viewer’s perception of movement.

4 Ways To Use Symmetry For More Interesting Images

Adding An Element

Symmetry works well in a wide range of applications, but it’s especially easy to use when patterns are present. Patterns are all around us, both human-made and nature-made. While we have focused up to this point on merely establishing symmetry, I should mention that another way of working with symmetry is to break it.

Breaking symmetry isn’t about distractions, as some might think, but about introducing tension via a strong point of interest.

In the photo below, the four black spaces interrupt the repetition of all the green spaces. In artistic terms, it’s a welcome interruption that helps establish greater visual interest in the image.

4 Ways To Use Symmetry For More Interesting Images

Final Thoughts

Taken on its own, symmetry is a simple concept that’s relatively easy to use in a photo. But to use it well, to use it to create unique and captivating images takes time, practice and experimentation.

But while you’re busy nailing down the different ways to incorporate symmetry into your work, don’t forget about overall composition.

Basic composition guidelines still have a function. Indeed, the joining of symmetry and the rule of thirds or filling the frame, for instance, has the potential to lead to the most visually arresting images you’ll ever make.

Further Reading

Let's block ads! (Why?)


Light Stalking https://ift.tt/3217gRv

Sourced by Time Trap Photography sharing the best photography tips, news and tricks throughout the industry. Time Trap Photography is dedicated to freezing those special moments in life that can be revisited and admired for generations to come. - Shannon Bourque
Please visit our main site for booking availability and rates.


"Time


Receive valuable industry knowledge delivered free to your email each day.


"Time

30. Juni 2019

4:03:00 AM

Das Bild des Tages von: Ralph Graef


kwerfeldein – Magazin für Fotografie https://ift.tt/2XEQpo7

Sourced by Time Trap Photography sharing the best photography tips, news and tricks throughout the industry. Time Trap Photography is dedicated to freezing those special moments in life that can be revisited and admired for generations to come. - Shannon Bourque
Please visit our main site for booking availability and rates.


"Time


Receive valuable industry knowledge delivered free to your email each day.


"Time

Saturday, June 29, 2019

browserfruits 26.2019

10:05:00 PM

Keine Angst, top secret sind unsere browserfruits nicht, auch wenn das Titelbild von Stefan Müller anderes behauptet. Der Satz spielt viel mehr auf die kleine Spionagekamera an, die Ihr ebenfalls im Foto sehen könnt. Aber nun viel Freude mit unserer sonntäglichen Linksammlung.


Linktipps

• Michelle Spalding rettet alte Aufnahmen, indem er sie mit Hilfe von Bildbearbeitung repariert. Zum Teil sind die ursprünglichen Aufnahmen so kaputt, dass seine Restaurierungskünste wie Zauberei wirken. → ansehen

• In Bangladesch sind Klimakrise, Korruption und Bevölkerungswachstum eine unheilvolle Allianz eingegangen. Das Ergebnis: Staub. Überall Staub. Der Fotograf Niklas Grapatin zeigt ihn uns – mit außergewöhnlichen Bildern. → ansehen

• Eine digitale SX-70? Joshua Gross hat eine alte Sofortbildkamera umgebaut. → ansehen

• Dieser „Lost Places“-Fotograf aus Ettlingen möchte anonym bleiben. Die neuesten badischen Nachrichten stellen seine Arbeit kurz vor. → ansehen

• ZEITjUNG hat ein Interview mit dem schwedischen Fotografen und Designer Daniel Zachrisson, der seine Motive aufs Wesentliche reduziert. → ansehen

• Der Fotograf Eugenio Grosso verbrachte acht Monate in den kurdischen Gebieten im Nordirak. Ze.tt gibt einen Einblick in seine Arbeiten, die sich vor allem auf das Leben der Kurd*innen konzentrieren. → ansehen

• My Modern Met hat ein Gespräch mit David Travis, der in seinem Garten Vögel fotografiert. → ansehen

• Die iranisch-schweizerische Fotografin Laurence Rasti thematisiert in ihrer Serie die gefährliche Gratwanderung zwischen Sicht- und Unsichtbarkeit von Homosexuellen im Iran. → ansehen

• PetaPixel zeigt die Farbspritzer-Fotos von Steve Kazemir und wie sie gemacht wurden. → ansehen


Buchempfehlungen

„Letizia Battaglia: Photography as a Life Choice“ versammelt über 300 neu veröffentlichte Werke von Letizia Battaglia (geboren 1935), einer der berühmtesten Fotografinnen Italiens, die sich über den gesamten Zeitraum ihrer 30-jährigen fotografischen Karriere erstrecken. In Fotografien und Kontaktabzügen aus Battaglias eigenem Archiv bietet das Buch einen umfassenden Überblick über ihre Arbeit. Das Buch erscheint in englischer Sprache im Verlag Marsilio Editori und kostet 41,18 €.

„Robert Frank: London/Wales“ ist ein Nachdruck der Steidl-Ausgabe von 2007 mit noch nie dagewesenen Fotografien Robert Franks aus London und Wales der frühen 50er Jahre. Das Buch kostet 42,39 €.


Ausstellungen

Berlin Peking Visual Exchange
Zeit: 28. Juni – 25. August 2019
Ort: Museum für Fotografie, Jebensstr. 2, 10623 Berlin

»dreizehnzeigen«. Bachelorarbeiten 2019|2 des Studiengangs Fotojournalismus und Dokumentarfotografie
Zeit: 26. Juni – 7. Juli 2019
Ort: Eisfabrik Hannover, GAF Galerie für Fotografie, Seilerstr. 15 D, 30169 Hannover

Portrait oder Selfie?
Zeit: 28. Juni – 31. Juli 2019
Ort: Raum für spanische Kunst, Galerie 100kubik, Mohrenstr. 21, 50670 Köln

Howard Greenberg Gallery: from archive to history
Zeit: 30. Juni – 22. September 2019
Ort: Kunst- und Kulturzentrum der Städteregion Aachen in Monschau, Austr. 9, 52156 Monschau


Drüben auf Instagram

@donatas_zazirskas – Mehr über den Fotografen Donatas erfährt man auf Instagram leider gar nicht. Aber seine Aktbilder sprechen für sich.

Videos

Der Reportagefotograf David Klammer hat die Besetzungen der RWE Kohlebahn und des Tagebaus Garzweiler durch Ende Gelände mit der Kamera begleitet und eine Videoshow erstellt.


Jessica Kobeissi hat verschiedenen Retouchern ein Beauty-Portrait zur Nachbearbeitung gegeben und vergleicht die Ergebnisse.


Ein Videoportrait über Lewis Hine, der Kinderarbeiter in Amerika fotografierte und mit seinen Bildern dafür sorgte, dass die Kinderarbeit endete.

Das Titelbild stammt heute von Stefan Müller. Vielen Dank!


kwerfeldein – Magazin für Fotografie https://ift.tt/2JbQ0jQ

Sourced by Time Trap Photography sharing the best photography tips, news and tricks throughout the industry. Time Trap Photography is dedicated to freezing those special moments in life that can be revisited and admired for generations to come. - Shannon Bourque
Please visit our main site for booking availability and rates.


"Time


Receive valuable industry knowledge delivered free to your email each day.


"Time

I get to work with the amazing Fantasy Creations By Nicole & the Beautiful @kaila homolka today. Sponsored by @sac grenade company 💨 https://ift.tt/31ZrmeK #headpieces #bodyjewelry #smokegrenades #sacramentofashion #fashionphotographer #itraptime

1:50:00 PM

via Time Trap Photography https://ift.tt/2FHbKD7

Image by Time Trap Photography sharing the best photography tips, news and tricks throughout the industry. Time Trap Photography is dedicated to freezing those special moments in life that can be revisited and admired for generations to come. - Shannon Bourque
Please visit our main site for booking availability and rates.


"Time


Receive valuable industry knowledge delivered free to your email each day.


"Time

3 Quick Tips To Help Get You Started With Off-Camera Flash

12:05:00 PM

Do you recall the moment you decided that you need to get better at — or get familiar with — flash photography? Thinking back, what was one of the first pieces of advice you encountered?

I’ll bet it was an exhortation to “get that flash off your camera.”

3 Quick Tips To Help Get You Started With Off-Camera Flash
  • Claim Your Free Camera Craft Cheat Sheet

Print it out and keep it for when you really need it - when you're out shooting!

Did you even know what that meant? How well did anyone bother to explain it? Unfortunately, a lot of new photographers run into abbreviated explanations when it comes to getting started with off-camera flash, leaving them frustrated and intimidated by the topic.

It doesn’t have to be this way. Here are 3 simple tips to help get you started working successfully with off-camera flash.

Get The Flash Off Your Camera And Then…

The pop-up flash on your camera is mostly useless. Not totally useless, but its effectiveness is limited.

If you’ve already made the leap to a separate flash unit, congrats, but you really will get the most out of it once you remove it from atop your camera.

That’s what everyone says, right? Well, once you remove it from the hot shoe on top of the camera, then what?

Simply use a light stand or a flat surface to position your flash in relation to your subject (a 45-degree angle is a great starting point).

When it comes to getting the flash to fire remotely, the exact how-to will depend on the flash you’re using. You may need a PC sync cable or an optical trigger (options that will work for virtually any flash), or you may be able to do it wirelessly (you may need to do a little research on your flash to see if it is capable of this).

Get The Settings Right

Now that your flash is in position you need to dial in your settings (for the sake of this discussion let’s assume you’ve got a manual flash and need to dial in the settings yourself).

Where to start? For now, start by experimenting. Let’s say you’re shooting outdoors and you want a blurred background. You might try this three-step approach:

  1. Set your aperture to get the amount of background blur you want — f/2.8, for example.
  2. With your camera in manual mode, aperture at f/2.8 (following on from step 1) and set to the lowest native ISO, expose for the ambient light. Choosing a faster shutter speed will give you a darker background, while a slower shutter speed will provide you with a brighter background. The choice is yours; don’t worry about your model appearing underexposed, you only care about the background at this stage.
  3. Now it’s time to light your model. Start with a flash power of 1/32. If this level doesn’t sufficiently illuminate the model, increase the power; if it’s too strong, decrease the power.

These settings will vary — sometimes drastically — depending on your shooting environment (indoors vs outdoors, ambient light levels, etc.), but you should now have an inkling of how to determine off-camera flash settings.

Get Yourself A Light Modifier

A light modifier, such as a reflector or a softbox, will allow you to soften, shape and redirect the light and help kick your off-camera flash work into high gear.

There are some cleverly designed modifiers out there, but you don’t need to spend a lot of money on one. In fact, it’s entirely possible that the only modifiers you’ll ever need are already in your possession: white poster board and sheer curtains come to mind.

Final Thoughts

There is much to learn about off-camera flash, but once you’ve got a decent grasp on the basic principles, you can begin to experiment with your technique. The points provided here will help encourage you to dig deeper into off-camera flash as you pursue your goal of mastering lighting.

Further Reading

Let's block ads! (Why?)


Light Stalking https://ift.tt/2Np30b6

Sourced by Time Trap Photography sharing the best photography tips, news and tricks throughout the industry. Time Trap Photography is dedicated to freezing those special moments in life that can be revisited and admired for generations to come. - Shannon Bourque
Please visit our main site for booking availability and rates.


"Time


Receive valuable industry knowledge delivered free to your email each day.


"Time

29. Juni 2019

4:02:00 AM

Das Bild des Tages von: Sunny Herzinger


kwerfeldein – Magazin für Fotografie https://ift.tt/2YkKRw9

Sourced by Time Trap Photography sharing the best photography tips, news and tricks throughout the industry. Time Trap Photography is dedicated to freezing those special moments in life that can be revisited and admired for generations to come. - Shannon Bourque
Please visit our main site for booking availability and rates.


"Time


Receive valuable industry knowledge delivered free to your email each day.


"Time

Friday, June 28, 2019

Experiment: Das doppelte Lottchen

10:05:00 PM

Ein Beitrag von: Stephanie Hagenstein

Im vergangenen Jahr schrieb ich von meiner Suche nach Kreativität, dem Gefühl des Stehenbleibens und damit verbundener Ängste. Auch wenn es bereits viele Monate zurückliegt, fühlt es sich an, als wären all diese Gedanken erst gestern noch in meinem Kopf umhergegeistert. Ich bin diesen Gefühlen, besonders der Angst, anderen nicht gerecht zu werden, noch immer so nah und es ist, als müsste ich sie abermals verbannen.

Doch dadurch, dass ich mich selbst wiederholt reflektiere und anderen gegenüber immer offener meine Wünsche kommuniziere, habe ich mir eine Tür öffnen können, deren Schlüssel ich jederzeit bei mir trug – ich war nur zu, unsicher ihn zu benutzen.

Und so kam es, dass ich zunächst mittels Selbstportraits neue Techniken ausprobierte, kurz darauf meine Mutter bat, Modell für eine solche Technik zu stehen und anschließend erste Modelle fand, die ebenfalls an meinen Ideen interessiert waren.

Besonders viel Freude bereitete es mir in diesem Kontext, mit vertrauten oder ähnlich schöpferischen Menschen zu arbeiten. Seither habe ich etliche Dinge ausprobiert und mit großer Begeisterung festgestellt, wie schön es sein kann, Neues zu versuchen und Unerwartetes zu schaffen.

Doch genug der langen Vorgeschichte! Ich möchte Euch zeigen, wie ich eine Person öfter in einem Bild erscheinen lasse. Inspiriert wurde ich einerseits durch Arthur Tress, der sich fotografisch mit den Albträumen von Kindern auseinandersetzte, und andererseits durch das sonderbare Fehlen meiner nie geborenen Zwillingsschwester.

Zwei Frauen vor einem Fenster

Drillinge auf einem Feld

Frau mit vielen Händen um einen Baum

Viele Beine ragen aus Bilderrahmen am Rand eines Feldwegs.

Zwillinge im Wald

Sechslinge frontal auf einem Feld

Zwillinge einander zugewandt auf einem Feld

Fünflinge stehen frontal auf einem Feld

Zur Bearbeitung solcher digitalen Fotografien nutze ich nur wenige Werkzeuge in Photoshop. Um die Vorgehensweise möglichst simpel und nachvollziehbar darzustellen, beschreibe ich Euch die einzelnen Schritte meiner Bearbeitung.

Wähle zuerst zwei unterschiedliche Fotos, die aus der gleichen Perspektive (zum Beispiel mittels Stativ) und mit den gleichen Einstellungen (Fokus, ISO, Blende, Belichtungszeit etc.) aufgenommen wurden. Am einfachsten ist es, wenn sich die zu vervielfältigenden Objekte nicht überschneiden.

Öffne dann die Fotos und füge das zweite Bild als Ebene in das erste Bild ein. Die Kurzbefehle dafür sind Strg+A (alles auswählen), Strg+C (Auswahl kopieren), wechsle von Bild zwei zu Bild eins, Strg+V (kopierte Auswahl einfügen). Füge der gerade erstellten Ebene eine Ebenenmaske hinzu.

Ich nutze dann das Verlaufswerkzeug, um einen Schwarzweißverlauf innerhalb der erstellten Ebenenmaske anzulegen. Die Fläche, die Du erhalten möchtest, sollte im weißen Bereich des Verlaufs liegen. Eventuell sind noch ein paar Kleinigkeiten wie zum Beispiel Schatten auszubessern. Fertig!

Screenshot

Screenshot

Sollten sich die Objekte jedoch überschneiden, ist etwas mehr Geduld gefragt. In diesem Fall könnt Ihr ebenfalls mit einer Ebenenmaske arbeiten. Bei klaren Abgrenzungen empfehle ich das magnetische Lassowerkzeug und das Pinselwerkzeug mit verschiedenen Härtegraden.

Mir hilft es auch, ab einem bestimmten Punkt die Ebenen zusammenzufügen („Sichtbare auf eine Ebene reduzieren“) und dann mit dem Kopierstempel und dem Bereichsreparatur-Pinsel den Feinschliff vorzunehmen.

Ich bin sehr gespannt auf eure Ergebnisse. Teilt diese gerne in den Kommentaren!


kwerfeldein – Magazin für Fotografie https://ift.tt/2Yh1GIw

Sourced by Time Trap Photography sharing the best photography tips, news and tricks throughout the industry. Time Trap Photography is dedicated to freezing those special moments in life that can be revisited and admired for generations to come. - Shannon Bourque
Please visit our main site for booking availability and rates.


"Time


Receive valuable industry knowledge delivered free to your email each day.


"Time

28. Juni 2019

4:02:00 AM

Das Bild des Tages von: mikle


kwerfeldein – Magazin für Fotografie https://ift.tt/2JhMZyG

Sourced by Time Trap Photography sharing the best photography tips, news and tricks throughout the industry. Time Trap Photography is dedicated to freezing those special moments in life that can be revisited and admired for generations to come. - Shannon Bourque
Please visit our main site for booking availability and rates.


"Time


Receive valuable industry knowledge delivered free to your email each day.


"Time

How to choose the right camera for Travel Photography

3:31:00 AM

I am planning to travel to Europe in summer of 2017 with my husband and some non-photographer friends and I began to wonder: Which travel photography camera would be ideal for me to carry on vacation?

Travel Photography in Southwest by Charlotte Gibb

Which camera should I purchase for travel photography?

Now, if you are a landscape photographer or if you are in the compromised position of sharing your life with one, then you understand the realities of our craft. We are easily distracted by a lovely scene or an interesting subject. We either work slowly and methodically, or we dash about wildly, making our compositions with intense concentration before the light changes. Our camera bags are typically heavy (mine weighs 35 lbs.), and we wouldn’t dream of leaving home without a tripod. These traits do not endear us to our non-photographer travel companions. So, which travel photography camera should I bring with me?

Simplify

After much deliberation, I finally decided that I would only bring a small travel camera kit. I would limit myself to just one travel camera body and one lens. Ok… and a small tripod. But that’s it. Really!

The problem was that my DSLR Canon 5DsR with my favorite 70-200mm lens is anything but compact. It still presented a fairly bulky and heavy package for travel photography. I wanted something smaller, but I was unwilling to give up much image quality. 

The first thing I do when faced with such a decision is to create a list of pros and cons… advantages and disadvantages of each camera. Size, weight, price, and ease of use all have to be taken into consideration. And then, when I still had doubts, I asked my landscape photography friends what cameras they prefer for travel photography. True to form, my friends were marvelous in their numerous, diverse, and enthusiastic suggestions and product endorsements.

So, here’s the take-away. In the world of travel photography cameras, there are basically four types of systems to consider: Smart phones, point-and-shoot, mirrorless, and digital SLRs. 

Smart Phone Camera for Travel Photography

Yes, I seriously considered this option.

  • Pros: One less piece of gear to lug about; I already own one; fits neatly in the pocket; there are tons of fun photo effects apps available; selfies!; it’s easy to share pictures on social media and with family/friends.
  • Cons: Not the best image quality; terrible zoom image quality; limited enlargement capability.
  • Good Options: Sony Xperia XA Ultra ($330); Apple iPhone 6s ($549); Apple iPhone 7 ($649); Motorola Moto Z Droid Force ($720); Samsung Galaxy S7 edge ($730).

Here are a few photos (found on Visual Wilderness) that were taken with a smart phone camera.

  • Taken with an iPhone 6

  • Travel Photography with iPhone camera by Jay Patel

    Travel Photography with iPhone Camera – Cuyahoga Valley National Park, OH

  • Cabin in the Woods captured Smart Phone Camera by Jay Patel

    Cabin in the Woods captured Smart Phone Camera, Twinsburg, OH

  • Travel Photography with smart phone camera at Monterrey Aquarium, California

    Travel Photography with smart phone camera at Monterrey Aquarium, California

Point-and-Shoot Camera

  • Pros: Pocket-able; economical; all-in-one body and lens.
  • Cons: Limitations in image quality; small sensor.
  • Good Options: Sony RX100 ($398); Canon PowerShot G9 X ($429); Panasonic Lumix FZ1000 ($798); Sony RX100 V ($998).

This image below was made a few years ago in Costa Rica with my point-and-shoot Leica V-Lux 4. This camera is compact with terrific zoom capability and good optics. Shooting in RAW and manual mode turned out to be extraordinarily complicated. However, the camera fits in my tiny purse.

Costa Rica with my point-and-shoot Leica V-Lux 4

Costa Rica with my point-and-shoot Leica V-Lux 4

Mirrorless Camera

  • Pros: Interchangeable-lenses; compact; great image quality; lightweight; both crop or full-frame sensor options.
  • Cons: Cost; heavier than point-and-shoot cameras; electronic viewfinder (I prefer optical viewfinders); absolutely will not fit in your pocket.
  • Good Options: Olympus OM-D E-M10 Mark II with 14-42mm and 40-150mm Lenses ($599); Sony a6300 with 16-70mm Lens ($1,796); Fujifilm X-T2 with 18-55mm Lens ($1,899); Sony a7R II (Body Only $2,698 + Sony FE 24-240mm f/3.5-6.3 Lens $898).

Here are a few travel photos found on Visual Wilderness that were captured with a Sony mirrorless camera:

  • Travel photography with handheld mirrorless camera at the iconic Machu Picchu, Peru by Jay Patel

    Capturing mood with handheld mirrorless camera at the iconic Machu Picchu, Peru

  • Macro photography in Big Island of Hawaii with Sony Mirrorless Camera by Jay Patel

    Macro photography in Big Island of Hawaii with Sony mirrorless camera

  • Wildlife photography with Sony mirrorless camera, Grimsey Island, Iceland

    Wildlife photography with Sony mirrorless camera, Grimsey Island, Iceland

Digital SLRs Camera & Lenses

  • Pros: Large sensors; high-quality lens options; highest overall image quality.
  • Cons: Cost, bulky, heavy.
  • Good Options: Nikon D3300 ($496 with 18-55mm lens); Canon EOS Rebel SL1 ($499 with 18-55mm lens); Nikon D5500 ($697 with 18-55mm lens); Canon EOS 6D ($2,299 with 24-105mm f/4 L lens); Nikon D810 (with 24-120mm lens $4,096).
Digital SLR used for outdoor travel photography by Charlotte Gibb

Digital SLRs offer wonderful image quality and lens options for travel photography, but they are bulky and heavy

Personal Choice

Choosing the right travel camera is a personal decision. What may be a great choice for me might not be a good fit for you. Keep in mind that the more portable the camera, the more likely you are to use it during your adventures. And, unless you are looking to enlarge your images, it might not be that important to have a camera with a large sensor. Finally, it is worth mentioning that renting a camera is a good option. BorrowLenses.com and LensRentals.com both have a wide range of gear to rent; you can try before you buy.

The right travel photography camera

Where did I finally land? I chose the Sony a7R II with a Sony FE 24-240mm f/3.5-6.3 OSS lens. I had been thinking about buying this camera body for some time because I can use it as a back-up body to my Canon 5DsR. Its sensor has exceptional dynamic range and it can be purchased with an optional adapter ring to connect my Canon L-class lenses. It also fits neatly alongside my Canon 5DsR in the bag for future landscape and travel photography trips.

So, in addition to getting a great travel photography camera, I’m also getting a great night photography camera and back-up camera. The Sony FE 24-240mm f/3.5-6.3 OSS lens that I purchased to use as a travel lens with the Sony a7R II is not the sharpest piece of glass I own, but it encompasses a broad range of focal lengths; I don’t need to bring extra lenses on my trip.

I am also packing my small tripod — a Gitzo Traveler 1545T. I removed the center post on the tripod to make it lighter. This also allows it to be positioned very low to the ground. The Gitzo fits inside my small backpack along with extra batteries, a polarizing filter, three neutral density filters, and a remote shutter release. 

For the most part, I’m not expecting to do much traditional landscape photography on this trip, but rather more travel photography; documenting not only the local landscape, but people, cultures, customs, and history. As such, portability and weight were important considerations in my decision. However, I still plan to use my iPhone 6 camera on my travels. After all, what’s a vacation album without a few selfies?

What camera system do you bring on your vacation?

About Author Charlotte Gibb

Charlotte Gibb is a contemporary fine art photographer based in the San Francisco Bay Area specializing in landscapes of the Western United States. Her images are often taken in familiar places for the well-versed landscape photographer, but she prides herself on her keen an eye toward the subtle and sometimes overlooked beauty of the natural world. Charlotte earned her Bachelor of Arts Degree from the Academy of Art University in San Francisco and has exhibited her work in several solo shows throughout California. Her darkroom, long gone now, has been replaced with digital darkroom tools, and her style has evolved from a somewhat journalistic approach, to one that pays tribute to the natural world.

Let's block ads! (Why?)


Visual Wilderness https://ift.tt/2NgNM7X

Sourced by Time Trap Photography sharing the best photography tips, news and tricks throughout the industry. Time Trap Photography is dedicated to freezing those special moments in life that can be revisited and admired for generations to come. - Shannon Bourque
Please visit our main site for booking availability and rates.


"Time


Receive valuable industry knowledge delivered free to your email each day.


"Time

About Us

Time Trap Photography is dedicated to freezing those special moments in life that can be revisited and admired for generations to come. - Shannon Bourque

The lens in focus

“Life is like a camera. Just focus on what’s important and capture the good times, develop from the negatives and if things don’t work out, just take another shot.” — Unknown

TIME TRAP PHOTOGRAPHY COPYRIGHT 2016