Saturday, October 31, 2020

Illegal Photo Op with a Panther in a Backyard Zoo Ends in Multiple Injuries, Lawsuit

4:49:00 PM

Wildlife photography often makes the headlines around here because of the first part of the very word, “wild.”

In other words, there’s always a huge risk that things could go sideways when filming or photographing wild animals.

For instance, there was that one time a shark almost broke through a diving cage to get the photographer inside.

But there are also just run-of-the-mill accidents that happen when someone doesn’t respect an animal’s space.

Today’s story, however, is quite strange in that one man named Dwight Turner paid another, Michael Poggi, for “full contact” with a wild panther that the former was keeping caged on his Davies, Florida “sanctuary” for wild and exotic animals.

This “experience” included a photo opportunity with the panther but none of that happened as Turner was attacked immediately upon entering the animal’s cage. His injuries were quite gruesome and, of course, necessitated a visit to the hospital. Authorities on the scene report that in addition to a torn right ear, Turner’s scalp was nearly detached from his head.

As you can imagine, Turner’s lawsuit against Poggi alleges that all of this is due to negligence, among other things, and that any waiver signed by the victim doesn’t apply to what occurred.

Authorities have charged Poggi with keeping wild animals in unsafe conditions as well as for allowing contact with the panther in the first place.

PetaPixel reports that Poggi’s sanctuary operation remains up and running where animals such as marmosets and white-faced capuchins sell for $USD 5,900 and $USD 14,500 respectively.

What do you think of Dwight Turner’s attempt to have a photo op with a panther only to get mauled in the process? How do you feel about his lawsuit? We would love to hear your feedback on this article. Let us know your opinions on this story in the comments section below.

Be sure to check out our other photography news on Light Stalking by clicking this link right here.

[PetaPixel]

Let's block ads! (Why?)


Light Stalking https://ift.tt/3oEdvWC

Sourced by Time Trap Photography sharing the best photography tips, news and tricks throughout the industry. Time Trap Photography is dedicated to freezing those special moments in life that can be revisited and admired for generations to come. - Shannon Bourque
Please visit our main site for booking availability and rates.


"Time


Receive valuable industry knowledge delivered free to your email each day.


"Time

31. Oktober 2020

5:18:00 AM

Das Bild des Tages von: M-Z-Photo


kwerfeldein – Magazin für Fotografie https://ift.tt/383XZO9

Sourced by Time Trap Photography sharing the best photography tips, news and tricks throughout the industry. Time Trap Photography is dedicated to freezing those special moments in life that can be revisited and admired for generations to come. - Shannon Bourque
Please visit our main site for booking availability and rates.


"Time


Receive valuable industry knowledge delivered free to your email each day.


"Time

Friday, October 30, 2020

52 Wochen – Ergebnisse: Geister

11:18:00 PM

Passend zu Halloween haben wir dieses Mal die Wochenergebnisse zum Thema Geister für Euch. Uns eins fällt auf: Geister und Schwarzweißfotografie passen gut zusammen. Und ja, beim Zusammenstellen der Bildserie ist mir doch ein wenig mulmig geworden.

Surreale Aufnahme einer gruseligen Gestalt

© Micaela Lucas

Skelett in schwarzweiß

© Heiko Gappa

Hand greift einen hellen Punkt

© Sophia Hegewald

Ein Geist kommt aus einer Flasche

© Andrea Epstein

Geistergestalt zwischen Bäumen

© Monika

Person wird mit Lichtern beschienen

© Polly Hummel

Zwei Kinder verstecken sich vor einem Geist hinter dem Sofa

© senjas

Das Projekt ist nach wie vor nicht als Wettbewerb gedacht, aber verratet uns dennoch gern, welches Bild dieses Mal Euer Favorit ist. Und nehmt noch am aktuellen Thema Makrofotografie teil! Am Montag geht es dann mit einem neuen Thema weiter.


kwerfeldein – Magazin für Fotografie https://ift.tt/2HNvTeL

Sourced by Time Trap Photography sharing the best photography tips, news and tricks throughout the industry. Time Trap Photography is dedicated to freezing those special moments in life that can be revisited and admired for generations to come. - Shannon Bourque
Please visit our main site for booking availability and rates.


"Time


Receive valuable industry knowledge delivered free to your email each day.


"Time

Instagram Removes “Recent” Hashtags Tab Temporarily

6:49:00 PM

Instagram has temporarily removed the “Recent” hashtags tab from the Interface for users in the United States in order to avoid the “viral” spread of disinformation the company claims.

This is apparently part of Facebook’s larger concern about how it is perceived during and after the election.

“I’m worried that with our nation so divided and election results potentially taking days or weeks to be finalized, there is a risk of civil unrest across the country. Given this, companies like ours need to go well beyond what we’ve done before,” Mark Zuckerberg said during an earnings call for Facebook.

Indeed, such a negative perception could have a material impact on Facebook’s operations – and even ratchet up calls for stricter regulations in the US for social media platforms.

And it isn’t just Facebook and its attendant properties that are under scrutiny from both sides of the political aisle. Rival service Twitter also tends to keep itself in the headlines for a user’s involvement in one political controversy or another.

Speaking of Twitter, Instagram made the announcement through the company’s @InstagramComms account on that platform, tweeting: “Starting today, for people in the U.S. we will temporarily remove the “Recent” tab from hashtag pages. We’re doing this to reduce the real-time spread of potentially harmful content that could pop up around the election.”

Yesterday, we brought you a story about how Instagram updated its nudity policy thanks to the activism of one of its users. In case you missed that, you can check it out here.

What do you think of Instagram’s decision to remove the “Recent” hashtags tab from its interface ahead of and during the US presidential election? Do you attribute misinformation to social media platforms or do you think they should allow users to post whatever they like? Let us know your thoughts in the comments section below.

Be sure to check out our other photography news by clicking this link right here.

[PetaPixel]

Let's block ads! (Why?)


Light Stalking https://ift.tt/2HP91Mk

Sourced by Time Trap Photography sharing the best photography tips, news and tricks throughout the industry. Time Trap Photography is dedicated to freezing those special moments in life that can be revisited and admired for generations to come. - Shannon Bourque
Please visit our main site for booking availability and rates.


"Time


Receive valuable industry knowledge delivered free to your email each day.


"Time

How To Photograph The Blue Hours With Amazing Results

8:49:00 AM

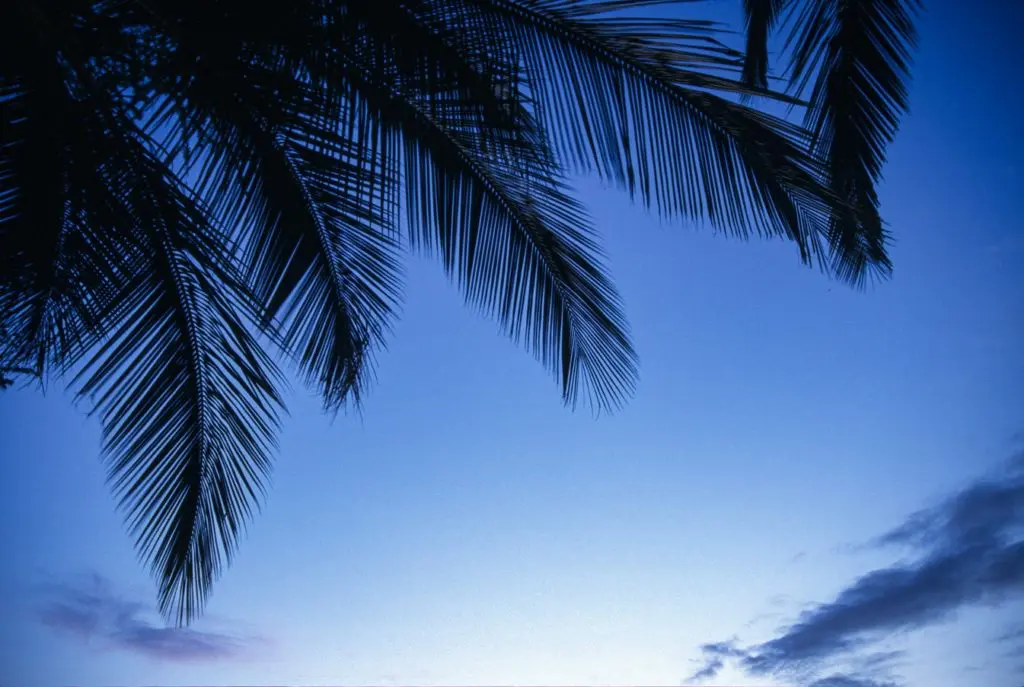
While you've most likely heard of the golden hours – that time right after sunrise or before sunset where the outdoors turn into a golden paradise – the blue hours are also a fantastic time to photograph under dramatic lighting.

If you want to be notified of the blue hour course where we dive very deep on the topic and show you how to get some spectacular results, then make sure you’re signed up here.

Chances are you’ve seen examples of blue hour photography but didn’t realize that they were anything more than well-timed night shots. To get that blue/purple quality to your images, there’s a specific window of opportunity during the twilight times (just before sunrise and after sunset) where your image is flooded with a stunning overcast light, illuminating your scene in an otherworldly fashion.

Often – especially with longer exposures – what you see in real life isn’t always what you see on your LCD screen. The camera has the ability to pick up tones and colors that you don’t normally see – nature's way of creative lighting.

So now that you know what the blue hours are, the more important question remains:

How do you capture blue hour photos?

photo by marcus voetter
Photo by Markus Voetter

Choosing A Subject

While the basic guidelines and principles of photography apply to blue hour photography, there are still common subjects that seem to work very well under this light – three are the most prominent in my mind.

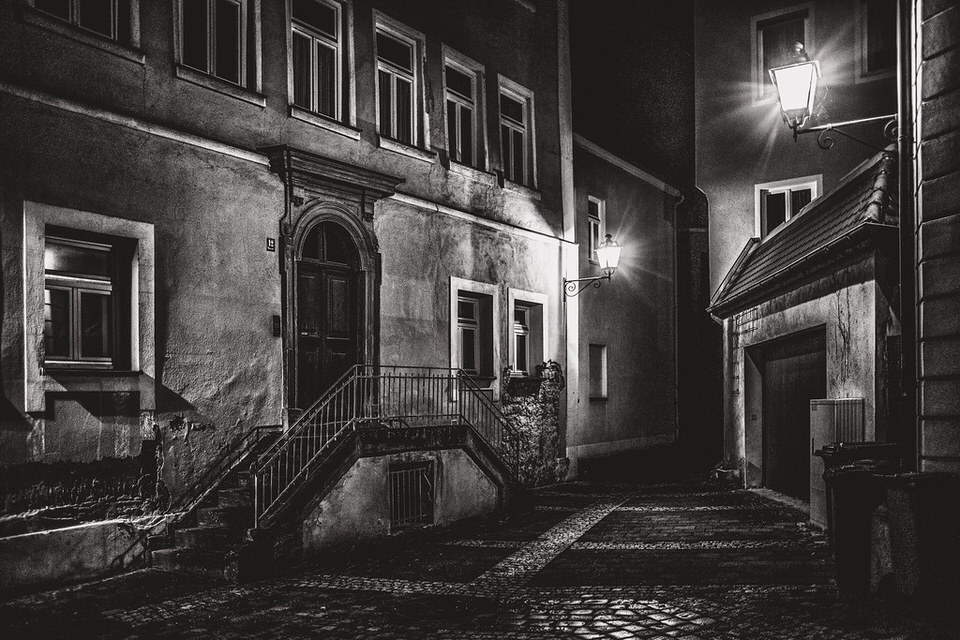
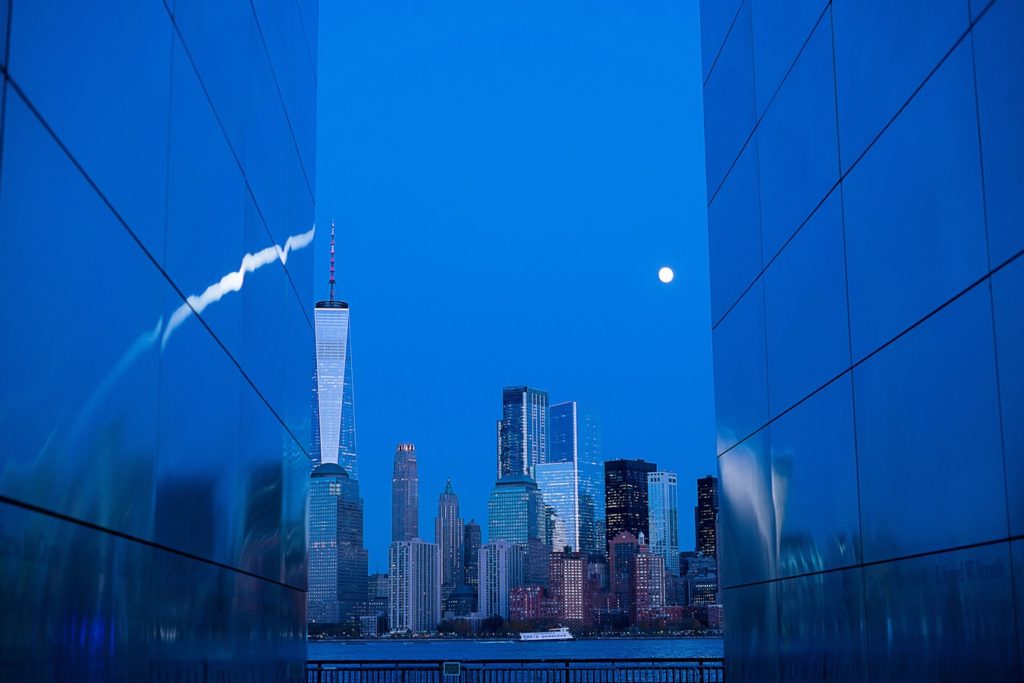
Cityscapes – Photos of urban areas – especially skylines – benefit greatly from the blue hour. As opposed to night shots where the sky is darkened, the blue hour provides much interest in the backdrop in addition to bathing your scene with that fantastic blue/purple hue. Combine this with lighting from artificial sources (windows, streetlamps, bridge lights, etc.) and you can have a truly outstanding image.

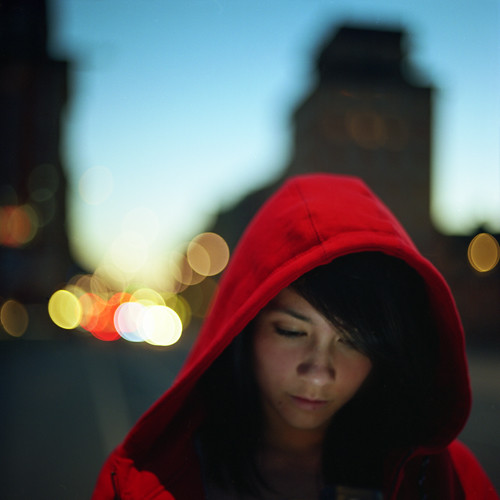
Portraits – Another popular subject to capture during the blue hours is portraits. The soft lighting of the sky (not to mention the incredible color) creates a surreal environment for truly exceptional portraits – the perfect setting to get creative.

Summer Start
Summer Start by von Schnauzer

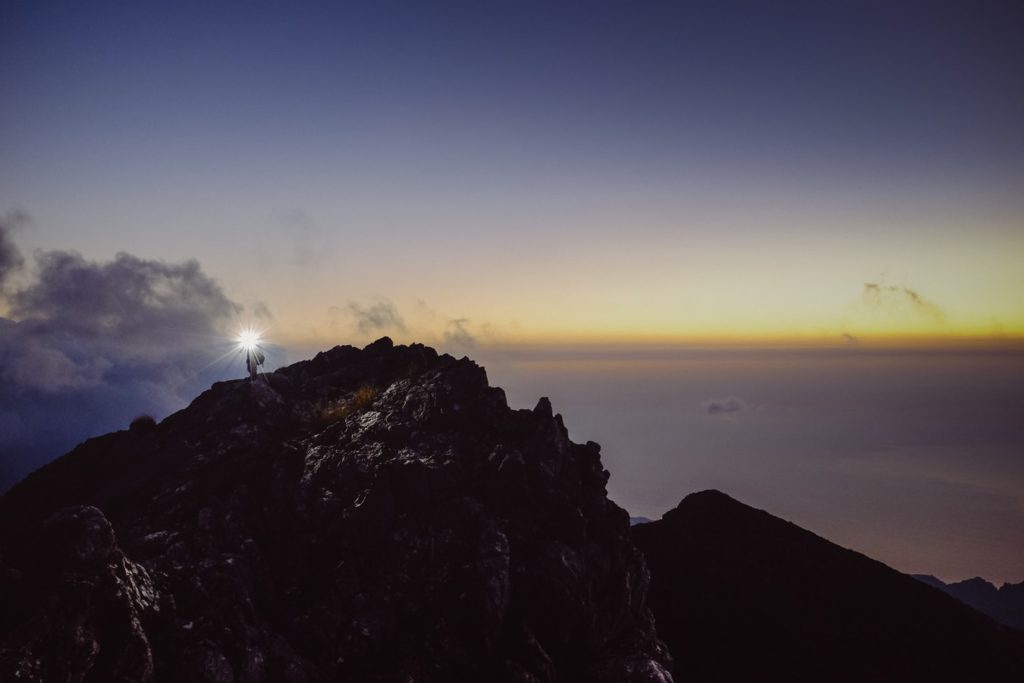
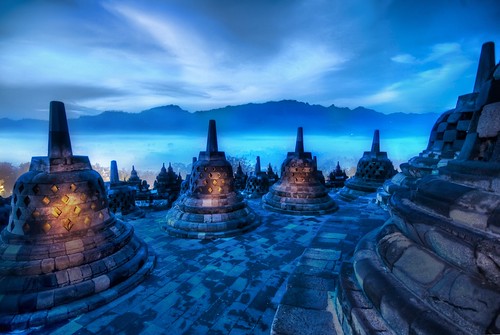
Landscapes – Whether you're photographing the rocky coastline or the middle of the desert, the twilight hours are an exceptional, unique way to capture a landscape.

If you want to be notified of the blue hour course where we dive very deep on the topic and show you how to get some spectacular results, then make sure you’re signed up here.

The Beating Hearts of the Buddhas
The Beating Hearts of the Buddhas by Stuck in Customs

Judging Your Exposure

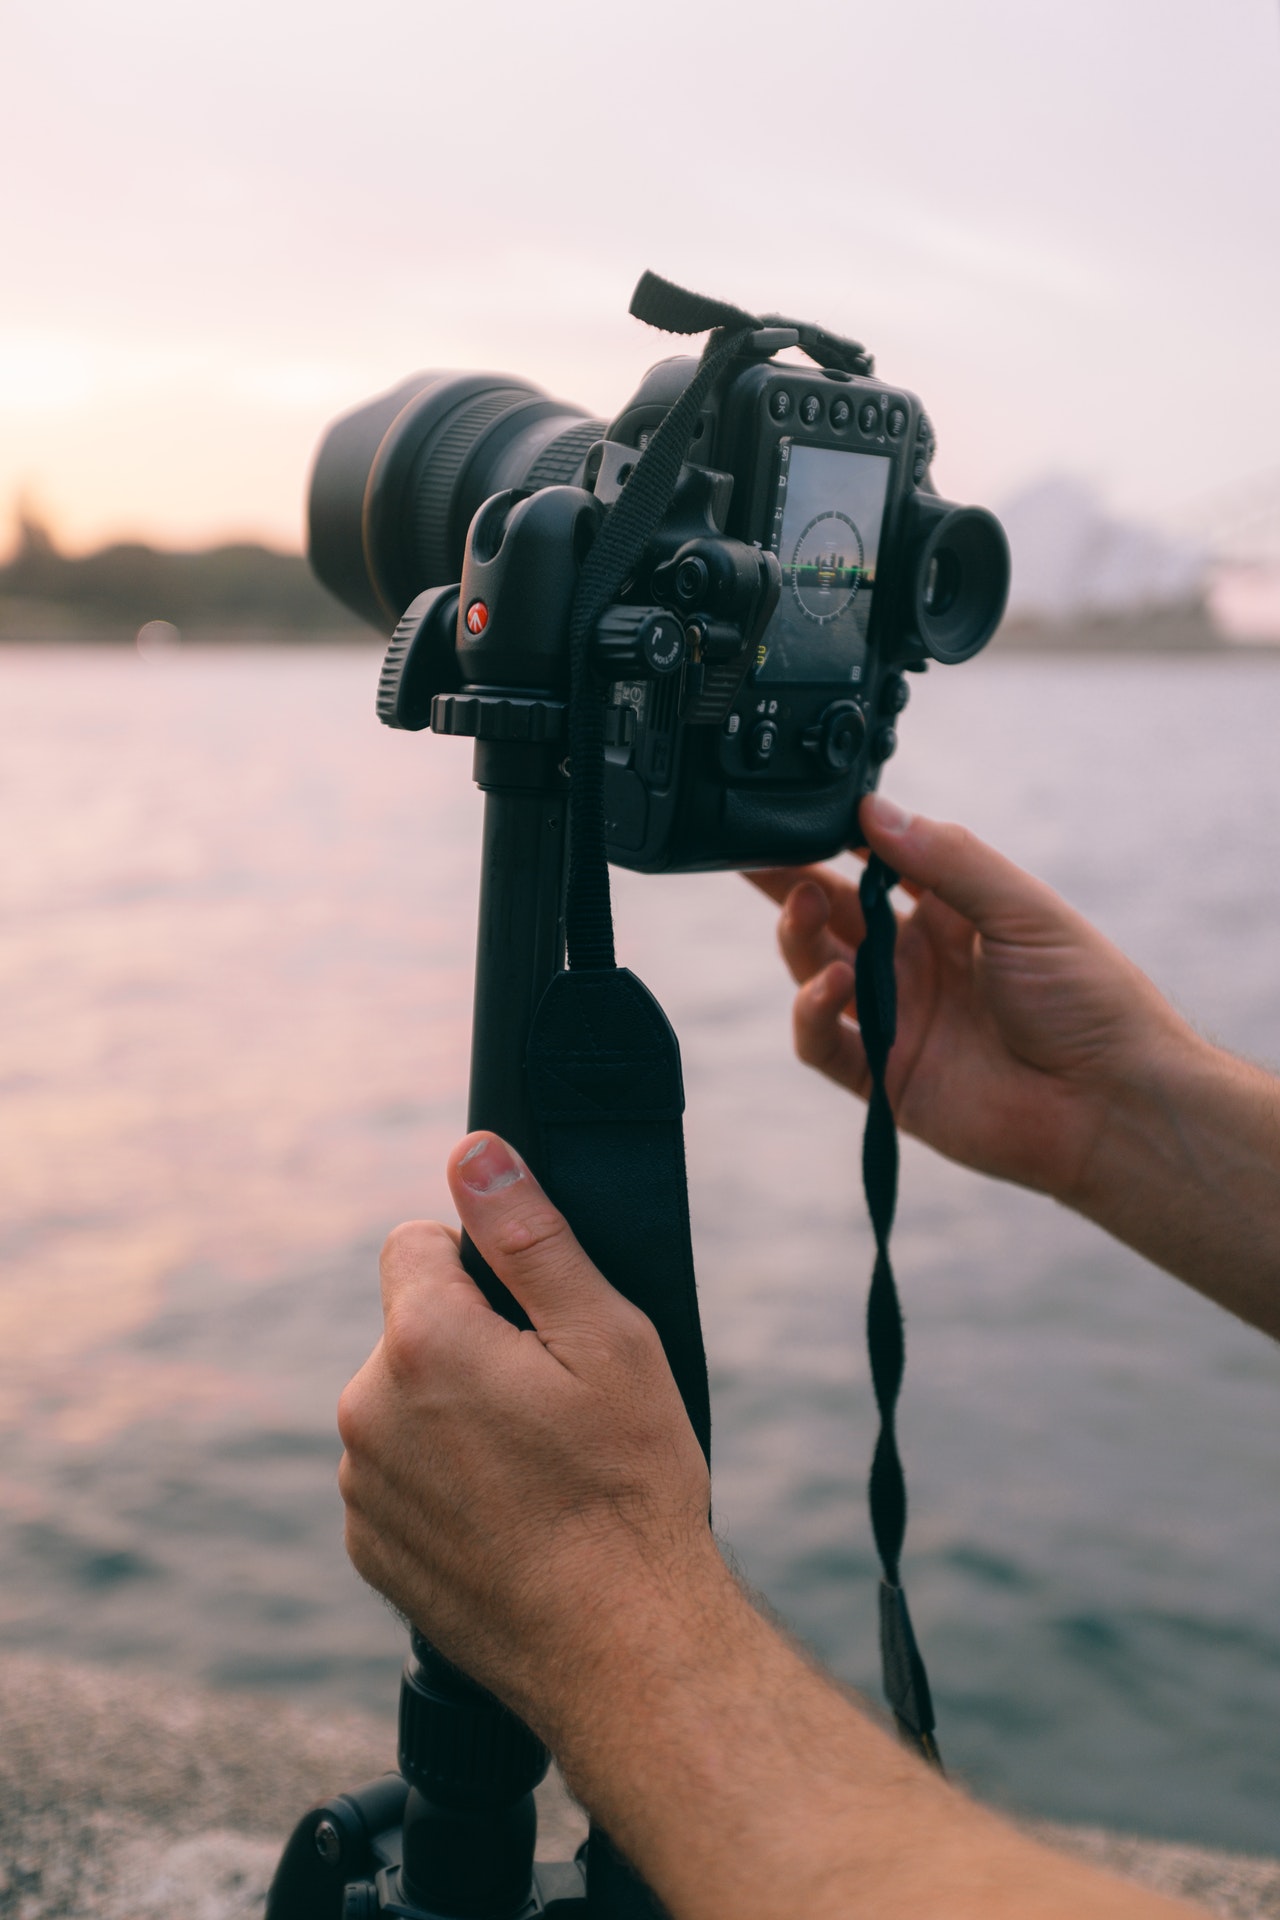
A huge concern with photographing the blue hours is your exposure time since you’re working with limited light. This translates to longer than normal shutter speeds, meaning motion blur and camera shake come into play.

While you’re not working in complete darkness, there is a substantially lower amount of light to work with – slow enough to blur your image. With this in mind, a tripod is absolutely necessary to not only stabilize your camera, but to help you frame your image more accurately.

This is especially true when photographing cityscapes as you’ll be using a shallow aperture (f/11 -f/16 range) to get great depth of field and detail – it wouldn’t be out of the question to have a shutter speed of 1 full second or more while working in this aperture range.

Smaller apertures also give that starburst quality to light sources – another reason why it works so well for cityscapes.

photo by jonathan roger
Photo by Jonathan Roger

When working with a tripod, make sure to shut off any image stabilization/vibration reduction for your lens – this can actually be counterproductive when your camera is mounted properly.

If you’re working with a wider aperture, you may not need a tripod for stabilization (depending on your focal length) since wider apertures = faster shutter speeds – this method works well for portraits taken during the blue hours since you need some kind of flexibility with your movement that the tripod doesn't provide.

A common technique with blue hour portraits is to compose your image where the skyline is your backdrop – whether it be a city or coastal scene – and use a gentle fill light for your model’s face (as seen in the portrait above).  When you combine this with a wide aperture, your portraits can be a stunning show of colors – with fantastic bokeh as well.

Your fill light can be anything from a remote strobe to an adjacent street lamp – as long as some light source is hitting your model’s face, you can create a stunning portrait.

The best way to judge your exposure is to take test shots – making sure to read your histogram to check for distracting blown highlights or blocked shadows (over and/or underexposed areas of your photo).

If you’re close enough to a stable shutter speed, you may be able to turn on your IS/VR (if that’s an option) to salvage a photo – this is a good idea only when handheld is preferable, such as with portraits. Landscapes, cityscapes, and other photos where you have a stationary subject should always be done with a tripod.

Another reason to use a tripod would be to autobracket (also known as HDR, exposure blending, or tone mapping). While you would generally autobracket during sunsets and sunrises for the great disparity in sky/ground exposures, it’s a bit different for the blue hours. Generally your light will be overcast providing an even exposure all around – except for light sources such as lamps and windows. When these are blown, they can be very distracting – autobracketing will allow you to blend two different exposures in order to recover the overexposed areas. For this to be a seamless blend, you’ll need a tripod to make sure all your shots are uniform in composition.

Photo by Mick Haupt

Planning Your Blue Hour Shoot

Much like the golden hour, the blue hour is a small window of opportunity – perhaps even shorter. In order to plan properly, you can visit bluehoursite.com where they have a handy calculator, allowing you to figure out exactly when the blue hour will occur – this works for both morning and evening twilight.

Another smart idea would be to scout your location before the blue hour starts, paying attention to compositions and perspectives. Since the blue hour is a very short time, anything you can do beforehand to make your shoot go smoother would be ideal.

Additional Tips:

To sum this up, here's the list of most important things to consider when it comes to blue hour photograhy:

  • Plan your shoot – The blue hour is very short and you have to arrive at the location of your choice at the right time. You also have to know what settings you're supposed to use (approximately) and just fine tune them.
  • Use a tripod – If you don't bring a tripod, you will have many limitations and you won't be able to play around with shutter speed. A tripod and a slow shutter speed will expand your possibilities – you'll be able to capture various lights from your surroundings (especially if you're in the city) against the dark blue sky.
  • Experiment with aperture Wide apertures will make street lights soft and magical, while small apertures will allow you to capture interesting details in the nature or starburst in the city.
  • Bring your smartphone too – Smartphones are getting better and better these days when it comes to shooting challenging lighting conditions such as the blue hour. You might be really happy with the results!
  • Don't forget to shoot in RAW – Blue hour images certainly require post processing, sometimes even heavy edits. You will want to enhance the blue tones and to optimize the exposure. The largest version of a JPEG file might be enough for that, but to stay on the safe side it's better to shoot in raw.

If you want to be notified of the blue hour course where we dive very deep on the topic and show you how to get some spectacular results, then make sure you’re signed up here.

Further Reading:

  1. Why You Should Be Photographing Your City At Blue Hour
  2. How To Shoot A Stunning Blue Hour Photograph And Edit It In Lightroom
  3. 3 Strong Composition Ideas For Blue Hour Photography
  4. 27 Inspiring Photos Of Architecture In The Blue Hour
  5. How To Focus In Low Light For Impressive Blue Hour, Night, And Astrophotography

Stunning shots and a good read. Thanks.

Beautiful shots, and a very useful tutorial. Thanks!

Great article…

Here is one of mine taken in that fine blue hour…

http://tinyurl.com/y94e66v

Cheers

awesome shot

wonderful shots and nice tutorials. Good carry on.

Beautiful pictures and Very informative.

Nice to see someone talking about the blue hour. In the past people have talked about a colour cast when I have shown photos taken at this hour. What I love is that between one frame and the next it vanishes – gone from blue to grey. It is magical.

One of my favourite times. I’m working on a project photographing cityscapes and the blue hour, or minutes in many cases, totally changes the feel and atmosphere, often making the ugly and mundane resonate.

Christopher Thanks for the tip. Perfect timing for me as my next task on the photography course I’m attending is to get a night time portrait image. Can’t use flash (or photoshop) though.

Great article! I think the blue hour is much better than the golden hour in the desert. It’s my favorite for evening photography.

Absolutely stunning! I love to have a camera that could give me the result of this tutorial. i am gonna have to start saving

Link to Christopher’s twitter account (in the Author bio below the article) is wrong. the correct one is http://twitter.com/#/mainescapes

or

http://twitter.com/mainescapes

please fix.

Yes, I just love this site Reply

Reply

um I don’t see my image. Did I do something wrong?

Great article! Reply

Let's block ads! (Why?)


Light Stalking https://ift.tt/2nPYUuJ

Sourced by Time Trap Photography sharing the best photography tips, news and tricks throughout the industry. Time Trap Photography is dedicated to freezing those special moments in life that can be revisited and admired for generations to come. - Shannon Bourque
Please visit our main site for booking availability and rates.


"Time


Receive valuable industry knowledge delivered free to your email each day.


"Time

30. Oktober 2020

5:18:00 AM

Das Bild des Tages von: Marco Bergner


kwerfeldein – Magazin für Fotografie https://ift.tt/35OMV4E

Sourced by Time Trap Photography sharing the best photography tips, news and tricks throughout the industry. Time Trap Photography is dedicated to freezing those special moments in life that can be revisited and admired for generations to come. - Shannon Bourque
Please visit our main site for booking availability and rates.


"Time


Receive valuable industry knowledge delivered free to your email each day.


"Time

Landscape Photography Trip Planning Guide for Beginners

5:03:00 AM

When you are visiting a new landscape photography location for the first time it is often difficult to know where to go and what to photograph. This is especially true if you are a beginner in landscape photography. My husband Ron Coscorrosa and I have written a series of in-depth landscape photography travel guides that helps photographers plan their visit to their bucket list locations. To create these travel guides, Ron and I had to spend several weeks on location… and sometimes must visit a location more than once. We also learned how to explore a location with a limited amount of time and get stunning photos.

Here is what we learned about how to explore our next landscape photography bucket list location:

Plan for your Landscape Photography Adventure

We always start our trip planning with a spark of inspiration – like seeing a photo or having a conversation with another photographer. After that spark of inspiration, we start thinking about logistics and reservations. Some national parks in the US are so popular that getting reservations for backcountry permits and camping spots requires a lot of planning. If we really want to see a popular spot, we investigate permits and reservations as one of our first steps. For more off-the-beaten-path spots, we look into access issues, road conditions, and other logistical details as an early step in the planning process. We also spend some time thinking about what kinds of conditions different seasons will bring and how those conditions align with our interests.

Long exposure landscape photography by Sarah Marino

Long Exposure with Canon 5D2 | Canon 70-200mm lens + 1.4x teleconverter @ 280mm | [email protected]/11 ISO 320

If this initial research suggests that our timing is aligned with our interests and the permits or reservations we need are available, we jump in by buying a photography guide (if available), at least one hiking guide, and some topographic maps.

Do Your Research

Compared to many other landscape photographers, I probably spend less time researching photo locations than some of my peers. I like reading hiking guide books and studying maps, but I try not to spend a lot of time studying other people’s photographs of the place I will be visiting. I also do not spend a lot of time with apps researching things like tides or moon phases and I don’t spend much time using tools like Google Earth. Instead, I like to arrive at a place with fresh eyes; I don’t want other people’s photos stuck in my mind. I also really enjoy the serendipitous nature of finding the unexpected. If I do too much planning, I find that I am too focused on finding a bunch or pre-conceived photographs instead of embracing what is there.

Landscape Photography at Jokusarlon, Iceland

Canon 6D | Canon 17-40mm F4L @ 17mm | [email protected]/16, 0.5, ISO 50 – Jokusarlon, Iceland

If we have another photographer’s guide to a location, we usually use it to scout the places we want to see most, but then allow sufficient time in our schedule for exploring on our own. We’ll visit iconic spots and photograph them, especially when visiting a place for the first time, but we also make time to drive down random roads, hike potentially interesting trails, and explore around the next bend just to see what’s there. Some of my favorite photographs have come about during these sorts of unplanned explorations.

Pay Attention to your Travel Expenses

We almost always camp close to the places we want to photograph. While there is nothing wrong with staying in hotels, we like being out in nature and close to the places that interest us the most. Also, I am not a morning person so being closer to interesting places helps motivate me to get up in the morning!

Blue hour at Vestrahorn, Iceland captured by Sarah Marino

Canon 6D | Canon 24-105mm @ 24mm | 1/[email protected]/16, ISO 800 – Blue Hour at Vestrahorn, Iceland

For travel to Iceland, we recommend renting a campervan for people who are traveling on their own and are comfortable with camping. The cost is close to that of a rental car and, with Iceland’s openness to wild camping, a campervan allows for comfortable travel and sleeping at many of the prime photo locations. This is especially convenient for trips that include photographing the aurora borealis, which obviously happens during the night.  For a place like Death Valley, camping often means that remote places are more accessible for photography at the edges of the day. Death Valley is an enormous park and lodging options are too far away from some interesting destinations to be practical. Car or tent camping allows a photographer to be at remote spots during the best times for photography without the hassle of worrying about getting back to a hotel or having to drive on rough, unfamiliar roads at night.

Get to know your Landscape Photography Location

A few years ago, both Ron and I wanted to see and photograph as many places as possible. After getting some of that pent up wanderlust out of our systems through a few years of intense travel, we started slowing down and revisiting places, this time with more depth. While I think it’s possible to make compelling photographs of a place on a first visit, I do find that my own work improves after repeated visits.

Landscape Photography by Sarah Marino

Canon 5D2 | Canon 24-105mm @ 25mm | [email protected]/14, ISO 800 – Joshua Tree by Sarah Marino

On my first visit to Zion National Park, for example, I was completely overwhelmed by the landscape. I walked away feeling a little defeated. My photos showed nothing special about a really special place. I felt they could have been created by anyone with decent photography skills. This experience made me want to come back, as we have for the last four autumn seasons, to develop a more in-depth portfolio of work from the park. I tell this story because it is representative of how we are photographing places now – spending more time over different seasons to get to know locations a little better than we might have in the past.

Our Iceland location guide is the result of three trips spread over two months. Our first trip took place before Iceland became a hot photo destination. After our second trip, we decided to create the type of guide we wish we had when planning our initial trip. At the time, finding information about photographing Iceland was quite difficult; we felt we had a lot to share that could help other photographers. Writing our Death Valley Guide came about for different reasons. We have made more than a dozen trips to Death Valley over different seasons and our Death Valley Guide is a result of a deep affection for the park and its surreal landscapes.

Challenges to Avoid

There are so many high-quality, inspirational photos on the internet that I sometimes get other people’s photos stuck in my mind. This is especially true for popular places. Thus, I think it’s important to balance planning with a willingness to experience what a place has to offer once you arrive. Having set expectations can lead to disappointment and copying photographs that have been made many times before. I try to balance my expectations with an openness for serendipity and a willingness to explore beyond the things we planned to see in advance.

So the only question remains is… What are you waiting for? 
The longer you wait, the less time you’ll have to explore the next location on your bucket list. If you are interested in exploring Death Valley or Planning a trip to Iceland, feel free to check out Sarah and Ron’s stunning  Photo Guides.

About Author Sarah Marino

Sarah Marino is a landscape and nature photographer from Colorado who is currently traveling full-time in an Airstream trailer with her fellow photographer husband, Ron Coscorrosa, and their two cats. Sarah strives to capture photographs that convey the elegance, beauty, and the awe-inspiring qualities of the landscapes she explores during her travels. In addition to grand landscapes, Sarah’s portfolio also includes a diverse range of smaller subjects including plants, trees, and abstract natural subjects.

Sarah has published a variety of educational materials for landscape and nature photographers. These ebooks and video tutorials include: Forever Light: The Landscape Photographer’s Guide to Iceland, Desert Paradise: The Landscape Photographer’s Guide to Death Valley National Park, Black & White Photography: A Complete Guide for Nature Photographers, and Beyond the Grand Landscape: A Guide to Photographing Nature’s Smaller Scenes.

You can view more of Sarah's photos, educational resources for nature photographers, and travel stories on her website.

Let's block ads! (Why?)


Visual Wilderness https://ift.tt/34DHC8F

Sourced by Time Trap Photography sharing the best photography tips, news and tricks throughout the industry. Time Trap Photography is dedicated to freezing those special moments in life that can be revisited and admired for generations to come. - Shannon Bourque
Please visit our main site for booking availability and rates.


"Time


Receive valuable industry knowledge delivered free to your email each day.


"Time

Landscape Photography Trip Planning Guide for Beginers

4:04:00 AM

When you are visiting a new landscape photography location for the first time it is often difficult to know where to go and what to photograph. This is especially true if you are a beginner in landscape photography. My husband Ron Coscorrosa and I have written a series of in-depth landscape photography travel guides that helps photographers plan their visit to their bucket list locations. To create these travel guides, Ron and I had to spend several weeks on location… and sometimes must visit a location more than once. We also learned how to explore a location with a limited amount of time and get stunning photos.

Here is what we learned about how to explore our next landscape photography bucket list location:

Plan for your Landscape Photography Adventure

We always start our trip planning with a spark of inspiration – like seeing a photo or having a conversation with another photographer. After that spark of inspiration, we start thinking about logistics and reservations. Some national parks in the US are so popular that getting reservations for backcountry permits and camping spots requires a lot of planning. If we really want to see a popular spot, we investigate permits and reservations as one of our first steps. For more off-the-beaten-path spots, we look into access issues, road conditions, and other logistical details as an early step in the planning process. We also spend some time thinking about what kinds of conditions different seasons will bring and how those conditions align with our interests.

Long exposure landscape photography by Sarah Marino

Long Exposure with Canon 5D2 | Canon 70-200mm lens + 1.4x teleconverter @ 280mm | [email protected]/11 ISO 320

If this initial research suggests that our timing is aligned with our interests and the permits or reservations we need are available, we jump in by buying a photography guide (if available), at least one hiking guide, and some topographic maps.

Do Your Research

Compared to many other landscape photographers, I probably spend less time researching photo locations than some of my peers. I like reading hiking guide books and studying maps, but I try not to spend a lot of time studying other people’s photographs of the place I will be visiting. I also do not spend a lot of time with apps researching things like tides or moon phases and I don’t spend much time using tools like Google Earth. Instead, I like to arrive at a place with fresh eyes; I don’t want other people’s photos stuck in my mind. I also really enjoy the serendipitous nature of finding the unexpected. If I do too much planning, I find that I am too focused on finding a bunch or pre-conceived photographs instead of embracing what is there.

Landscape Photography at Jokusarlon, Iceland

Canon 6D | Canon 17-40mm F4L @ 17mm | [email protected]/16, 0.5, ISO 50 – Jokusarlon, Iceland

If we have another photographer’s guide to a location, we usually use it to scout the places we want to see most, but then allow sufficient time in our schedule for exploring on our own. We’ll visit iconic spots and photograph them, especially when visiting a place for the first time, but we also make time to drive down random roads, hike potentially interesting trails, and explore around the next bend just to see what’s there. Some of my favorite photographs have come about during these sorts of unplanned explorations.

Pay Attention to your Travel Expenses

We almost always camp close to the places we want to photograph. While there is nothing wrong with staying in hotels, we like being out in nature and close to the places that interest us the most. Also, I am not a morning person so being closer to interesting places helps motivate me to get up in the morning!

Blue hour at Vestrahorn, Iceland captured by Sarah Marino

Canon 6D | Canon 24-105mm @ 24mm | 1/[email protected]/16, ISO 800 – Blue Hour at Vestrahorn, Iceland

For travel to Iceland, we recommend renting a campervan for people who are traveling on their own and are comfortable with camping. The cost is close to that of a rental car and, with Iceland’s openness to wild camping, a campervan allows for comfortable travel and sleeping at many of the prime photo locations. This is especially convenient for trips that include photographing the aurora borealis, which obviously happens during the night.  For a place like Death Valley, camping often means that remote places are more accessible for photography at the edges of the day. Death Valley is an enormous park and lodging options are too far away from some interesting destinations to be practical. Car or tent camping allows a photographer to be at remote spots during the best times for photography without the hassle of worrying about getting back to a hotel or having to drive on rough, unfamiliar roads at night.

Get to know your Landscape Photography Location

A few years ago, both Ron and I wanted to see and photograph as many places as possible. After getting some of that pent up wanderlust out of our systems through a few years of intense travel, we started slowing down and revisiting places, this time with more depth. While I think it’s possible to make compelling photographs of a place on a first visit, I do find that my own work improves after repeated visits.

Landscape Photography by Sarah Marino

Canon 5D2 | Canon 24-105mm @ 25mm | [email protected]/14, ISO 800 – Joshua Tree by Sarah Marino

On my first visit to Zion National Park, for example, I was completely overwhelmed by the landscape. I walked away feeling a little defeated. My photos showed nothing special about a really special place. I felt they could have been created by anyone with decent photography skills. This experience made me want to come back, as we have for the last four autumn seasons, to develop a more in-depth portfolio of work from the park. I tell this story because it is representative of how we are photographing places now – spending more time over different seasons to get to know locations a little better than we might have in the past.

Our Iceland location guide is the result of three trips spread over two months. Our first trip took place before Iceland became a hot photo destination. After our second trip, we decided to create the type of guide we wish we had when planning our initial trip. At the time, finding information about photographing Iceland was quite difficult; we felt we had a lot to share that could help other photographers. Writing our Death Valley Guide came about for different reasons. We have made more than a dozen trips to Death Valley over different seasons and our Death Valley Guide is a result of a deep affection for the park and its surreal landscapes.

Challenges to Avoid

There are so many high-quality, inspirational photos on the internet that I sometimes get other people’s photos stuck in my mind. This is especially true for popular places. Thus, I think it’s important to balance planning with a willingness to experience what a place has to offer once you arrive. Having set expectations can lead to disappointment and copying photographs that have been made many times before. I try to balance my expectations with an openness for serendipity and a willingness to explore beyond the things we planned to see in advance.

So the only question remains is… What are you waiting for? 
The longer you wait, the less time you’ll have to explore the next location on your bucket list. If you are interested in exploring Death Valley or Planning a trip to Iceland, feel free to check out Sarah and Ron’s stunning  Photo Guides.

About Author Sarah Marino

Sarah Marino is a landscape and nature photographer from Colorado who is currently traveling full-time in an Airstream trailer with her fellow photographer husband, Ron Coscorrosa, and their two cats. Sarah strives to capture photographs that convey the elegance, beauty, and the awe-inspiring qualities of the landscapes she explores during her travels. In addition to grand landscapes, Sarah’s portfolio also includes a diverse range of smaller subjects including plants, trees, and abstract natural subjects.

Sarah has published a variety of educational materials for landscape and nature photographers. These ebooks and video tutorials include: Forever Light: The Landscape Photographer’s Guide to Iceland, Desert Paradise: The Landscape Photographer’s Guide to Death Valley National Park, Black & White Photography: A Complete Guide for Nature Photographers, and Beyond the Grand Landscape: A Guide to Photographing Nature’s Smaller Scenes.

You can view more of Sarah's photos, educational resources for nature photographers, and travel stories on her website.

Let's block ads! (Why?)


Visual Wilderness https://ift.tt/31W6NRY

Sourced by Time Trap Photography sharing the best photography tips, news and tricks throughout the industry. Time Trap Photography is dedicated to freezing those special moments in life that can be revisited and admired for generations to come. - Shannon Bourque
Please visit our main site for booking availability and rates.


"Time


Receive valuable industry knowledge delivered free to your email each day.


"Time

Test: CAPTURE X – Fine-Art-Papiere im Vergleich

12:18:00 AM

Am Montag durften wir Euch die neuen Fine-Art-Papiere von CAPTURE X vorstellen. Natürlich waren wir auch selbst sehr neugierig und wollten sie testen. Ich habe mich mit Redakteur Sebastian getroffen, um die Papiere gegen die Konkurrenz antreten zu lassen.

Wir haben uns drei Papiere aus der CAPTURE X Kollektion ausgesucht und sie mit den beliebtesten Papieren auf dem Markt verglichen. Es traten an:

Unsere Testmotive

Ein dunkles Portrait einer FrauSchwarzweiß-Aufnahme von Hochhäusern und einer Rauchwolke
Landschaftsaufnahme mit Bergsee

© Sebastian H. Schroeder

Etwas Wichtiges vorweg: Es gibt nicht das eine, perfekte Papier. Je nach Motiv wählt man das beste Papier aus. Braucht man zum Beispiel ein tiefes, makelloses Schwarz, wird man ein anderes Papier nutzen, als für ein Foto, das feine Grauabstufungen besitzt. Matte, strukturierte Papiere wirken anders als leicht glänzende Oberflächen.

Die berühmte eierlegende Wollmilchsau gibt es auch in der Papierwelt nicht. Es ist also nicht möglich, ein bestimmtes Papier auf ein Siegerpodest zu stellen und zu sagen: Druckt damit.

Wir können nur Vor- und Nachteile für unsere Motive abbilden und haben ganz gezielt möglichst verschiedene Aufnahmen für den Test ausgewählt: Eine bunte Landschaftsaufnahme, für die wir eine hohe Brillanz und starke Sättigung suchen, ein schwarzweißes Straßenfoto aus New York, bei dem wir Strukturen und Schärfe betrachten und ein sehr dunkles Portrait, bei dem wir gern ein sattes Schwarz mit feinsten Abstufungen sehen möchten.

Sebastian erklärt noch ein wenig genauer, wie unsere Auswahl zustande kam und wie die Motive sich auf den jeweiligen Papieren verhalten:

Wie wir getestet haben

Neben einfach nachprüfbaren Fakten wie dem Preis, haben wir für jedes Papier ein Testchart gedruckt, an dem sich schon viele Vor- und Nachteile der einzelnen Papiere ablesen lassen. Farbdarstellung, Hautfarbtöne, Schwarzweißwiedergabe, Tiefendifferenzierung, Kontrast, Klarheit und Schärfe waren unsere wichtigsten Kriterien im Test.

Zusätzlich haben wir jedes der drei oben gezeigten Motive auf allen Papieren gedruckt und diese miteinander verglichen.

Testcharts

Unsere Testergebnisse

CAPTURE X Rag Fine Textured 310 g/m² gegen Hahnemühle Photo Rag 308 g/m²

Die schön strukturierten Rag-Papiere zeigen die Vor- und Nachteile am besten bei unserem dunklen Portrait und in der Schwarzweiß-Aufnahme. Das CAPTURE-X-Papier hat eine außerordentlich gute Schwarzwiedergabe, weit besser als das Hahnemühle-Papier. Dafür ist das CAPTURE-X-Papier in der Differenzierung der dunklen Farbtöne sichtbar schwächer als das Vergleichspapier. Die feine Linie zwischen dem Rücken der abgebildeten Frau und dem dunklen Hintergrund ist kaum sichtbar. Das Hahnemühle-Papier hat an dieser Stelle die Tiefen besser im Griff.

Im Testchart zeigte das CAPTURE-X-Papier zudem im Grünbereich einen kleine Farbabriss, wodurch das Portrait insgesamt ein klein wenig röter wirkt als auf dem Hahnemühle-Papier. Abgesehen von diesen zwei Punkten liefert das CAPTURE X Rag Fine Textured allerdings super Ergebnisse: Wie schon im ersten Vergleich starke Farbbrillanz, sehr hohe Schärfedarstellung und eine sehr schön anzusehende Papierstruktur.

Wenn Ihr nicht gerade ein Papier sucht, dass verschiedene tiefe Schwarztöne trennen muss, dann erhält das CAPTURE-X-Papier eine klare Kaufempfehlung. Außerdem ist es 40 % günstiger als das Vergleichspapier von Hahnemühle.

Papiere im Vergleich

Links: Hahnemühle, rechts: CAPTURE X

CAPTURE X Natural Matt 200 g/m² gegen Hahnemühle Photo Rag 188 g/m²

Auch in diesem Test gewinnt CAPTURE X den Preisvergleich mit 60 % Ersparnis. In diesem Vergleich hat sich gezeigt, dass man mit Testcharts allein nicht alles beurteilen kann: Denn auch wenn das Hahnemühle-Papier auf dem Chart in der Schärfe gewinnt, ist die subjektive Schärfe auf dem CAPTURE-X-Papier höher. Das liegt erneut an der tiefen Schwarzwiedergabe. Es macht also immer Sinn, den Gesamteindruck zu bewerten.

Papiere im Vergleich

Links: Hahnemühle, rechts: CAPTURE X

Detailvergleich von zwei Bildern

Die feinen Linien im hinteren Bereich des Busses sind auf dem unteren Papier von CAPTURE X klarer erkennbar.

CAPTURE X Photo Lustre 300 g/m² gegen Epson Premium Luster Photo 260 g/m²

Im direkten Vergleich der Lustre-Papiere war die Farbbrillanz von CAPTURE X auf den ersten Blick intensiver. Es gibt die Farben wesentlich satter wieder, was sich insbesondere bei der Landschaftsaufnahme positiv auswirkt. Im Vergleich der anderen beiden Motive hat es jedoch Schwächen bei der Tiefendifferenzierung. Die Schärfe ist bei beiden Papieren gut.

Zudem ist es – wenn auch nur wenige Cent – teurer als das Lustre-Papier von Epson. Für Letzteres muss man jedoch beim Format A4 direkt tief in die Tasche greifen und ein Paket mit 100 Blatt kaufen, während CAPTURE X auch im Paket zu 25 Blatt zu haben ist. Zudem ist die Grammatur mit 300g deutlich stärker, wodurch sich vielleicht auch der etwa 13 Cent teurere Preis pro Blatt erklärt.

Papiere im Vergleich

Links: Hahnemühle, rechts: CAPTURE X

Der Vergleich im Video

Wie Ihr sicher gemerkt habt, sind die Unterschiede oft nur minimal und in Fotos nur schwer wiederzugeben. Im Video könnt Ihr den Vergleich der Papiere noch genauer und mit mehr Details ansehen:

ICC-Profile

Für Druckprofis ist sicher ein kleiner Blick auf die ICC-Profile spannend. CAPTURE X bietet diese auf der Webseite zum Herunterladen für die gängigsten Drucker von Canon und Epson an. Sebastians Erfahrung zeigt, dass gutes Papier mit den normalen Druckereinstellungen gute Ergebnisse erzielen kann. Mit den Profilen der Herstellerfirmen, kann man die Ergebnisse aber noch einmal verbessern, denn diese sind auf den Farbton des jeweiligen Papiers optimiert.

Die Königsdisziplin ist es eigene ICC-Profile zu erstellen, durch die sich dann wirklich ganz genau das Papier auf den eigenen Drucker und die Druckbedingungen abstimmen lässt. Wer davon zum ersten Mal hört und mehr wissen möchte, erfährt darüber mehr im Video:

Fazit

Die Papiere von CAPTURE X liefern sehr gute Qualität, die es durchaus mit den Größen der Branche aufnehmen kann. Überzeugt haben uns vor allem die beiden matten Papiere, die mit den Pendants von Hahnemühle absolut mithalten konnten und auch noch günstiger waren.

Eine kleine Nachbesserung wünschen wir uns allerdings noch bei der Tiefendifferenzierung. Ohne diese Schwäche hätten sich alle Papiere gegen die Wettbewerber durchgesetzt.

CAPTURE X tritt mit dem Versprechen an, ihre Papiere mit Hilfe der Nutzer*innen weiterzuentwickeln und zu verändern. Sie bitten gezielt um Meinungen der Kreativen in Umfragen und den sozialen Medien. Wir können also weiterhin gespannt sein und vielleicht trägt unser kleiner Test ja ebenso zu Anpassungen bei, die die Papiere weiter perfektionieren.

Solltet Ihr jetzt selbst gespannt auf eines der geteseten Papiere sein: Hier geht es zur Webseite von CAPTURE X, hier findet Ihr mehr Informationen zu Hahnemühle und hier zu den Epson-Papieren.

Dieser Test wurde unabhängig von weiteren Werbemaßnahmen durchgeführt und über die Bereitstellung der CAPTURE-X-Papiere hinaus nicht gesponsert.


kwerfeldein – Magazin für Fotografie https://ift.tt/34Hgztb

Sourced by Time Trap Photography sharing the best photography tips, news and tricks throughout the industry. Time Trap Photography is dedicated to freezing those special moments in life that can be revisited and admired for generations to come. - Shannon Bourque
Please visit our main site for booking availability and rates.


"Time


Receive valuable industry knowledge delivered free to your email each day.


"Time

About Us

Time Trap Photography is dedicated to freezing those special moments in life that can be revisited and admired for generations to come. - Shannon Bourque

The lens in focus

“Life is like a camera. Just focus on what’s important and capture the good times, develop from the negatives and if things don’t work out, just take another shot.” — Unknown

TIME TRAP PHOTOGRAPHY COPYRIGHT 2016