Monday, September 30, 2019

Mystische Nachbarschaft

10:09:00 PM

Ich wünschte, ich hätte Wiesen, Felder und Seen direkt vor der Haustür und rede mir ein, ich würde dann sicher viel mehr fotografieren. Ich lebe in einer Großstadt und in meinen Arbeiten spielt die Natur eine wichtige Rolle. Vor meiner Haustür sind aber vor allem Straßen und viele weitere Haustüren.

Um dennoch meiner Leidenschaft nachzugehen und die Art Bilder zu machen, die ich liebe, suche ich meine Locations deshalb oft in Vorgärten und an Straßenrändern. Einen Wald gibt es zum Glück auch nicht weit von hier, den möchte ich natürlich nicht verschweigen. Aber im Großen und Ganzen finde ich erstaunlich viel Inspiration an Straßenecken.

Da ich oft gefragt werde, wo und wie meine Bilder entstehen, zeige ich Euch heute ein paar kleine Beispiele, die sicher auch in Eurer nächsten Umgebung zu finden sind, egal wie grau sie auf den ersten Blick erscheint.

Vorgarten

Collage Frau in Hortensien

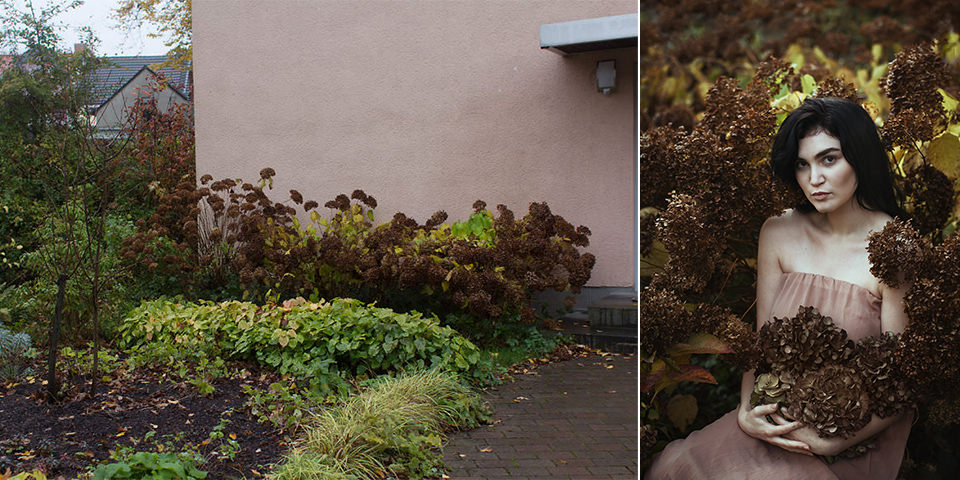
Mein erstes Beispiel zeigt einen herbstlichen Vorgarten, in dem ich im letzten Jahr Portraits von Modell Saskia gemacht habe. Inspiriert haben mich die vertrockneten Hortensien an der Hauswand. Ein wenig Überwindung kostet es immer, aber klingeln und um Erlaubnis zu bitten ist enorm wichtig. Am besten ist es, ein paar Beispielbilder dabei zu haben.

Im schlimmsten Fall kommt ein Nein als Antwort und man zieht halt weiter. In diesem Fall war die Nachbarin sehr freundlich und hat uns sogar erlaubt, einige der Hortensienblüten zu pflücken. Ich habe Saskia seitlich auf die Treppe gesetzt und in die Blüten hineinfotografiert, sodass man möglichst wenig von der Hauswand sieht. Im Nachhinein habe ich noch die rechte Ecke, zwischen der das Nachbarhaus durchscheint, aufgefüllt.

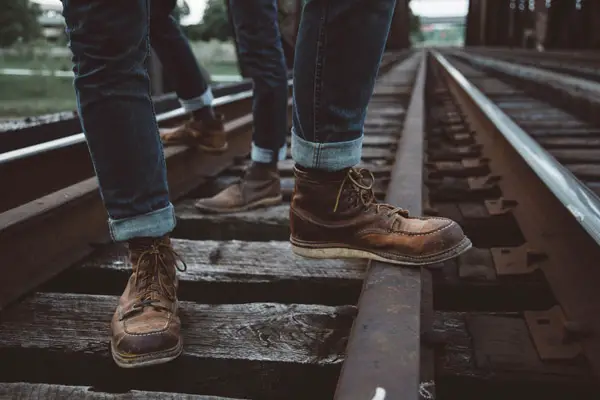
Sicher gibt es auch bei Euch diese Efeuhecken, die entlang von Mauern und Zäunen wachsen. Blendet man die Umgebung aus, wird aus dem Fahrradweg neben den Bahngleisen eine Location, die an Schneewittchens Welt erinnert.

Hecke an einem Weg

Frau zwischen Efeu

Ich merke, wie ich meine Umwelt durch meine Fotos ganz anders wahrnehme. Überall sehe ich interessante Ecken, eine verwunschene Treppe neben einer Fastfood-Filiale oder einen märchenhaften Baum im Stadtpark neben der Hauptverkehrsstraße.

Das schönste Wurzelwerk habe ich bisher auch an einem weniger einladenden Ort gefunden. Es liegt entlang der Schrebergärten an einem kleinen Hang, der in den Wald führt. Gerade an kleinen Berghängen trotzen Bäume ihrer Umgebung und bilden gigantische Wurzeln, die sich immer für Fotos eignen.

Wurzel

Frau zwischen Wurzeln

Ich habe unzählige Bilder an eher ungewöhnlichen Orten gemacht, aber oft nicht die Umgebung mitfotografiert. Das werde ich in Zukunft öfter machen, um zu zeigen, welch schöne Details sich zwischen Beton und Straßenlärm verstecken, wenn man die Augen offen hält. Am Ende ist es einfach eine Frage des Blickwinkels und des richtigen Beschnitts – und schon sieht das Foto ganz anders aus.

Das einzige Problem an diesen Orten ist, dass man nie ganz allein ist. Spaziergänger*innen bleiben stehen und schauen mir über die Schulter, stellen Fragen oder holen sogar das Handy heraus und fotografieren mit. Auch gibt es leider oft irgendeine Person, die mir erzählt, dass das Fotografieren dort verboten sei. In solchen Situationen wünsche ich mir dann doch wieder ein einsames Häuschen umgeben von Wildnis.

Irgendwann wird es soweit sein. Aber bis dahin fotografiere ich weiter in meiner Nachbarschaft, die auf den ersten Blick so trist erscheint und auf den zweiten Blick plötzlich Märchenwelten erschließt.


kwerfeldein – Magazin für Fotografie https://ift.tt/2oIlyXV

Sourced by Time Trap Photography sharing the best photography tips, news and tricks throughout the industry. Time Trap Photography is dedicated to freezing those special moments in life that can be revisited and admired for generations to come. - Shannon Bourque
Please visit our main site for booking availability and rates.


"Time


Receive valuable industry knowledge delivered free to your email each day.


"Time

Meet the Canon EOS M200, A New APS-C Mirrorless for Everybody (But Especially Social Media Fans)

5:39:00 PM

Last Updated on by

As we get closer to the end of the year, we were expecting a batch of new cameras to be released but this year is proving particularly fruitful.

EOS M200
from Canon.

Today we’re bringing you word of Canon’s next mirrorless wonder for everybody, the EOS M200 which is being billed as an entry-level APS-C mirrorless camera with a 24.1 Megapixel CMOS sensor and a ship date of THIS MONTH.
Just in time for one of the biggest shopping seasons in the world.
Positioned as the natural successor to the M100, the M200 is coming with eye-detection autofocus, the sensor listed above, and 4K video. In the press for the camera, Canon also highlights the “social media enthusiast” as a target audience for the camera.
That’s both not very surprising and interesting from a market standpoint given how intense the competition is with smartphones. Still, anyone serious about social media probably should get a camera and the Canon EOS M200 wants to be there when that customer decides to make the leap. Perhaps that is why it comes in at a competitive $USD 549.
From a press release on the camera, president and chief operating officer, Canon U.S.A., Inc Kazuto Ogawa was quoted as saying, “Ease of use, convenience and shareability are imperatives for consumers today, especially when introducing new imaging products into an ever-changing market place…The new EOS M200 camera is a mix of tried and true Canon features as well as new ones, and combined they create a non-intimidating mirrorless camera for the experienced photographer – yet it is approachable for someone beginning their visual storytelling journey.”

  • Claim Your Free Camera Craft Cheat Sheet

Print it out and keep it for when you really need it - when you're out shooting!

EOS M200
from Canon.
EOS M200
from Canon.
EOS M200
from Canon.

Here’s some more stats on the camera:
DIGIC 8 Imaging Processor
4K UHD, Full HD up to 60p, Vertical video support1
Dual Pixel CMOS AF
Eye Detection Auto-focus
Convenient Wi-Fi®2 and Bluetooth®3 Technology
Capable of Sharing Photos and Videos to Social Media Platforms
Compact and Lightweight Design
Compatible with Extensive Line of EF-M, Canon EF4 and EF-S4 lenses
What do you think? Does the Canon EOS M200 sound like a good alternative for the social-media obsessed consumer? Let us know your thoughts in the comments below.
Also, don’t forget to check out our other photography news articles on Light Stalking by clicking here.
[SLR Lounge]


Let's block ads! (Why?)


Light Stalking https://ift.tt/2oMDctL

Sourced by Time Trap Photography sharing the best photography tips, news and tricks throughout the industry. Time Trap Photography is dedicated to freezing those special moments in life that can be revisited and admired for generations to come. - Shannon Bourque
Please visit our main site for booking availability and rates.


"Time


Receive valuable industry knowledge delivered free to your email each day.


"Time

5 Awesome Ways to Improve Your Clothing Photography

7:42:00 AM

Clothing photography… it’s chic, it’s in demand, and it can score you a pretty penny if you prove yourself. What’s even better is that clothing photography has weaved itself into numerous popular industries and niches, ranging from fashion and runways (duh), to Ecommerce stores, all the way to social media and its influencers – there is no shortage of gig opportunities for the aspiring clothing photographer.

clothing_photography_0

Even if you’re not a photographer per se but would love to snap a few pics of your handmade apparel to sell it online, you stand a decent chance of elevating the price with a high-quality image.

Now, there is no denying that photography is a nuanced artform, and people study this art for years on end on some of the finest universities on the planet, but that doesn’t mean that you can’t acquire the necessary skillset through self-education and some trial and error. With that in mind, here are some awesome tips for you to take your clothing photography game to the next level and sell your pics for some big bucks.

1. Scale the lighting just right

Much like with almost every photoshoot, it all begins with the lighting and how it interacts with the primary objects in the scene. Keep in mind that optimizing the light sources can and will mean the difference between an amazing photo and a blurry mess nobody will want to buy. At the very least, you want to avoid the dreaded flash glare that tends to obscure the focal points of the image and make it look completely unnatural and unappealing.

clothing_photography_3

When it comes to clothing photography, you will need to take into consideration the unique ways different light angles and hues affect the look and “feel” of the fabric, its texture, and its patterns. Clothing is tricky because it needs to look natural and playful, like you’ve captured it in motion (more on that in a bit), so there is need to try out as many different types of lighting as possible depending on the angle you’re photographing from. Experiment with accent lighting, don’t use your camera’s flash, and you will get there.

2. Adapt and play around with the scene

The quickest and easiest way to snap a few quality pics of a piece of clothing is to take photos in your studio. It’s a controlled environment where you can play around with the lighting, take pictures from any and every angle, and play around with the clothes until you’ve created the “perfect” photograph. However, you shouldn’t underestimate the potential of diverse scenery and backgrounds, as it creates a more natural look for the piece and can inspire the buyers to relate to the image – something that a studio photo might not be able to achieve.

clothing_photography_4

Consider a change of scenery to capture the item in a more candid setting, such as a park, in front of a beautiful street mural, or a corporate office building – it all depends on the style of the clothes, really. Remember, you’re trying to appeal to a certain audience, so an aspiring business leader would probably like to see the three-piece suit you’re photographing being worn by a “successful business person” on their way to the office, or in a corner-side café with a cappuccino in their hand while they’re managing projects on a laptop. Use the same mindset to create a relatable backdrop for every piece of clothing or ensemble.

3. Take multiple shots from multiple angles

Most importantly, you need to take multiple shots from multiple angles, especially if you’re photographing products for a reputable online fashion store where shoppers can examine every clothing option from every angle in order to reinforce their decision to buy. Catalog photos such as these need to boast items in a multitude of different angles, but it’s also important that you take photos of actual models wearing the pieces.

clothing_photography_5

The more pics the customers have to work with, the higher the chances that they will put the item in their shopping cart – even though the photos of the items are but a single piece of the online shopping puzzle. With that said, avoid duplicates at all costs, and stick to a single photo per angle to avoid confusion. Make sure to run every photo for that item through the same post-production process to avoid discolorations and mismatched imagery – customers like consistency.

4. Capture the clothing in motion and in use

No matter what you’re trying to capture through your lens, the key focal point (in this case, the clothing item) needs to tell a story, it needs a narrative, and the viewer needs to experience the item in use. Why? Let’s take an example from a different industry, the theater.

If you go to any theater’s website right now and click on the gallery section, chances are that you’re going to come across pictures showing an empty stage and empty rows of seats, in an attempt to showcase the capacity and beauty of the hall. But what is the image missing? Life.

clothing_photography_1

The same goes for clothing photography. When shot in front of a blank backdrop, levitating in the air, the item is an inanimate object devoid of soul and substance. On the other hand, if you go the extra mile to capture the item being worn, doing something meaningful, and conveying a certain message, then you’re relating to the lives and intrinsic values of your audience – you’re inspiring people to become a part of the story.

5. Match the clothes with the model

Humans are primarily visual creatures, and they have a remarkable propensity to spot irregularities, identify mismatching compositions and accents, and get that dreaded “off-putting” feeling they simply can’t pinpoint, but they know it’s there. Needless to say, you must not allow your photographs to evoke these emotions and reactions, which is why you need to match the item to the model.

clothing_photography_2

Now, we’re all for equality, but when it comes to the composition of a photograph, you need to be realistic and acknowledge that some skin tones, facial features, and body types simply work better with different materials, colors, patterns, styles, etc. As a photographer, it will be up to you to find the perfect model for every item, or at the very least, use your magic to make the item look as natural on the model you’re working with as possible.

Wrapping up

Clothing photography will always be popular, because every industry where this artform is relevant is one the rise, whether it’s Ecommerce or just fashion in general. As a clothing photographer, you have the opportunity to become wealthy and successful, but you will first need to stand out in your unique style and approach that creates enthralling images that sell. Use these tips, make your mark on the industry, and don’t forget to come back years from now to give back to other aspiring photographers.

Let me know below if you have any questions in the comments.

Check out this link for tips on fashion photography.

Let's block ads! (Why?)


Photodoto https://ift.tt/2nR2CG6

Sourced by Time Trap Photography sharing the best photography tips, news and tricks throughout the industry.
Time trap photography><br></a> <hr><a href=Time trap photography tweet
Sourced by the Time Trap Photography guys https://ift.tt/1LW7xnO
Time Trap Photography is dedicated to freezing those special moments in life that can be revisited and admired for generations to come.

5 Tips That Will Take Your Fall Photography To A New Level

5:02:00 AM

Are you ready for the fall season? Even though the calendar shows that we (in the Northern Hemisphere) have officially transitioned into fall, I realize that there are some places where the effects aren’t apparent yet. 

Don’t fear — the crisp air and colorful leaves are coming. Fall is a photographer’s paradise and even if things haven’t quite turned the corner in your neck of the woods, it’s always good to be prepared.

Grab Your Landscape Photography Cheat Sheet

All of the information you need along with camera settings for cracking landscape photographs.

Print it out and take it with you!

Here are 5 simple tips that will help take your fall photography to the next level.

Chase The Light

Of course, this applies any time of the year — you always want to find the best light. But I think most will agree that autumn light is extra beautiful and it is a wonderful complement to the changing foliage.

Use the warm light to really convey the glow of the season by looking for backlit scenes and capturing the light as it filters in through the leaves.

Valiphotos

Add Some Saturation

Again, fall is about warm, earthy colors. You can enhance the natural beauty of these tones by adding a bit of saturation in post-production. It’s easy to go overboard, so try to avoid being heavy-handed with slider. You just want to make the image pop a bit.

Valiphotos

Pick The Perfect Time

This is particularly important for those interested in photographing colorful leaves. Although fall may last for a period of three months, the colorful foliage sticks around for only about a third of that time.


Ideally, you want to catch “peak foliage,” which varies according to the region in which you live. If you’re a veteran fall photographer, you will likely know what that timeframe is. 

If you are in the US, check out the Fall Foliage Prediction Map. You can use this visual guide to track the progression of the changing colors and plan your photography around it. If you have something similar in your part of the world, then tell us in the comments below

Venture Into The Fog

To me, fog and mist are captivating treats any time of year, but they definitely add the perfect dynamic touch to fall photos.

Fog and mist tend to appear just after sunrise. If accompanied by cloud coverage they’ll linger longer into the day, otherwise, you need to be prepared to capture fog and mist pretty quickly.

Eberhard Grossgasteiger

Vary Your Perspective

Wide-angle lenses are great for fall photography, as they allow you to capture vast, colorful scenery. On the other hand, fall brings with it plenty of opportunity to photograph details, so get low and get close to things.

You might also try working with very shallow depth of field or perhaps trying out something a bit more abstract where colors dominate.

Jeswin Thomas

Final Thoughts

Fall provides unique visuals for photographers to play with. From seasonal colors and tones to atmospheric conditions, the autumnal wonderland will keep you busy for weeks on end.

Create classic wide angle compositions that will appeal immediately to everyone, but also take the time to experiment with the bevvy of colors and textures at your disposal to convey a different take on the season.

Further Reading

Let's block ads! (Why?)


Light Stalking https://ift.tt/2oz3rDL

Sourced by Time Trap Photography sharing the best photography tips, news and tricks throughout the industry. Time Trap Photography is dedicated to freezing those special moments in life that can be revisited and admired for generations to come. - Shannon Bourque
Please visit our main site for booking availability and rates.


"Time


Receive valuable industry knowledge delivered free to your email each day.


"Time

30. September 2019

4:04:00 AM

Das Bild des Tages von: Thomas TRENZ


kwerfeldein – Magazin für Fotografie https://ift.tt/2oB3QFV

Sourced by Time Trap Photography sharing the best photography tips, news and tricks throughout the industry. Time Trap Photography is dedicated to freezing those special moments in life that can be revisited and admired for generations to come. - Shannon Bourque
Please visit our main site for booking availability and rates.


"Time


Receive valuable industry knowledge delivered free to your email each day.


"Time

6 Effective Tips for Gorgeous Flower Photography

3:49:00 AM

Do you struggle to capture amazing photos of flowers? The kind that will absolutely stun your viewers? While it might seem difficult, taking stunning flower photos is actually fairly easy–if you know what to do. In this article, I’ll share 6 tips for flower photography that will practically guarantee amazing flower photos.

Are you ready to take your flower photos to the next level? Let’s get started.

1. Get Close for the Most Unique Shots

Flower photography is all about getting close. So once you’ve found a subject, get close. And keep getting closer. Here’s why:

The closer you get to your subject, the more unique your perspective. You’ll show viewers something that they’ve never seen before–and that will add a whole new dimension to your flower photography. Now, professional macro photographers use dedicated macro photography lenses to magnify their subjects. But this isn’t a requirement.

You can use any lens that lets you get close. Telephoto lenses often work well, here. But some wide-angle lenses focus close, as well.

Close-up of a flower petal with a macro photography lens by Jaymes Dempsey

Close-up of a flower petal with a macro photography lens by Jaymes Dempsey

One more recommendation: Experiment with different photography composition from all different angles. Let me explain:

Once you’ve found a flower, take a shot from the distance. That way, you’ll have a record shot of the flower.

But then…Move in closer. Take a nice portrait of the flower. Next, go even closer for a detailed image. Focus on the most interesting aspects of the flower: the petals, the center, and even the stem. And finally, get as close as you can, and take a gorgeous abstract shot.

Abstract flower photo with a macro photography lens

Abstract flower photo with a macro photography lens

2. Shoot under a soft light

Good flower photography starts with light. So…

If you want beautiful flower photos, you’ve got to learn about different lighting scenarios. Fortunately, this is more complicated than it sounds. Because there is one type of light that’s absolutely fantastic for flower photography: Soft, cloudy light.

Creative flower photography under soft light by Jaymes Dempsey

Creative flower photography under soft light by Jaymes Dempsey

You see, harsh sunlight is terrible for macro photography. It’s bright, it’s contrast-heavy, and it causes all sorts of problems for flower photos. So never photograph flowers at noon on a sunny day. The light is terrible.

But when the clouds roll in…That’s when the light gets wonderfully soft. The clouds diffuse the light and leave you with something beautiful.

One of the great things about cloudy light is that it enhances colors for macro photography subjects. The diffused light will make your flowers look more saturated–which looks pretty great!

Macro photography under soft light to create saturated colors by Jaymes Dempsey

Macro photography under soft light to create saturated colors by Jaymes Dempsey

3. Use a Wide Aperture for a Soft-Focus Look

In flower photography, I advocate creating artistic images. And one of the best ways to create artistic image is to create a gorgeous soft-focus look. Like this:

  • Creative flower photography with soft camera focus

    Creative flower photography with soft camera focus

  • Experimenting with abstract flower photography using wide open aperture

    Experimenting with abstract flower photography using wide open aperture

Notice the way the image fades in and out of focus. It’s actually a simple effect to reproduce–you just need to use a wide aperture. Specifically, I recommend choosing an f-stop between f/2.8 and f/5.6. And I also recommend getting as close as you can. This will ensure an ultra-narrow depth of field, with a razor-thin point of focus. It will also create a deeply blurred background, which will enhance the soft-focus effect.

If you’re struggling to create pleasing soft-focus images, I recommend switching to manual focus. This will give you far more control over your photo; you’ll be able to easily choose the area in the photo that is sharp. Regardless, don’t be afraid to experiment with different wide apertures and different points of focus. Abstract flower photography is all about experimentation!

4. Use golden-hour light

I’ve talked about the beauty of cloudy light for flower photography. But it turns out that there’s actually one other type of light that works great for flower photography: Golden-hour light.

The golden hours are the hours just after sunrise and just before sunset. During these times, the sun is low in the sky, and it casts a gorgeous golden glow over the entire scene.

Now, while golden-hour lighting is excellent for macro photography, you need to be careful. You see, when the sun is low in the sky, it has directionality; that is, it shines on your subjects from different directions. And different directions will give you different effects, some of which are better than others.

  • Front lit macro photography example by Jaymes Dempsey

    Front lit macro photography example by Jaymes Dempsey

  • Back lit flower photography by Jaymes Dempsey

    Back lit flower photography by Jaymes Dempsey

In general, there are three types of directional light:

  • Front light is when the light hits the front of the subject (and comes from behind the photographer).
  • Back light is when the light hits from behind the subject (and comes from in front of the photographer).
  • And side light is when the light comes from off to the side of the subject.

I recommend front light as a flower photography go-to. It will evenly illuminate your subject without overpowering it. But sidelight can create a darker, more dramatic look. And backlight will give you some artistic effects, if you can deal with its intensity!

5. Increase subject to background distance

Backgrounds are one of the most underrated elements of macro photography. Because an amazing background will greatly enhance your flower photo. But a poor background will just cause problems.

Now, the best backgrounds are uniform, smooth, and non-distracting. They help the main subject stand out. And the best backgrounds actually enhance the photo–by adding a splash of color to the image.

Flower photography with clean uniform background

Flower photography with clean uniform background

So how do you create a beautiful background? As mentioned above, you should use a narrow aperture to guarantee a blurry background. The blur with increase the overall uniformity of the backdrop, which is exactly what you want.

But you should also increase the subject to background distance. In other words, you should make sure that your subject is far from the background. Why? The farther the background is from your subject, the deeper the extent of the background blur. And the better the blur, the better the background.

For instance, I captured this photo by ensuring a good subject to background separation:

Flower photography with clean uniform background

Flower photography with clean uniform background created by increasing separation between subject and background

Here’s what I recommend:

Once you’ve found your main subject, observe it from different angles. Get down low to the ground. Move to the side. Eventually, you’ll find an angle that gives you a beautiful background–one that’s nice, smooth, and helps your subject stand out.

6. Pay attention to your photography composition

Here’s one last flower photography tip for you:

If you really want your photo to stand out you’ve got to carefully arrange your subject in the frame. That is, you must make sure that your subject is positioned in the best place possible–so that it stands out, and draws the eye. One of the best ways to do this is to use the rule of thirds. The rule of thirds suggests that you position your subject about a third of the way into the frame, like this:

  • Macro photography composition using diagonals by Jaymes Dempsey

    Macro photography composition using diagonals by Jaymes Dempsey

  • Flower photography composition using rule of thirds

    Flower photography composition using rule of thirds Jaymes Dempsey

But the rule of thirds isn’t the only way to make your subject stand out. You can also put empty space (also known as ‘negative space’) around your main subject, thereby directing the viewer straight toward the focal point. This is especially effective if your subject is small in the frame.

The bottom line? If you take your time with your photography composition, you can capture a truly stunning flower photo.

Conclusion

Capturing amazing flower photos doesn’t have to be hard. In fact, it’s often easy! And if you follow the tips I’ve laid out above you’ll be taking amazing flower photos in no time!

Feel free to share your own tips about capturing creative flower photography in the comments below.

Let's block ads! (Why?)


Visual Wilderness https://ift.tt/2oAqoqh

Sourced by Time Trap Photography sharing the best photography tips, news and tricks throughout the industry. Time Trap Photography is dedicated to freezing those special moments in life that can be revisited and admired for generations to come. - Shannon Bourque
Please visit our main site for booking availability and rates.


"Time


Receive valuable industry knowledge delivered free to your email each day.


"Time

Die letzte Wildnis

12:19:00 AM

Müll im Wald

Lappland ist eines der letzten verbliebenen Wildnisgebiete in Europa. Über Europa hinweg existieren die letzten unberührten und naturbelassenen Gebiete in schwach besiedelten arktischen Regionen. Manche Gebiete sind bis auf den heutigen Tag noch nicht erschlossen. Die Einwohnerdichte liegt im Schnitt deutlich unter zwei Menschen pro Quadratkilometer.

Aber dieses idyllische Bild ist leider irreführend. Teilweise aufgrund der schieren Größe des Gebietes über das wir reden: Lappland hat eine Fläche von ca. 110.000 km². Man muss etwas genauer hinsehen, um die entscheidenden Details nicht zu übersehen.

Die Idee zu diesem Projekt ist entstanden, als ich am Wegesrand in einem abgelegenen Gebiet eine mit Müll gefüllte, zusammengeknotete Einkaufstüte einer bekannten schwedischen Supermarktkette entdeckte. Neben ihr lag ein Coffee-To-Go-Becher und auf ihr prangte in großen Buchstaben die Aufschrift (übersetzt) „100 % klimaneutral“.

Müll im Wald

Im Moment wird – gerade auch hier in Schweden – viel über Klimaveränderung gesprochen. Ich mache mir dabei aber große Sorgen, dass wir den Umwelt- und Naturschutz und unsere Verantwortung für die natürlichen Lebensräume völlig vergessen.

Wir haben alle vom omnipräsenten Plastik in den Ozeanen der Erde gehört. Jedes Jahr landen 8.000.000 t Plastikmüll in unseren Ozeanen zusätzlich zu den 150.000.000 t, die bereits in den marinen Umgebungen beerdigt sind. Es ist eine Katastrophe für viele Tierarten, die das Plastik fressen und deswegen schlicht eingehen.

Aber zurück zu Lappland: Die letzte Wildnis Europas ist nicht mehr so unberührt, wie es scheint. Die Wahrheit ist weit davon entfernt, denn die „unberührte“ Natur ist angefüllt mit Abfall. In den zurückliegenden Monaten habe ich viele abgelegene Gebiete in Lappand bereist, um nach den Spuren der Zivilisation zu suchen. Und was ich dort – im Prinzip überall – gefunden habe, hat mich tief schockiert.

Müll im Wald

Müll im Wald

Müll im Wald

Flasche im Wald

Müll im Wald

Müll im Wald

Müll im Wald

Müll im Wald

Müll im Wald

Müll im Wald

Ich habe Hinterlassenschaften von Menschen gefunden, die offenbar davon ausgehen, dass wir noch einen weiteren Planeten auf Lager haben. Auch wenn es hier in Lappland (noch) nicht so ernst ist wie in den Ozeanen, ist die allgegenwärtige Umweltverschmutzung bereits so ernst, dass eine Erholung nicht mehr möglich zu sein scheint.

Ich denke, es steckt auch ein psychologischer Mechanismus dahinter: Menschen sind normalerweise nicht in der Lage, schleichende Entwicklungen wahrzunehmen. Die meisten derartigen Entwicklungen verlaufen exponentiell. Und wir nehmen sie meistens erst dann wahr, wenn die statistische Kurve „plötzlich abhebt“. Das Problem an der Geschichte: Dann ist es in aller Regel viel zu spät, um noch etwas zu ändern.

Meine unerfreuliche Schlussfolgerung: Wir haben auch hier den „Point of no return“ überschritten und werden mit den weiteren Entwicklungen leben müssen. Jedenfalls so lange, wie wir das als Menschheit können.


kwerfeldein – Magazin für Fotografie https://ift.tt/2nQhG6E

Sourced by Time Trap Photography sharing the best photography tips, news and tricks throughout the industry. Time Trap Photography is dedicated to freezing those special moments in life that can be revisited and admired for generations to come. - Shannon Bourque
Please visit our main site for booking availability and rates.


"Time


Receive valuable industry knowledge delivered free to your email each day.


"Time

About Us

Time Trap Photography is dedicated to freezing those special moments in life that can be revisited and admired for generations to come. - Shannon Bourque

The lens in focus

“Life is like a camera. Just focus on what’s important and capture the good times, develop from the negatives and if things don’t work out, just take another shot.” — Unknown

TIME TRAP PHOTOGRAPHY COPYRIGHT 2016