Are you drowning in an ocean of digital photos? While the digital age has simplified the way we store our photos, the sheer quantity of files can make organizing your photos an overwhelming task. Though you may want to give up on the project altogether, just take a deep breath…and continue reading.
I like to keep things organized – but I know that this is a major stumbling block for many digital shooters.
How many of you are diligent at organizing & keywording your photos? And how many are avoiding the issue altogether?
Benefits for Organizing your Photos
If you go looking for that pretty shot you took in 2005 or 2018 – you know the one I mean… the shot from Iceland, Colorado or Hawaii or Arizona… the one with the interesting patterns or the fantastic sky – how long will it take you to find it? Will you find it at all? Is it buried with thousands of other images in the depths of your computer? In one of hundreds of cryptically labeled files? How many folders are labeled “vacation”? How many shots should have been deleted long ago – but are still waiting in folders within folders? And how many times have you looked at the mess of files and folders on your screen and thought, “I really MUST do something about this mess!” But where to begin?
It’s a lot easier to organize a digital file system than it was to organize all those prints we used to have in envelopes and boxes – waiting to be labeled and put into albums. Unfortunately, most of us have more digital files than we can count. We can shoot as much as we like… no need to worry about the cost of film. We can easily ignore the enormous number of photos in our collections… just close the window on the computer, and the mess is gone. And so it grows, and grows, and grows.
Step #1: Getting Started
So, here’s my recommendation to get started… Don’t Touch Anything!
Just take a few minutes to think. What kinds of photos are you taking? What categories will work for you? Would you rather sort your photographs by date or location? Do you have photos that should be deleted? Would keywords helps you find your images when you need them?
When I started organizing my files, I decided to begin with the current year – rather than going back to the beginning of time and trying to organize old files first. That way, any new files that enter the system will be introduced into a clutter-free environment. Those old files have been sitting there for years – they can sit a while longer. Why not start clean in 2011? Then, when you are sure you like your filing system, you can work backwards, one file at a time.
Step #2: Create a Folder Structure
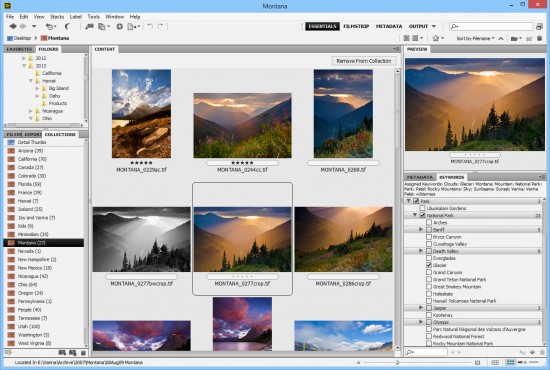
Take a look at the structure I’ve chosen for my own system. It’s really very simple. I sort my photographs first by year, and then by state (or country). You might argue that it’s best to sort by month as well – and that may work well for you. However, Jay and I tend to return to a location more than once in a year – so that only serves to complicate the system for me. Besides, each photo is tagged with a date in-camera, so if I need to know the month, I can easily look it up. I sort by location so that all my photos from that location are together. If I need to find a shot from, say, Blackwater Falls, I’ll open my 2006 folder, click on Midwest Folder, and choose Blackwater Falls. All the locations we visited on the island are listed alphabetically, and I just select Blackwater Falls from the list.
Now, I want to talk a bit about handling specific files. Beyond my clean organizational system, I use two simple techniques to help keep everything organized: Renaming & Keywording my photos.
Step 3: Renaming your Photos
First, when I download my files to my computer system, I rename them using the Adobe Bridge (or Lightroom) download application. It allows me to change the name of the file to anything I like, and I use this feature to make my life easier. If the photos are from Utah, each file gets the prefix “utah”. After that, I use the number already assigned by the camera. Those numbers just let me keep things flowing along in chronological order.
For example, my file name for this shot from our recent trip is new_mexico.CR2. Why does that little label matter? Well – most of the time, I can tell you exactly where any given photo was taken (though I may not remember what I had for breakfast this morning)… but all those desert shots might start to look the same after a while. Some of my less memorable files could be hard to place – especially several years down the road. If I can’t quite place this image in the future, that little file name will help jog my memory… “Ah yes. Right-o. New Mexico. Now I’ve got it!”
Step 4: Keywording Your Photos
Ok – so that’s the first thing. The second? Key-wording. Now, hold on! Come out of the corner! Quit knocking your forehead against the wall! It’s not as bad as it sounds!
After every trip – and before I process anything at all – I keyword my files. Thankfully, I don’t do this one file at a time. Instead, I do it in chunks. Let’s say I just pulled 100 photos off my memory card. My first step is to break them down into the appropriate files. For this trip, I needed three files within my New Mexico directory… White Sands, Valley of Fires, and Bosque del Apache. Once the photos are sorted, I select all the images in one file and start key-wording.
Now, I’m not talking about going nuts here. This should be a quick and simple process. If I start getting too specific, I’ll have to keyword each and every file individually. Instead, I want to give a general overview to help me find a file if I need to search for it later. For example, this image from White Sands gets these keywords: Desert; National Park; New Mexico; Sand Dunes; USA; Varina Patel; White Sands National Monument. That’s all the information I’ll need to find the file in the future… and if someone else is looking for it, my name gives them a little help, too. All these keywords are included in the meta-data for my file, so it is transferred to my website and to Visual Wilderness each time I upload a file. I only have to do it once, and that makes me very happy.
Since most of the images in this file are similar, all these keywords apply to the rest of the files too, so I can keyword an entire set of files in just a few seconds. Some images will need specific keywords – and I can select a few at a time (or just one) if necessary. I have one shot of Jay in this bunch of photos, so I selected it separately and added one keyword: portrait. Done. I have a standard list of keywords that I always use – so I just browse my list and check off the appropriate keywords.
Misc Photos, Portfolios and More!
I should also point out that the files represented here are for my landscape photography only. So I can find them more easily, I file family photos separately. Also, I have a file called “Portfolio”. Every single processed image – landscapes, events, portraits, family photos – gets a space here. When I am finished processing, I simply create a small JPEG file with a watermark and save it to my portfolio file. When I’m not sure which photo I want – or when I want to show someone a selection of my work – I can browse my portfolio.
There are all kinds of options for sorting your files… do it any way you like. What matters is that you can find what you are looking for – without getting too frustrated. So take a few minutes to think about how you want to sort things and then jump in and get started. It’s not as hard as you think!
So, that’s how I do it. What about you? I’m sure many of you have simple tips or suggestions that might help others streamline the organization process… or get it started. Why not pass on your ideas to others who could benefit from them? We’d love to hear from you, and I’m sure many others would too.
Visual Wilderness https://ift.tt/3cfDA7i
Sourced by Time Trap Photography sharing the best photography tips, news and tricks throughout the industry. Time Trap Photography is dedicated to freezing those special moments in life that can be revisited and admired for generations to come. - Shannon Bourque
Please visit our main site for booking availability and rates.

Receive valuable industry knowledge delivered free to your email each day.


No comments:
Post a Comment
Thank you so much for your comment. A moderator will review and approve all relevant posts. We appreciate your support and encourage you to stay with us by subscribing to our email updates. Where you can easily pick and choose what photography subjects interests you. Subscription link: http://bit.ly/photo-sub