Have you ever heard about the term SOOC mentioned for Nature Photography? SOOC stands for “Straight Out Of the Camera”. And those who use the term are generally looking for a pat on the back. Their nature photography is clearly superior because they “got it right” in the camera. No “manipulation”. No Photoshop or Lightroom post-processing. Just a true representation of the scene in all its glory. While I enjoy the challenge of “getting it right in the camera”, the fact is that even the most advanced cameras can’t always handle the broad dynamic range of light in nature. With the help of Photoshop Layers & Masks, I am often able to create a photo that is much closer to reality than SOOC photos.
Consider the above image. I took this photograph of Lizard Lake in Colorado on a partly cloudy day. There’s no bright glaring sunlight here. The range of light isn’t very extreme. At first glance, the lighting, the colors, and the exposure look pretty well balanced. You might think that under such conditions, the photograph could be easily captured with a point-n-shoot or even a mobile phone camera in automatic mode. And a average DSLR or mirrorless camera should be able to handle that range of light easily, right?
Well. No. This is not an SOOC image. In fact, I created this photo by blending three separate exposures using Photoshop Layers & Masks to maintain a natural look.
Here are the three bracketed exposures – SOOC using default settings. Notice that none of the individual exposures looks better than the processed image. And none of these SOOC shots represent reality as closely as the manually blended image. It is true that photographers can get pretty artistic with Photoshop and HDR technology – but in many cases, processing software also lets us bring our nature photography much closer to reality than those SOOC photos.
Here are few reasons why I use Photoshop Layers & Mask for post processing:
#1: Adjusting Contrast
Sometimes we find ourselves photographing a scene where the light conditions are perfect. We can capture the entire dynamic range with a single exposure, so no special filters or bracketing is necessary. But when we open up the raw file, it appears to lack the contrast and details that we remember while out in the field. This occurs because, although the contrast and sensitivity of our eyes adjusts based upon the light conditions, the dynamic range of the camera’s sensor remains fixed. So, low contrast scenes end up using only a fraction of the dynamic range of the sensor. The result is the creation of a flat and unappealing image. In the image below from Cuyahoga Valley National Park, I was able to restore the rich contrast and vibrant colors using Photoshop Layers & Masks:
#2: Balancing Light
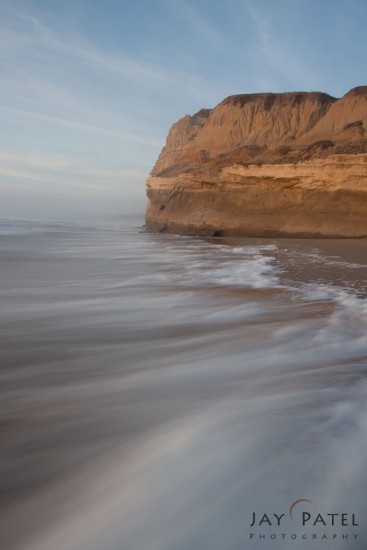
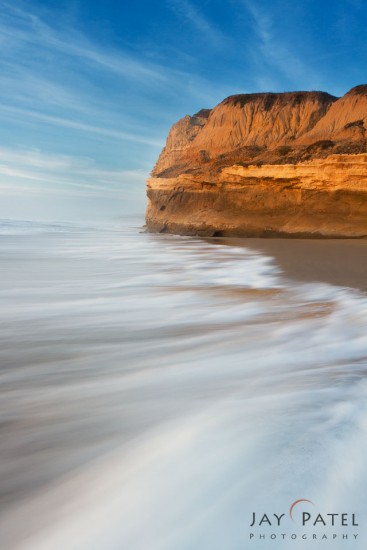
If you open this image below from San Gregorio State Park, California and look at its histogram, you’ll notice that the entire dynamic range is contained within a single shot. In fact, the image uses only part of the dynamic range that can be displayed by the camera. Sometimes, low contrast landscape photos like this create a problem for us. The scene as I remember looked something like the one you see in the processed image.
So what happened? Why did the camera fail to capture the image as I remember it even though it was an easy shot to take? Here is what happened:
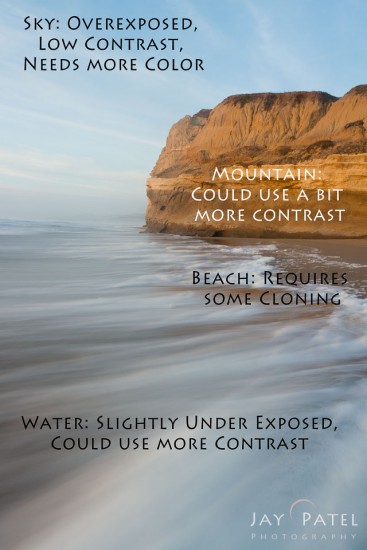
On this particular day, the light in the sky was more intense then the light falling on the foreground. Why? Because a low-lying layer of mist on the horizon was blocking the light from falling on the foreground, while the sky was lit by direct sunlight. When the camera captured the photo, it over-exposed the sky and under-exposed the foreground.
The image outlines the processing corrections that I had to make for this low contrast nature photo. To make these changes, I used Photoshop Layers & Masks. I used a RAW converter to create 2 virtual copies from the RAW file – one for the foreground and one for the sky. Then, I used Photoshop Layers and Mask to blend these two virtual copies together into a single photo with correctly balanced light.
Then, I needed to bring out the details and colors as I remembered them. To do this, I used the curves tool and targeted adjustments using Photoshop Layers & Masks to fine tune the contrast for the foreground, sky, and mountains. I used a separate clone layer to clone out the distracting foreground elements.
#3: Creating Mood with Multiple Camera Exposures
Conveying mood in a photograph sometimes requires a little extra care in your processing technique. I took this shot in Tinkers Creek State Park in Ohio on a foggy morning. To preserve the moody atmosphere, I processed a single RAW image twice – then combined these two versions of the same image using Photoshop Layers & Masks.
Fog and humidity in the air reduce the contrast of objects that are farther away, so my first step was to process the RAW file with low contrast. The image you see above shows the result. The foggy atmosphere in the trees and highlights is preserved, but the grass in the foreground and the wooden boardwalk look dull and unappealing.
Next, I used the same RAW file and processed the image with higher contrast settings. The image above shows that these adjustments produced good details in the foreground – but the appearance of the fog in the tree was all but lost. As a final step, I selectively combined the low-contrast and high-contrast images using layers and masks in Photoshop. I retain good details in the foreground, while also preserving the foggy, low-contrast mood in the trees and the highlights.
There are – of course – LOTS of other good reasons to take the time to process your photos such as focus stacking. exposure blending and more that will allow you take your nature photography to the next level. So if a nature photographer talks about their SOOC photos and not-very-subtly implies that those who use processing software are cheating and that their photos are fakes. And that’s all well and good for them. I think I’ll stick to my post-processing, thank you very much. 😉
It is best that a beginner nature photographer who is just getting started in Photoshop focus on just the essentials of Layers & Masks. To get you started we have introduced brand new video tutorial Photoshop Layers and Mask for Beginners. In just two hours beginners will be easily able to navigate Photoshop Layers & Mask and accomplish all the task you see in this article.
I hope that this encourages you to give post processing a try and a try if you have not done so already. The possibilities are endless!
Visual Wilderness https://ift.tt/3hgzvm0
Sourced by Time Trap Photography sharing the best photography tips, news and tricks throughout the industry. Time Trap Photography is dedicated to freezing those special moments in life that can be revisited and admired for generations to come. - Shannon Bourque
Please visit our main site for booking availability and rates.

Receive valuable industry knowledge delivered free to your email each day.


No comments:
Post a Comment
Thank you so much for your comment. A moderator will review and approve all relevant posts. We appreciate your support and encourage you to stay with us by subscribing to our email updates. Where you can easily pick and choose what photography subjects interests you. Subscription link: http://bit.ly/photo-sub