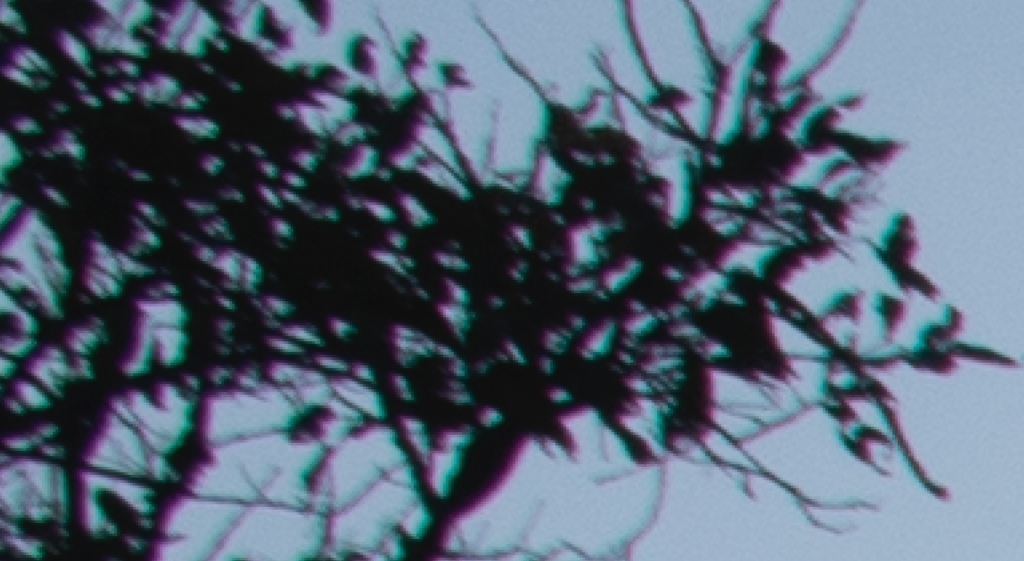
Chromatic aberration is also called colour fringing and is a fringing effect caused by the refraction of different wavelengths of light at slightly different angles than the norm that results in failure to focus all the colours to a single point in our case, the focal point. It is a coloured blurry effect seen along the edges of your subject, created when a camera doesn’t or cannot focus all colours on to the same focal point. This is common in cheaper lenses, but are also present in some expensive lenses.
If you find chromatic aberration in your images, do not panic as it is quite easy to minimise or fix. In this article, we will teach you how to fix it.
What Is Chromatic Aberration?
As we discussed above, chromatic aberration is colour fringing which occurs when light enters the camera, gets dispersed and does not converge to a point. The dispersed light contains different wavelengths and when these are not focused on to a particular point after leaving the lens and reaching the sensor (focal point), the resulting image can look blurry rather than sharp with the edges having colours like magenta, green, etc. This is most evident around objects where there is high contrast in light, that is dark edges close to very bright areas.
What Does Chromatic Aberration Look Like?
Transverse chromatic aberration looks like a coloured halo or colour fringe around your subject and, for longitudinal aberration there are colours in many parts of the frame beside the edges of the subject – we will see why in a minute.

Why Does Chromatic Aberration Occur?
We know white light is a combination of various wavelengths (colours) of light and we also know that when light passes through a prism, it gets dispersed into its constituent colours as seen in the image below.
When there are defects in the way the lens is manufactured, wavelengths of light get refracted at a slightly different angle than they usually should and as a result, some lenses are unable to bring all the wavelengths of light into a single focal point and this happens due to the curvature of the lens.
As a result of the above, colour fringing (such as purple fringing) occurs and the resulting photograph looks blurred with noticeable coloured fringes along the edges of your subject. No lens is a hundred per cent perfect and this effect is different in different lenses as the glass and construction vary.
Some reasons why aberration can occur are:
- Using cheaper lenses that have low-quality glass, old lenses and/or cheap converters.
- Shooting scenes with high contrast, for example, shooting against the light or shooting against a very bright background.
- Shooting with wide open apertures
There Are Two Types Of Chromatic Aberration:
- Longitudinal or Axial Aberration
- Transverse or Lateral Aberration
Longitudinal or axial aberration:
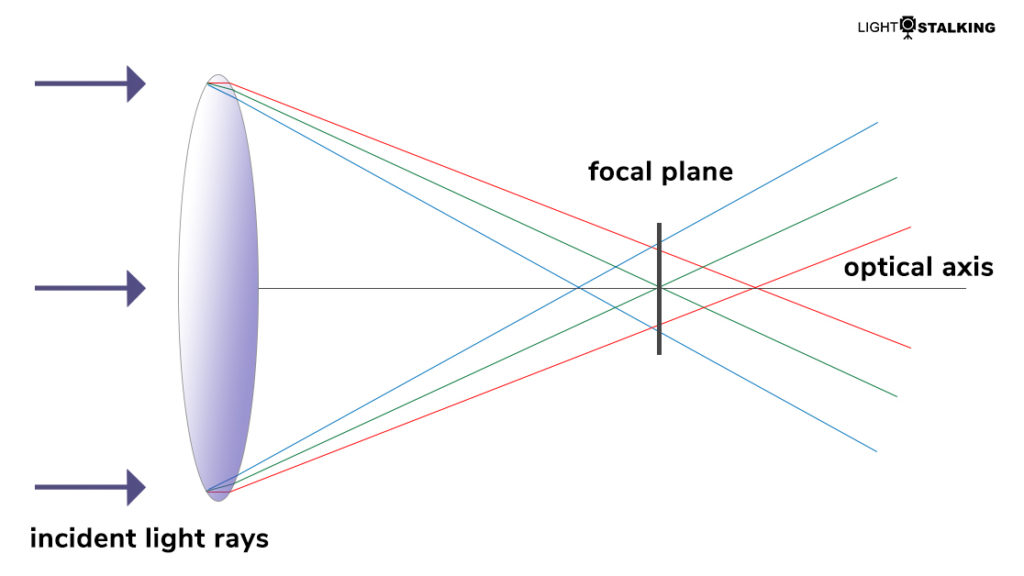
Light gets refracted when passing from one medium to another and this phenomenon occurs when the different wavelengths of light do not converge at the focal point of the lens after refraction on passing through the glass, but converge at different points along the same axis (optical axis), which is also called “focus shift” (different planes, but the points fall on the same axis at different points, see illustration below). This is because, the lens is not able to focus the different colours on to the focal point, which is the sensor in our case. It focuses on one or more colours either to the front or back of the focal point.
This can result in colour fringing not only at the edges of the subject but also on the subject itself, because of colours being focused at the front and/or back of the focal point – as a result of this, one part of the image may show a green colour fringing, another part a red colour and so on, and other areas neutral. These aberrations are most evident in lenses with very wide apertures and using narrow aperture values can minimise the effect of longitudinal chromatic aberration. Moreover, these are most evident along the contrasty edges where there is a huge difference in the intensity of light.
The illustration below is not exact but is a representation of how and why longitudinal chromatic aberration occurs. You can see that the light of various wavelengths leaving the lens, do not all hit the focal plane, instead, some wavelengths converge before or after the focal plane. As a result, there is fringing around and on the subject.
Transverse or lateral aberration:
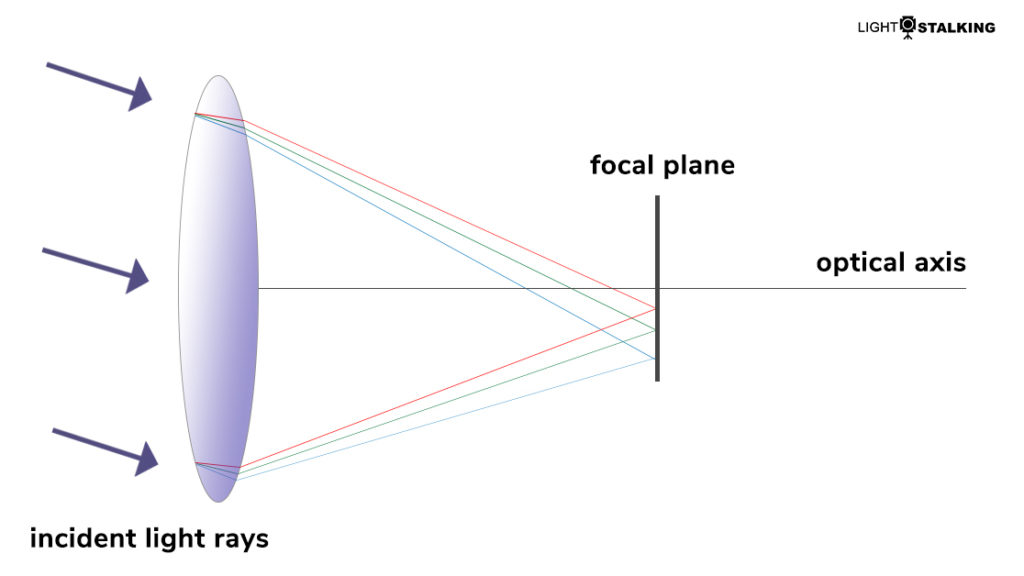
It occurs when different wavelengths of light focus at different points on the same focal plane (same focal plane, different focal points, see illustration below). As a result, this type of chromatic aberration is only visible at the edges of the subjects especially in areas where there is high contrast in light. This type of fringing is common in very wide angle lenses and cheap lenses and are only seen towards the edges of the frame and never in the middle.
Also, unlike longitudinal chromatic aberration, transverse aberration is seen only on the edges of the subject and not on the subject, and is more evident along the high contrast edges where there is a huge difference in intensity of light. Most of the time these colour fringes appear as complementary colours on opposite edges – green on one side and red on the other side, etc.

Transverse chromatic aberration can only be reduced while editing as stopping down the aperture does not help for this type of aberration.
The illustration below is not exact but is just a representation for how and why transverse aberration occurs. You can see that the rays of various wavelengths leaving the lens, do not hit the focal plane at the same point, instead, some wavelengths converge above or below the focal point. As a result, there is fringing almost towards the edges of the frame.
Note: It is not that a lens can have only longitudinal or transverse aberration, but both the aberrations can be found in cheap lenses. Transverse chromatic aberration is easier to correct in post-processing compared to longitudinal chromatic aberration. When both aberrations are found in a lens, it is quite complicated and so you need to carefully choose good glasses for your camera.
What Does Chromatic Aberration Do?
Chromatic aberration causes a fringing pattern around the edges of dark subjects against a brighter background and as a result, the edges appear blurred and not sharp. This can make the image look like it is out of focus and if you are planning on printing your images large, this will show up terribly as a bad quality image on the print.
Fixing Or Minimising The Problem:
Chromatic aberration can be minimised or avoided in camera or eliminated while post-processing using Lightroom or Photoshop. If you educate yourself about the factors that cause chromatic aberration, you can be careful while purchasing a lens or when shooting if you have already purchased one.
In the following sections, we will look at the different ways in which chromatic aberration can be minimised or eliminated.
How can you minimise the issue while shooting?
Although camera manufacturers take every care and put in tremendous effort into minimising chromatic aberration in lenses, a slight amount of chromatic aberration becomes sometimes unavoidable.
What type of lenses should you choose to minimise chromatic aberration?
- When choosing wide angle lenses, prime lenses perform better compared to zoom lenses.
- Too wide or too long focal lengths show more chromatic aberration compared to lenses in the mid focal length range. So lenses in the mid focal range would be better, and this is most applicable for portrait lenses.

Some of the tricks to remove chromatic aberration effect while shooting are:
- Although shooting with wide open apertures can give that dreamy beautiful bokeh, if you are having trouble with chromatic aberration, then you will need to stop down your lens aperture to avoid this issue.
- As much as possible, try to avoid high contrast scenes. Look for the light and frame your shot so that there isn’t high contrast between your subject and the other areas. If you are shooting indoors, try avoiding bright backdrops like white. In unavoidable situations, shoot raw, so you can remove chromatic aberration while post-processing.
- As much as possible, avoid backlighting.
- Reflective surfaces can boost chromatic aberrations along the edges of the bright reflective areas. So try and avoid these type of surfaces in the frame.
- Focus very accurately, so that chromatic aberration does not become very evident.
- Since transverse chromatic aberration is more evident towards the edges because of the curvature of the lens, try to compose your shot with your subject placed in the middle and not near the edges so that there is no chromatic aberration around your main subject. You can crop and recompose the shot while post-processing.
- Avoid blown up highlights as that can show an increased effect of chromatic aberration.
- If you are using a zoom lens, try not to shoot at the shortest or longest focal lengths as these focal lengths tend to be not too sharp and can enhance the effect of chromatic aberration.

How To Fix Chromatic Aberration?
- In Camera: The best way to reduce chromatic aberration is by stopping down the aperture if the lens has longitudinal chromatic aberration, which means using narrow apertures and not shooting with the aperture wide open. Transverse chromatic aberration cannot be reduced by stopping down apertures and hence will need to be removed while post-processing.
- In Lightroom: Removing chromatic aberration in Lightroom is fairly straightforward and simple, and can be done in a few clicks. Make sure that you shoot only raw as it gives greater flexibility and more control over your images, so these fringing effects can be fixed easily and effectively.
- In Photoshop: Chromatic aberration can be removed from images using Photoshop using a few methods – using camera raw, using lens correction, using blend method, etc.
Note: If you shoot jpegs, the camera will apply some corrections to chromatic aberrations internally, but then if you need to make further changes to any colour fringing still evident in your images, it will be extremely difficult to remove them while editing without loss in image quality.
Similar to Lightroom and Photoshop, if you are using another application for editing, you will need to look for the lens correction panels in your application where you can apply similar tweaks to remove chromatic aberration from your images. We will now look at how to remove chromatic aberrations in Lightroom and Photoshop.
Here are the steps involved in removing chromatic aberration using Lightroom:
- In Lightroom, you will be doing most of your post processing in the “Develop Module.” In this module, locate the “Lens Corrections” panel. The recent version of Lightroom has two tabs in there – Profile and Manual
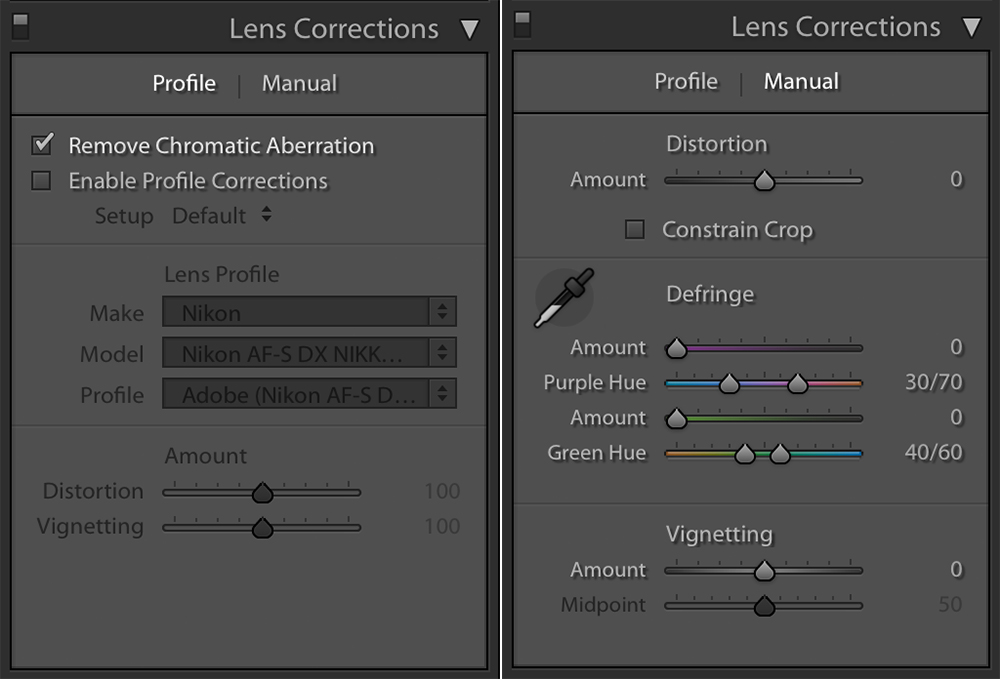
- In the “Profile” tab, select “Enable Profile Corrections” and “Remove Chromatic Aberration.” “Enable Profile Corrections” will remove distortions using the preloaded profiles in Lightroom for various lens manufacturers and “Remove Chromatic Aberration” will minimise or eliminate chromatic aberration in your image.
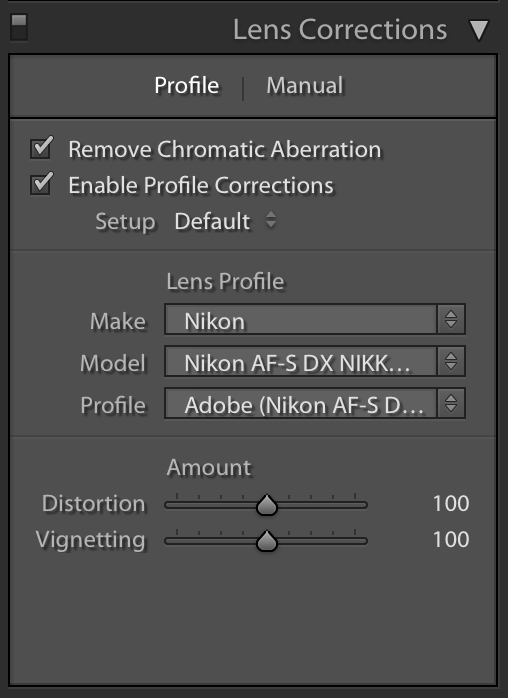
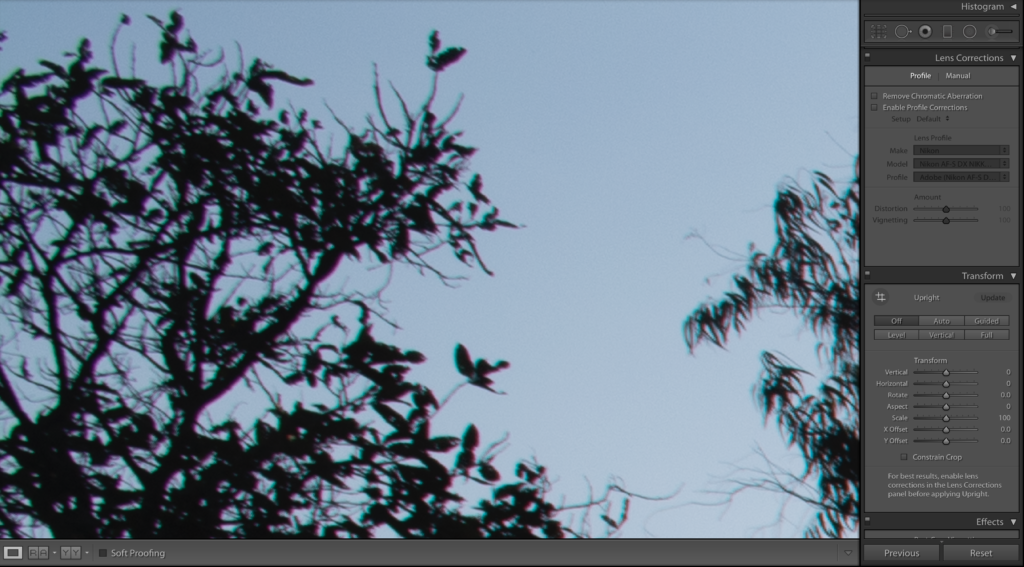

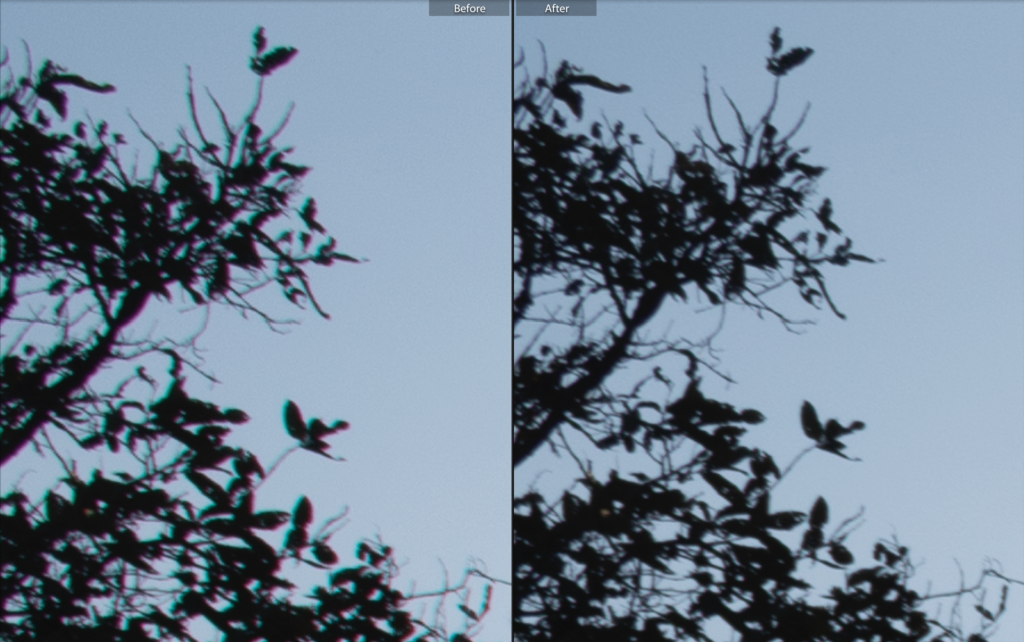
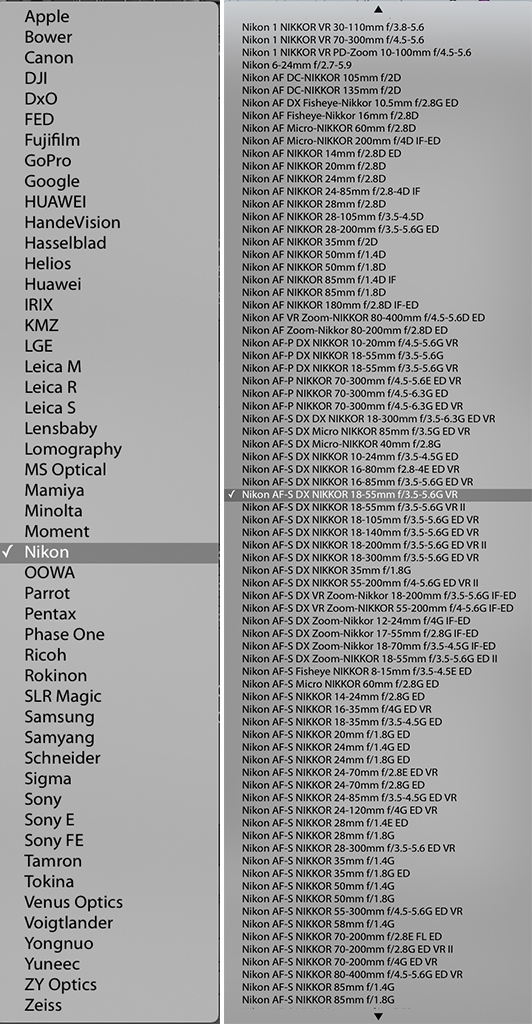
Note: Lightroom comes preloaded with profiles for most camera lenses and based on that it will automatically be able to recognize your lens and apply some corrections to distortions and chromatic aberrations. If for some reason Lightroom was not able to do this correction automatically, you can manually look through the list and select your lens make and model. If you still do not find the lens in the list, you can manually use the sliders to correct distortion, chromatic aberration and any vignetting.
- Some lenses may require some more manual corrections to be done to correct distortion, vignetting and fringing effects. In that case, go to the “Manual” tab and use the “Distortion” and “Defringe” sliders to fine-tune and fix chromatic aberration till you see it disappear.
- If you want to be really precise with selecting the fringing colour, then use the “Fringe Color Selector” or eyedropper tool and sample along different areas along the edges that show chromatic aberration. Select the fringe colour and fix it.
- If the automatic method or “Fringe Color Selector” tool did not help, you can also fine tune further using all the sliders in the “Defringe” section to reduce or eliminate chromatic aberration.

This is a very simple and straightforward way to fix chromatic aberration and in most images, automatically selecting the boxes in the “Profile” tab will do the job. Very rarely you will need to go to the “Manual” tab to make any adjustments there.
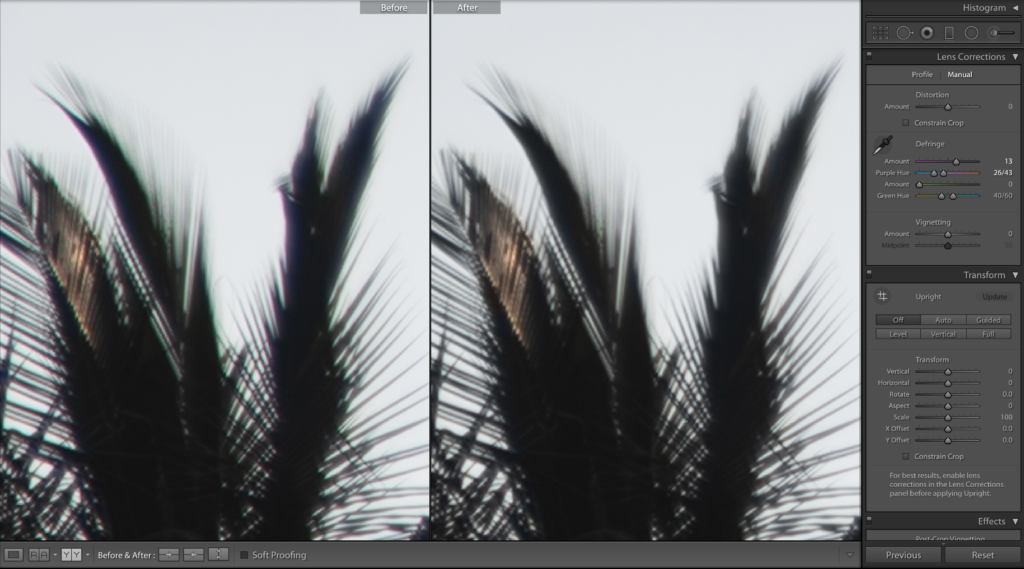
Here are two more examples, where minor adjustments had to be made in the “Manual” Tab to remove Chromatic Aberration.

Removing aberration in Photoshop:
Using Adobe Camera Raw:
In Photoshop, when you open a raw file, it opens in Adobe camera raw and similar to Lightroom, chromatic aberration can be easily fixed in photoshop. You have the same adjustments that you would find in Lightroom. Here are the steps to remove chromatic aberration in Adobe camera raw.
- Open your raw file in camera raw and go to the “Lens Corrections” tab where you have both “Profile” and “Manual” tabs.
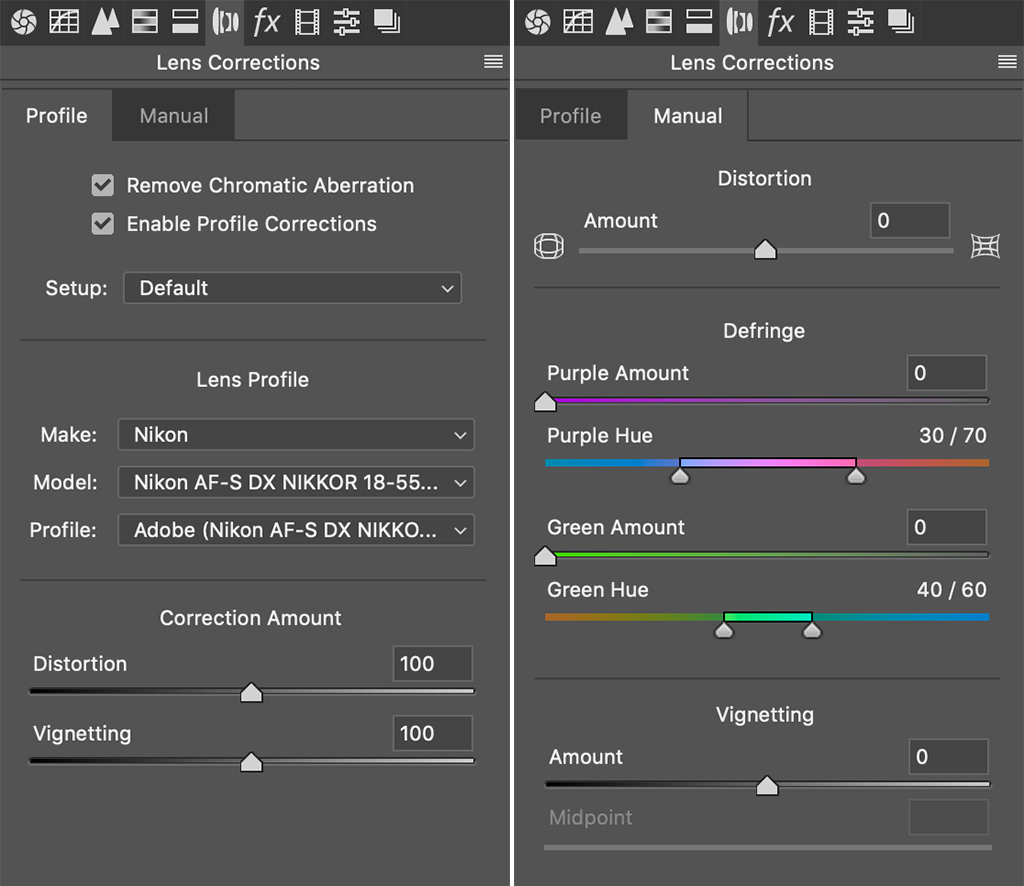
- In the “Profile” tab, select “Enable Profile Corrections” and “Remove Chromatic Aberration” and doing this will remove distortions using preloaded profiles / presets in camera raw for various lens manufacturers and will minimise or eliminate chromatic aberration in your image.
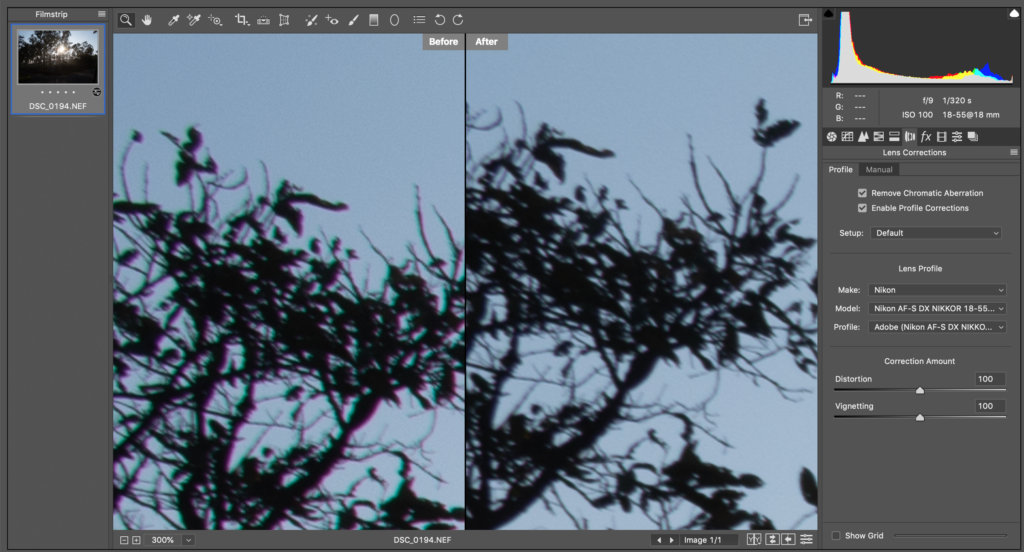
- If you do not see the lens automatically selected, choose from the drop-down list. Choose “Make” and then “Model” and this is very similar to what you see above for Lightroom.
- If the automatic correction does not work, go to the manual tab and fine-tune corrections using the “Defringe” panel. Magnify the image to look for fine details along the edges of your subject.
Here are two more methods that you can try in Photoshop:
1. Using lens correction:
- Go to “Filter” menu in Photoshop -> Lens Correction
- In the “Auto Correction” Tab, you can select “Geometric Distortion” and “Chromatic Aberration”
- If you need to further manually make adjustments, go to the “Custom” tab and under “Chromatic aberration” make changes to the relevant sliders based on the colour fringe in your image to remove them.
2. Using Layer Mask:
- Duplicate the background layer by pressing Ctrl + J or Cmd + J
- Go to Filter -> Blur -> Gaussian Blur
- Set the radius to about 20 pixels. If you are working with smaller images or if the effect of chromatic aberration is very less, then choose lower values for radius like 5 or 10.
- Now press ok and choose the blend mode to “Color”
- Since the above method may make changes to the colours in other parts of the image, add a mask and invert it by clicking Ctrl + I or Cmd + I.
- This will add a black layer mask
- Select the paintbrush tool and with foreground set to white, just paint along the areas that have chromatic aberration. Change the opacity to make adjustments to this effect, so the image looks more natural.
Removing chromatic aberration options should be quite similar in most editing applications. Look through the menu and panels and it should be easy to fix chromatic aberration using any application.
Further Resources:
- How to Avoid and Fix Chromatic Aberration for Sharper Photographs
- How to Use Lightroom’s Lens Correction Controls
- The Pros And Cons Of Cheap Lenses Revealed
- 5 ways to remove chromatic aberration from images with Photoshop
- Defeat Chromatic Aberration
- What is Chromatic Aberration and How Do You Fix it?
Light Stalking https://ift.tt/2XCZJb8
Sourced by Time Trap Photography sharing the best photography tips, news and tricks throughout the industry. Time Trap Photography is dedicated to freezing those special moments in life that can be revisited and admired for generations to come. - Shannon Bourque
Please visit our main site for booking availability and rates.

Receive valuable industry knowledge delivered free to your email each day.


No comments:
Post a Comment
Thank you so much for your comment. A moderator will review and approve all relevant posts. We appreciate your support and encourage you to stay with us by subscribing to our email updates. Where you can easily pick and choose what photography subjects interests you. Subscription link: http://bit.ly/photo-sub