Wednesday, January 31, 2018

How The Beauty of Geometry and Symmetry Can Enhance Your Compositions

7:10:00 AM

Geometry and symmetry do not sound like photographic techniques, more the sort of thing you would learn from a maths book.

Mathematical they might be, but they are also beautiful, powerful compositional tools that can make images really stand out from the crowd. Symmetry and geometry are two techniques that work well on their own and perhaps even better when combined.

Today we are going to take a look at these two powerhouse compositional tools.

What Are Geometry and Symmetry?

Let's start with symmetry in photography. Symmetry is created when either the top and bottom, left, right or diagonals are mirror images of each other. Symmetry by its very definition requires you to think outside of the “rule of thirds”. Even to a seasoned photographer, it can feel unnatural to use a center-point to define your composition. Although symmetry occurs in nature, it is much more visible in the man-made world.

Symmetry is all around us in the man mad word. By Bill Morrow

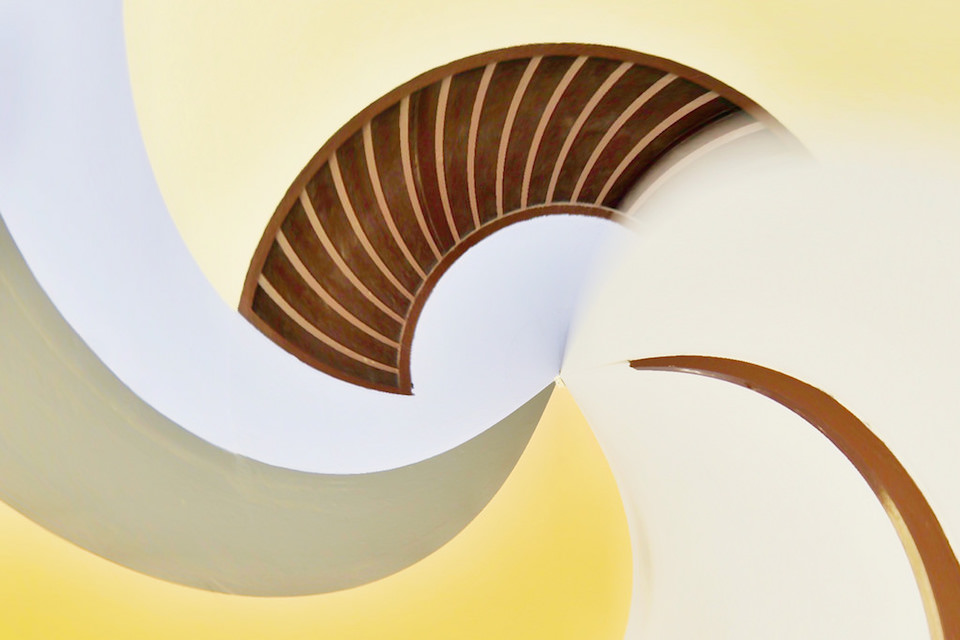
Geometry is the science of shapes. Square, triangles lines, and circles are all geometrical elements that we can use in photography. We can use hard edged geometrical shapes to create bold imagery or more subtle “soft edged” geometry to define or aid a composition.

Both symmetry and geometry do not have to be confined to the physical. Light and shade can also contain geometrical shapes and display symmetry.

Learning To See And Use Geometry And Symmetry.

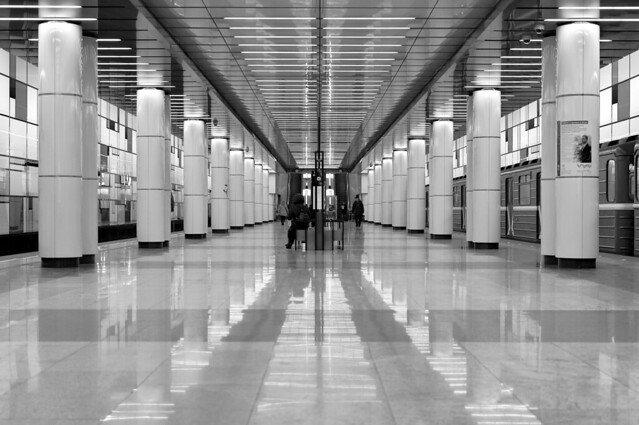
Starting off with symmetry. Great symmetrical composition often occurs when we have a subject that is placed dead centre of two identical objects. This might be a person walking up a straight flight of steps or even just the infinity point of a long straight tunnel.

If our symmetry is based on objects to the left and right of frame, the composition very often works better if we place our subject on either the upper or lower third of the frame. This works as a counterbalance as pure symmetry can make an image look very sterile.

Symmetry working with the rule of thirds. By Thomas Leuthard (2008-2017)

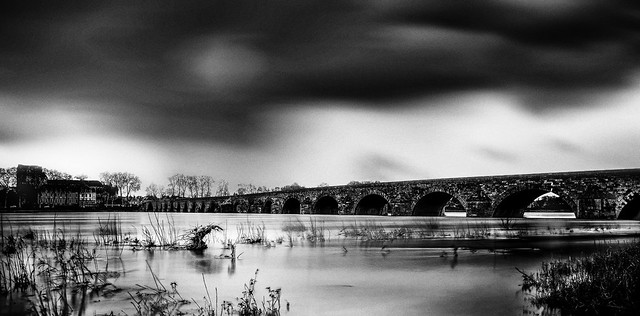
Natural symmetry might be the reflection of a beautiful landscape in the stillness of a deep water lake. Again while this might look great at first glance, you will often start to feel there is something not quite right. We can counter the symmetry by positioning a subject somewhere on the left or right third. This might be a rowing boat or even an interesting boulder, so long as we have a balance to our mirror image.

Light plays a very important factor in great geometrical composition. Hard-edged geometrical shapes are best defined by the light falling on them and the shadows that light creates. Very often hard geometry is defined by repeating identical shapes such as windows in a modern office building or multiple containers stacked in a port.

Alone these shots look visually striking but often lack a focal point with which to lead the eye. We can counter the repetitiveness by looking for an element that breaks it, such as a person leaning out of one of the office windows. By placing that person on one of the thirds we create a visual balance to the repeating pattern.

Geometry is not confined to straight lines. By josef.stuefer

The other type of geometry is soft geometry. This occurs more in natural environments and is where we use loosely defined shapes such as triangles or circles as compositional elements to our shots. It could be the natural curve of a shoreline drawing our eye to our subject or a triangular cliff face used to frame an imposing landscape.

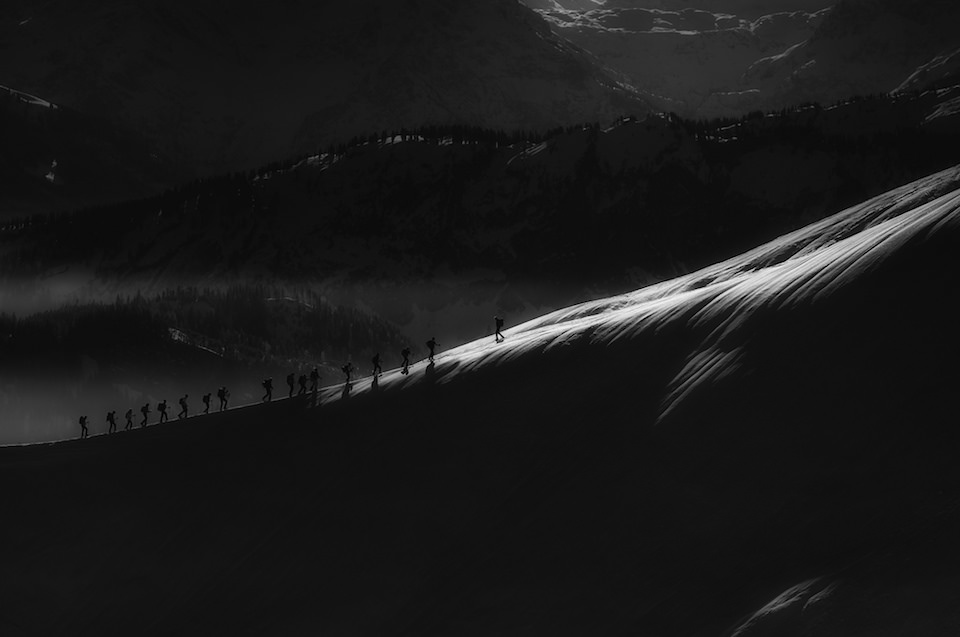
Soft geometry can be hard to find at first. The reason for this is that our minds are hard-wired to look for hard, well-defined shapes. However, if you start to look carefully at scenes you will soon start to see soft geometry as in the case of this scene where the soft geometrical lines of shadows lead our eyes towards the boat.

Soft geometry in the form of leading lines. By Jason Row Photography

Often geometry will work hand in hand with symmetry and there is no more obvious example of this than leading lines. Leading lines are a geometric shape that in many cases split a scene into two distinct mirror images. By adding a subject on the upper third we can create a very striking image.

Symmetry and geometry are both very powerful compositional tools in their own rights. Both occur in nature and in the man-made world and when combined in one shot can lead to some fantastic imagery.

Even if you are not carrying a camera, the next time you are out, take a look at the world around you and look for examples of both

For More On These Great Compositional Elements

21 Clever Uses of Geometric Patterns in Photography – for inspiration, see these great examples of geometry

7 Tips to Spice up Your Photography Using Geometry – a great post from Marco De Groot over at Passion Passport

Advanced Composition Guide – for more on Advanced Composition, check out the guide at Photzy

Let's block ads! (Why?)


Light Stalking http://ift.tt/2DZyjDH

Sourced by Time Trap Photography sharing the best photography tips, news and tricks throughout the industry. Time Trap Photography is dedicated to freezing those special moments in life that can be revisited and admired for generations to come. - Shannon Bourque
Please visit our main site for booking availability and rates.


"Time


Receive valuable industry knowledge delivered free to your email each day.


"Time

3 Must-Have Apps For Black-And-White Photography

5:00:00 AM

Black-and-white photography shouldn't be used only for aesthetic reasons, but for utilitarian purposes. By keeping ourselves from the distractions that color creates in our mind we can obtain – as photographers and spectators – images with clearer and more efficient messages.

The early options for transforming light into images were all monochromatic. Black and white was the way light was registered inside the camera after it hit the emulsion. Then color film appeared, and if a photographer wanted to shoot black and white or color, he or she had to choose one or the other before taking the picture.

Thus, monochrome images were still made inside the camera, despite the options. Since the appearance of digital sensors, rendering a photograph in black and white has become a post-production decision, and this is where the vast majority of photographers are nowadays.

Photo by Elisabetta Foco on Unsplash

It isn't wise to shoot using a camera’s monochrome mode unless it offers internal profiles that can render images in specific monochrome styles like the built-in profiles available in some Fujifilm cameras.

There are multiple software options you can use to transform a regular color photograph into a black-and-white image. Today we'll talk about the 3 most powerful tools for making that happen.

Adobe Lightroom

This software is a favorite of many photographers since it has a logical workspace when we think in terms of workflow. From the edition stage (image selection process) to the printing and online publication of the images (final output), it provides a holistic workflow.

The sequence for developing an image in Lightroom is similar to what we can find in any type of native RAW development software. One advantage of using Lightroom for black-and-white photography is the control it offers over 8 color channels (red, orange, yellow, green, aqua, blue, purple and magenta). Enhancing contrast by brightening or darkening tones via color channels offers richer levels of contrast. By doing this, a photographer can avoid odd results when tweaking contrast, a common phenomenon when you work only with values linked to exposure.

Photo by Erico Marcelino on Unsplash

Lightroom has evolved over time and offers a number of specialized tools for photography development. The spirit of Lightroom lies in its logical similarity with certain tasks done in the darkroom in the days of analog photography.

Currently, Lightroom is available in its latest CC version (Creative Cloud) 7.1.0.1148620, which launched on December 12, 2017.

Lightroom enables you to work with default files (which you can think of as recipes) called presets. Many options exist on the Internet to achieve certain looks thanks to this vast world of presets, and you can also create your own for traceability purposes.

Capture One Pro

This software is engineered by Phase One, a Danish company that specializes in high-end digital photography equipment. Luckily for us, Phase One can be used on photographs taken by almost any camera (which is a good thing if we see the price tag on Phase One cameras).

It is often compared with Lightroom – but honestly, they complement each other. For specific adjustments, Capture One Pro is the solution, due to its color correction mechanics, which surpass by far the ones available in Lightroom. You could work a black-and-white image quickly in Lightroom and export a DNG file for further enhancement in Capture One Pro. But this is just one way to do things.

Photo by Larm Rmah on Unsplash

Capture One Pro offers something that may seem irrelevant to some but is important for many professional photographers: C1P allows you to modify the workspace in almost any way, allowing photographers to shape very comfortable working experience. There should be more tutorials on how to use this powerful tool, which may become the future of post-production in photography if Adobe doesn’t do something about Lightroom’s color-correction methods.

The only disadvantage I can see in working with Capture One Pro compared with Lightroom is the way it controls only 6 color channels instead of the 8 offered by Lightroom (I haven't tried the latest release, which is 11, but I hope they have considered this).

Nik Silver Efex

Many photographers were intrigued when Google bought Nik Software and quickly released it for free (its previous price was $500), and then left it unattended. Nik Software works as a plugin for Lightroom and Photoshop, and within its array of options there is Silver Efex Pro, which allows you to “Master the art of black-and-white photography with darkroom-inspired controls”.

Photo by Jeremy Bishop on Unsplash

It is said that Nik Silver Efex Pro is inspired in how it mimics working in the darkroom, even more so than Lightroom. Its advanced controls for working in black and white allow photographers to achieve great results quickly. Its Dynamic Brightness, Soft Contrast, Amplify Whites, Amplify Blacks, and the advanced Grain Engine tool are great assets for any photographer that wants to take their black-and-white photography to the next level.

With Silver Efex Pro, you can simulate about 20 films in black and white, and not only at the level of contrast and tone, but even grain, and the effects of color filters like the ones affixed to camera lenses when shooting with black-and-white film. DXO acquired the digital assets of the Nik Software brand that belonged to Google in October 2017, and its new market launch is still to come. Hopefully, DXO will not abandon the project as well.

Photo by Brunel Johnson on Unsplash

Whichever options you choose, always keep in mind that black-and-white photography must happen for a reason, and not simply because “it looks cool”. The great benefit of digital photography is that it gives us the best of both worlds with the same image, which was impossible in the era of film.

Let's block ads! (Why?)


Light Stalking http://ift.tt/2DQsfxV

Sourced by Time Trap Photography sharing the best photography tips, news and tricks throughout the industry. Time Trap Photography is dedicated to freezing those special moments in life that can be revisited and admired for generations to come. - Shannon Bourque
Please visit our main site for booking availability and rates.


"Time


Receive valuable industry knowledge delivered free to your email each day.


"Time

31. Januar 2018

4:03:00 AM

Das Bild des Tages von: Ivan


kwerfeldein – Magazin für Fotografie http://ift.tt/2np8Bz0

Sourced by Time Trap Photography sharing the best photography tips, news and tricks throughout the industry. Time Trap Photography is dedicated to freezing those special moments in life that can be revisited and admired for generations to come. - Shannon Bourque
Please visit our main site for booking availability and rates.


"Time


Receive valuable industry knowledge delivered free to your email each day.


"Time

Tuesday, January 30, 2018

A Fast Effective Way To Remove Stray Hairs In Photoshop

7:05:00 AM

Every portrait photographer knows that dealing with stray hairs in post-processing can be a hassle. Of all the tasks under the retouching umbrella, I most often hear that stray hair removal is among the most frustrating.

I’m sure you’ve encountered numerous suggestions about how to tackle this, and hopefully, you have found a method that works for you. If you haven’t or if you’d like to try a different technique, here is one that you might find useful. It’s relatively quick and simple and yields great results.

Take note, however, that the following method works only on non-textured backgrounds.

The Process

Photo by Jason D. Little

  • Go to Filter>Blur>Surface Blur (make sure you are working on the duplicated layer). Set the Radius to anywhere between 40 and 50 pixels and set the Threshold to no more than 30 levels. The exact settings you need may vary depending on the image you’re working with, but the idea is to introduce enough surface blur so that the stray hairs begin to disappear. Once you’re happy with the settings, click OK.

  • Now we need to create a layer mask that hides all that blur: if you’re on a Mac, hold the Option key while clicking the Add Layer Mask button at the bottom of the screen. Windows users, hold the Alt key.

  • Open the Brush tool (B) and set the foreground color to white. Set a brush hardness of about 75%, opacity 100% and flow rate of about 80%. Now simply begin to paint away those rogue hairs.

  • When you’ve tamed your model’s locks to your satisfaction, save the image as you normally would and you’re done!

Photo by Jason D. Little

Conclusion

Again, the above procedure is just one of many ways to accomplish the same task. Give it a try; experiment with it and tweak settings to suit your needs. This just might become your go-to technique for eliminating stray hairs.

Let's block ads! (Why?)


Light Stalking http://ift.tt/2rPH6mx

Sourced by Time Trap Photography sharing the best photography tips, news and tricks throughout the industry. Time Trap Photography is dedicated to freezing those special moments in life that can be revisited and admired for generations to come. - Shannon Bourque
Please visit our main site for booking availability and rates.


"Time


Receive valuable industry knowledge delivered free to your email each day.


"Time

5 Tips On Beating or Embracing Shadows That You Can Try Today

5:07:00 AM

When our cameras register light, shadows are inevitably present to some degree. Shadows can enhance a figure's or subject's volume but also produce undesirable results.

Shadows are often candidates for reduction or elimination so that our images can appear to be nicely lit. The following five solutions can help you eliminate harsh, ugly shadows in our images. Some solutions happen inside the camera; others can be done in post-production.

Photo by Mads Schmidt Rasmussen on Unsplash

Fill Light

Fill light is the first solution you can use to avoid or reduce ugly shadows when photographing something. This kind of light doesn't refer to your “key”, or main light. It is used to light the rear of the subject and reduce the overall contrast in the scene. Another great gift of working with fill light is that it enhances the subject’s tridimensional nature.

Photo by Rene Böhmer on Unsplash

This light can originate from strobes, flashes or even reflective surfaces – like a reflector or even a light colored wall or surface.

The main goal is to have a light beam perpendicular to the direction of the light entering our lens. The intensity of the fill light will depend on the hardness of the light. Less-diffused light is harder; more diffuse light is softer. By experimenting with fill lighting, shadows will become more pleasant than if you shoot with a single key light.

Flash

Flashes are very useful when available light is at a minimum or doesn't quite fulfill the photographer’s requirements. They also empower photographers with “permanent” lighting. Many cameras come with built-in flashes, but the best flash illumination happens with separate flash units that can be directed to achieve specific lighting results.

Photo by Igor Ovsyannykov on Unsplash

The direction of the flash is very important, as are the power settings, to reduce unwanted shadows in your photographs. There is no exact recipe. Anticipation will be your best friend if you want to achieve fast results, but the ability to anticipate the light the flash will cast on the subject can only be achieved with tons of practice.

One of the best web resources for understanding light is The Strobist Blog – an old-timer indeed, but awesome for any photographer who wants to understand artificial light in a broad way.

Overexposure

Digital sensors have evolved impressively over the years, and they will evolve even more. Nowadays they allow us to easily gain 3 stops of light, and in some cases up to 5.

Digital photography works the opposite to analog photography when it comes to exposure. With film, underexposure allows photographers to recover shadows and dark tones without messing too much with the lighter areas and highlights.

With digital, overexposing allows us to recover highlights and lights in post-production without getting odd results in darker areas of the image. This is because sensors capture more information in what corresponds to the right side of the histogram – hence the overexposure method.

Photo by Dan Freeman on Unsplash

Do a test, and overexpose an image by one stop. You will be able to recover the blown-out zones easily because even when they are excessively lit, they contain a decent amount of information, and you will also retain detail in the shadows because they will be filled with light, too.

Shadows In RAW

Always shoot in RAW. It doesn't matter if you end up with massive files; RAW ensures that you shoot less, but get better shots, just like when you shoot with film. By working with a RAW file, you'll have all the information your camera can give to you – and after all, you paid for that powerful device.

So get the best out of it! Lights, highlights, exposure, and brightness are values you can tweak in RAW development, and you can also enhance shadows, darks, and blacks.

Photo by Matthew Ansley on Unsplash

By increasing the value of those specific settings, you will gently lighten things up and reduce the harsh nature that some shadows can create. Again, there is no exact recipe for this, so all images must be treated uniquely according to your own taste.

Local Adjustments

Many types of RAW development software have built-in local adjustment capabilities. They allow you to tweak precise zones in an image (which are usually masked by the person developing the image with a brush) separately from the overall image.

This requires some patience, but the results are worth it. By selecting a specific shadow, you can work things out almost as if you had a dedicated flash targeting that particular shadowy spot in the scene.

Some people use graphic tablets instead of traditional mice or trackpads, which takes the post-production experience to a completely different level.

Planning Images With Light Schemes

Leaving a bit of room for improvisation will result in better images, and the best way to do this is by planning your photographs, especially during photo shoots. Street photography is harder to plan, but anticipating the lighting will help you avoid ugly shadows in any scene.

One habit I always recommend to photographers is to work with light schemes. Working with a planning mindset beats any of the previous solutions mentioned above. You can use basic and traditional stuff like paper and pen, or the free tool available at Lighting Diagrams. There, you can create your own diagrams and browse among examples that many photographers have uploaded for free.

Shadows can become an important element of anyone’s photographic style – therefore, they should be treated with care, just like light. Shadows can be responsible for the drama in your images and shouldn’t be completely eliminated, but shaped into what we really want to show in our photographs.

Here Are Some Great Tips If You Are Interested In More On Light

Bite Size Tips: Understand These Concepts of Light for Better Photographs – see Dalia's tips on some basic lighting concepts
15 Stunning Photos That Will Make You Appreciate The Visual Appeal of Shadows in Photography – for inspiration see these beautiful photos posted by Ritesh
Understanding Light – head on over to Photzy for this great guide to Understanding Light

Let's block ads! (Why?)


Light Stalking http://ift.tt/2DMgJQd

Sourced by Time Trap Photography sharing the best photography tips, news and tricks throughout the industry. Time Trap Photography is dedicated to freezing those special moments in life that can be revisited and admired for generations to come. - Shannon Bourque
Please visit our main site for booking availability and rates.


"Time


Receive valuable industry knowledge delivered free to your email each day.


"Time

30. Januar 2018

4:03:00 AM

Das Bild des Tages von: dedalus11


kwerfeldein – Magazin für Fotografie http://ift.tt/2DWVm1H

Sourced by Time Trap Photography sharing the best photography tips, news and tricks throughout the industry. Time Trap Photography is dedicated to freezing those special moments in life that can be revisited and admired for generations to come. - Shannon Bourque
Please visit our main site for booking availability and rates.


"Time


Receive valuable industry knowledge delivered free to your email each day.


"Time

Monday, January 29, 2018

The Coolest Photography Links Of The Week

7:02:00 AM

The world of photography has been very active this week, with new articles and photographs being published everywhere that represent the very best the field has to share. This weeks list of links is composed of tutorials, special features, and great photography, all hand-curated by Toad Hollow Photography to ensure that there is something here for everyone. We really hope you like this weeks list as much as the Toad did in bringing it to you.

TUTORIALS

A Brief Introduction To Adobe Photoshop – this primer article is published here on Light Stalking, and it discusses a short overview of Photoshop, what it does, and how to interpret the interface as a new user. Screenshots included throughout the article shows you the various items covered, helping to reveal a few of the mysteries of this very powerful image production software.

Chrissie

Chrissie

How to Create More Visually Interesting Street Photography – this article will take you from 0 to 60 in a moment as you learn about some of the basic premises behind capturing great candid street photography. Sample shots are included as you read along, helping you to see how to apply the concepts in your own work.

Learn how to do three-point lighting like a pro – a brief 7-minute video presentation is embedded in this primer article that covers a simple portrait lighting setup. Each step is explained in detail in both the article and video, making it much easier to visualize how to apply this yourself while shooting portraits.

Anja Pietsch

Anja Pietsch

An Easy Tutorial for Getting a Great Wedding Photo – check out this short video presentation that talks about how to get a great wedding photo, every time. There are, of course, countless opportunities for great images during these celebrations, and with this concept in your pocket, you are guaranteed to come away with a winner of a shot.

9 Tips for Shooting Stunning Cityscapes: Steps in Urban Photography – capturing stunning cityscapes is something that most everyone wants to try at some point in their photography practice. This short article covers 9 tips and tricks and includes some absolutely amazing examples to help get you started.

Коля Саныч

Коля Саныч

Three Methods to Convert Photos to Black and White in Lightroom – black-and-white images will always be a genre of photography that is in-style, with applications both personally as well as professionally. This 15-minute video tutorial covers three different ways of performing this transformation in Lightroom, giving you the tools you need to apply the method that works best for your desired results.

How to Store and Handle Old Photos Without Damaging Them – many of us have access to old family or archival photographs, and knowing how best to handle them is important in terms of maintaining them for future generations to enjoy. This short video presentation takes us through doing this in less than 5 minutes.

SPECIAL FEATURES

Grizzly Bear Photography in Khutzeymateen British Columbia – our love for Grizzly Bears is no real secret, so when we see posts like this one published here by Anne McKinnell we dive into it with all our hearts. Anne’s adventures result in a stunning series of intimate and candid shots of these amazing creatures in their natural habitats, living undisturbed as they have for years. For those who love wildlife photography, you won’t want to miss checking this post out.

Rolf Dietrich Brecher

Rolf Dietrich Brecher

Photography at 200mph – An interview with motorsports photographer Kurt Bradley – the fast-paced life of a race photographer comes alive in the great interview with a leader in the field today. This behind-the-scenes look at how someone goes about working in this specific genre of photography provides amazing insight and inspiration for those of us who love this style.

The Ultimate Guide To Taking Beautiful Pictures – with so much great learning material published online in the field of photography, it sure is great to have an article that compiles some of the best pieces into a singular list that discusses the intricacies of getting great shots. This article covers several key topics in regards to capturing great shots by sharing a select list of links to great resources covering various aspects of photography.

鎮邦

鎮邦

How I Found My Niche in Professional Photography – this in-depth interview features insights from a professional photographer working in the field today with a focus on large-scale industrial and architectural subjects. A great selection of sample photographs is included as the article progresses, instantly giving visual feedback and a touch of inspiration for those looking to set out on a career of their own.

The dark world of Thomas G. Anderson will make you turn the lights on – prepare to be utterly creeped out in this collection of photographs from a well-known horror photographer. These dark images are framed by the interview of the artist, giving you a little insight into what drives someone to makes images like this.

GREAT PHOTOGRAPHY

Castle – Germany is well known for its old buildings and castles, making it a perfect location to head to when looking for these character-rich structures. Pascal Schirmer captures and shares a terrific shot of a massive ancient castle that features a stunning reflection in a still body of water that sits in the foreground.

Curtis Jones

Curtis Jones

Morning Beauty – Grand Teton National Park, Wyoming – this incredible photograph of the world-famous Teton Mountains comes to us from Len Saltiel who shares some personal insights into the experiences he has while photographing these subjects alongside the image itself. The picture features beautiful golden light as it dances across the mountain tops, creating drama and a sense of depth that adds to the natural majestic beauty of the setting.

Grass Roofs – Daniel Casson uses a cinematic post-processing technique with this shot to highlight the feel of the location that features buildings and homes with grass roofs sitting in front of a dramatic mountain. A wonderful waterfall rushes down in the backdrop, adding a perfect element to the shot.

Theo Crazzolara

Theo Crazzolara

Moody Haifoss – let’s head over to Iceland where a world-famous waterfall dominates a rugged landscape created by eons of erosion. Johannes Hulsch’s shot takes advantage of the low lying fog that creates a muted veil over the setting, adding an ethereal feel to a shot that reveals a breathtaking view.

Seward Harbor Aerial – Ron Niebrugge shares a terrific downward looking shot of a marina lined with boats captured in Alaska. The lines from the docks and the shapes of the boats work in harmony together to create an almost abstract looking image at first glance that also has terrific detail when looked at more closely.

aotaro

aotaro

Autumn Tracks – all the wonder and romance of a steam locomotive comes to life in this beautiful themed shot by Alexander Riek. As the train rounds the corner of the tracks and heads towards the camera billowing smoke, a canopy of beautiful autumn colors helps to create a frame for the scene.

Moraine Lake is gorgeous! – the Canadian Rocky Mountains are a very frequently photographed collection of mountains that reveals different personalities and sights with the changing seasons and weather. This shot was captured and shared by Jim Nix and showcases some of the intense dramatic beauty the region has to offer to those who make the trip.

Angelo Brathot

Angelo Brathot

Trillium Lake at Dawn – beautiful colors and tones dance across a still lake in the early morning in this delightful photograph by Angela Chong. A lone duck slowly drifts across the water creating a gentle wake as a thin fog covers the scene to add to the incredible sense of tranquility captured here.

Street art à la Butte-aux-Cailles: “le retour (1)” – Mathias Lucas shares a terrific collection of photographs featuring various subjects and vignettes captured on the streets in France. These colorful and thoughtful compositions and vignettes showcase different aspects of life in the region, and when enjoyed as a set they also tell a wonderful story through a visual medium.

Allan Hack

Allan Hack

New boys on the block – you can’t help but marvel when you see this terrific photo of a trio of young owls sitting about as a low sun paints the landscape around them. Jon Albert captures them at the perfect moment in this shot, as two of the feathered creatures stare back at the camera and one stares off camera right at something that has caught its eye.

Ghost Signs – Lisa Gordon does a wonderful job of capturing a set of photographs depicting various “ghost signs” in her area. These painted logos and ads on the side of buildings were completed years ago, and time has caused them to fade and weather, adding to the rich artistic tension that may soon disappear from the community’s vernacular.

Graeme Scott

Graeme Scott

Dubai – a vibrant sunset paints the sky in incredible colors as the contemporary and dramatic architecture of this famous city casts incredible forms in this amazing shot by Herbert A. Franke. Crisp details in the buildings draw the viewer into this frame where terrific features and elements await discovery.

pierre-alain pannatier

pierre-alain pannatier

Regional Transit Authority – if you are waiting at the stop for this particular bus, you’re likely to be late for your appointment. Check out this terrific black-and-white shot from Michael Criswell of a long unused bus sitting in a nest of vegetation as time continues to ravage it through the art of decay and rust.

Bled Sunrise – Rossano Ferrari finds a terrific elevated perspective to capture this beautiful lake in Slovenia, finding a stunning sunrise full of color and joy articulated by an amazing sunburst in the photograph. As you take in the image, the tiny island in the middle of the lake that houses an ancient monastery creates a stunning anchor into the shot itself.

Timothy Neesam

Timothy Neesam

Limestone Anchorage II – west coast photographer Ehpem shares a terrific monochromatic shot that looks out over the still waters of the ocean with a pair of dark islands or land masses standing as silhouettes against the sky. The waters create gentle rippled reflections of the seascape, adding a wonderful finishing element to this composition.

we missed the red tram – a quintessential winter scene greets the viewer in this amazing photograph captured during a snowstorm in the heart of a city. A red tram makes it way down the road as pedestrians walk amongst the snowflakes, creating an image that is an instant classic from e&e photography.

Thomas Hitz

Thomas Hitz

Harvest Moon – a beautiful color palette covers the sky as a huge full moon lingers in the sky above the silhouetted landscape below in this shot from JayJacy Photography. A thin band of clouds creates a great texture for the colors to play with, making this picture stand out as a dramatic and beautiful example of nature’s light play.

autumn light – a muted reflection fills the front portion of this photograph as incredible colors in the autumn leaves on the trees that lead down to the pool dominate the back portion. Tiger Seo’s shot is full of rich details, adding to the inherent beauty of a fall scene.

Let's block ads! (Why?)


Light Stalking http://ift.tt/2rR1tjo

Sourced by Time Trap Photography sharing the best photography tips, news and tricks throughout the industry. Time Trap Photography is dedicated to freezing those special moments in life that can be revisited and admired for generations to come. - Shannon Bourque
Please visit our main site for booking availability and rates.


"Time


Receive valuable industry knowledge delivered free to your email each day.


"Time

How to capture stunning landscape photographs — handheld!

5:46:00 AM

If you’re a landscape photographer, using a tripod is probably integral to your field workflow, and for good reason. A tripod allows you to slow down shutter speed for blurred water effects, make images even in very low light situations, and capture a broad depth of field — all while ensuring your images are sharp and free of camera shake. But there can be times when you do not have a tripod. Perhaps you don’t want to carry the extra weight, or maybe the light is changing fast and there’s no time to set up a tripod. Some locations even restrict the use of tripods. So, what can you do to achieve sharp, beautiful landscape photographs handheld? Here are some tips that can help. 

“Autumn Storm”, Canadian Rockies, October 1, 2017. Handheld. Canon 5DsR with Canon 100-400mm f/4.5-5.6 lens. 164mm, ISO 400, f/10, 1/250 sec.

1. Choose a fast shutter speed.

To minimize the effect of camera shake, choose a shutter speed that is fast enough to freeze motion. A good rule of thumb is to choose a shutter speed that is 2x focal length or your lens. So, if your lens has a focal length of 400mm, try not to shoot any slower than 1/800th of a second. Likewise, if your lens has a focal length of 100mm, keep the shutter speed at 1/200th of a second or faster. And, so on. 

“Alone in the Woods”, Glacier National Park, October 5, 2017 — Handheld. Canon 5DsR with Canon 100-400mm f/4.5-5.6 lens. 214 mm, ISO 500, f/5.6, 1/400 sec.

2. Select an aperture appropriate for the composition.

If your subject is far away and the plane of focus is more or less shallow, then you’re in luck. You can use a wider aperture (smaller f-stop number) without needing to bump up the ISO as much. However, if you need to capture a broad depth of field keeping both foreground and background in focus, then you will need to make a decision. Using a smaller aperture, such as f/16 might require slowing down the shutter speed, which increases the risk of camera shake. So, that brings me to tip #3.

“Canadian Rockies Turquoise”, October 1, 2017. Handheld. Sony a7RII with Canon 24-105mm f/4 L lens. 67mm, ISO 100, f/10, 1/250 sec.

3. Increase ISO

Increasing the ISO will add noise to your image, but it may be necessary to maintain a faster shutter speed. Adjust your ISO only after you’ve first decided on shutter speed and aperture. Some camera models tolerate higher ISO settings with less noise than others, so it is important to experiment with your camera and decide how much noise is considered OK for your taste. If noise in your image is completely unacceptable to you, and you still want to maintain a fast shutter speed, there is one more option.

4. Use software to solve field problems.

Some issues in the field can be solved with software in post-processing. For example, if you want to keep the ISO down, but you also need maximum depth of field, you can use focus-stacking techniques. Here’s how: Holding the camera steady, make a series of exposures with a wide aperture (smaller number) capturing different focal distances across the entire depth range you want in focus. 

Then, open the files as layers into Photoshop from Adobe Lightroom.

Once the files are opened in Photoshop, with all the layers selected, choose “Auto Align Layers” from the “Edit” menu. Photoshop is pretty good at aligning images, even if they are slightly askew from one another.

Then, select “Auto Blend Layers” from the “Edit” menu. Photoshop will automatically create masks to blend the sharpest parts of each layer.

5. Brace your camera.

If you find that you must use a slower shutter speed than the recommended 2x lens focal length, then do what you can to brace the camera and practice proper handholding technique. A wall or rail can be enough to steady the camera. Otherwise, assume a solid stance, feet spread, and elbows in close to your body. A lower center of gravity will also steady the camera, so consider sitting on the ground, or better yet, place the camera on the ground.  

“English Sheep”, July 16, 2017, England. Handheld. Sony a7RII with Sony 24-240mm f/3.5-6.3 lens. 130mm, ISO 3200, f/10, 1/500 sec.

6. Use your camera’s burst mode. 

When you depress the shutter release to make an exposure, it is likely that the camera will move very slightly, causing blurring. By setting your camera to burst mode, the first frame may have some evidence of camera shake, but subsequent images will be sharper.

“Autumn Pallet”, October 5, 2017, Glacier National Park. Handheld. Canon 5DsR with Canon 100-400mm f/4.5-5.6 lens. 400mm, ISO 640, f/7.1, 1/640 sec.

7. Turn on image stabilization.

If your camera or lens is equipped with image stabilization technology, make sure it is turned on. This is contrary advice to what you should do if your camera is mounted on a tripod, in which case image stabilization can actually cause camera shake, blurring your image.

I don’t advocate leaving a tripod behind, but if you do find yourself in a situation where you don’t have one, these tips can ensure that you have the best chance of getting the composition you envisioned.

About Author Charlotte Gibb

Charlotte Gibb is a contemporary fine art photographer based in the San Francisco Bay Area specializing in landscapes of the Western United States. Her images are often taken in familiar places for the well-versed landscape photographer, but she prides herself on her keen an eye toward the subtle and sometimes overlooked beauty of the natural world. Charlotte earned her Bachelor of Arts Degree from the Academy of Art University in San Francisco and has exhibited her work in several solo shows throughout California. Her darkroom, long gone now, has been replaced with digital darkroom tools, and her style has evolved from a somewhat journalistic approach, to one that pays tribute to the natural world.

Let's block ads! (Why?)


Visual Wilderness http://ift.tt/2Fnzmu7

Sourced by Time Trap Photography sharing the best photography tips, news and tricks throughout the industry. Time Trap Photography is dedicated to freezing those special moments in life that can be revisited and admired for generations to come. - Shannon Bourque
Please visit our main site for booking availability and rates.


"Time


Receive valuable industry knowledge delivered free to your email each day.


"Time

5 Portrait Photographers of the Famous

5:07:00 AM

It is understood that a portrait is a representation of a person’s character. The best portraits are the materialization of the idea of a person. That idea might come from the subject, or from what was expected of them by the general public.

This may sound strange nowadays, because the vast majority of people have access to portraits of themselves, even if they serve insipid purposes like bureaucracy-related stuff. But this concept becomes clearer if we compare it with famous people, public figures who are recognized worldwide for something specific.

Today we’ll talk about five photographers who built and are continuing to build their careers around portraying famous people from human history. Some of these portraits have become iconic, and when we think about someone, there’s a fair chance that we picture as they are in one of these portraits.

Image By Yousuf Karsh – This image is available from Library and Archives Canada under the reproduction reference number PA-212511

Yousuf Karsh was an Armenian-Canadian photographer known for his portraits of notable and famous people. He arrived in Canada as a refugee of the Armenian Genocide, and by the 1930s he had established himself as an important photographer in Ottawa. Karsh has often been described as the greatest portrait photographer of the 20th century.

Many of his portraits are extremely powerful, but “The Roaring Lion – 1941” is perhaps his most iconic image. The portrait depicts Winston Churchill in an intriguing, yet convincing way. It has been known that this photograph was a real problem for Karsh to get because Churchill wasn't in the mood for photographs; he only gave Karsh two minutes of his time. Fortunately, Karsh managed to squeeze a lot into those two minutes, as only a legend can do.

Here you can see more photographs by Karsh.

Image By Source, Fair use, http://ift.tt/2Fr0JmS

A series of tragic events led Halsman to leave Austria for France in the 1930s. After that, he began contributing to fashion magazines like Vogue and rapidly gained fame as one of the best portrait photographers in France.

When WWII exploded and German troops advanced into France, Albert Einstein helped Halsman get into the United States. The photographer later portrayed Einstein in 1947.

Halsman portrayed a lot of people, from Louis Armstrong to Audrey Hepburn, but perhaps his muse was Salvador Dalí. They collaborated a lot together, and one of the most famous images they created is “Dalí Atomicus“.

Thanks to his involvement with the Magnum Agency, you can find the complete contact sheet from that particular session in this book. It has been said that Dalí wanted the cats to be exploded with some sort of dynamite, but Halsman refused and instead went for the more “natural” flying-cats approach by having them thrown in the air.

Imagine how PETA would have reacted. You can see more of Halsman’s work on his official website.

Image By Source, Fair use, http://ift.tt/2DYoeHa

Herbert Ritts Jr. was an American photographer who was quite prolific; but this time we'll center on portraiture of public figures, from models to celebrities. He was the guy you had to call if you wanted a classical portrait of the rich and famous.

The photograph he made of the five supermodels Stephanie Seymour, Cindy Crawford, Tatjana Patitz, Christy Turlington and Naomi Campbell in 1989 is one of his most famous images, but here you can see his whole repertoire.

Personally speaking, as a jazz lover, his portrait of Dizzy Gillespie is my favorite Ritts portrait. He created so many great portraits of the famous that it’s almost certain you’ve seen at least half a dozen of them without knowing it.

Copyright holder release per the OTRS ticket – Wikipedia:Contact us/Photo submission, CC BY-SA 3.0, http://ift.tt/2FqkcnN

David Bailey is a still-active British fashion and portrait photographer; the two genres really get along together, as we have seen through our three previous photographers.

Bailey studied at a private school in Ilford (what a cool place name!), but at the age of 15 he left school and became a copy boy at the Yorkshire Post. After he was fired in 1958, he started pursuing a career as a professional photographer, which he achieved in 1959.

Bailey's unique photographs depict the famous as the stars they are, and here you can get a glimpse of his work, which unfortunately isn't as widely available as that of the others. Still, it’s an impressive compendium that you'll definitely enjoy.

Image retrieved from The New Yorker

Platon Antoniou, best known simply as Platon, is a British photographer with a long career in portraiture and who has captured everything from villagers and presidents to well-known public figures.

He defines himself as a portrait photographer, a photographer of people. His awareness of people made him join Human Rights Watch in 2009 to help them celebrate those who fight for equality and justice in countries oppressed by political forces.

Watching a photographer actually work helps one penetrate their mystical abilities, and here you can see a short video of Platon giving a brief tour of his studio with short shots of him actually working. Here you can see more of his work. This is his most recent image, a portrait made of the great Professor Stephen Hawking.

Watching famous and public figures posing for portraits in front of a passionate photographer is a beautiful experience, because the subjects start to feel more human to the viewer.

This is the main reason why we wanted to present you today with the work of these five photographers, who have made inaccessible people easier to connect with, even when they know nothing about us.

Here Is Some More Info To Enhance Your Portrait Photography

Get Started With The Art Of Portrait Photography – read Dalia's piece here at Light Stalking

10 Tips for Exciting Portraits – Free Quick Guide – get your free guide from Photzy to give your portraits pizzazz

Let's block ads! (Why?)


Light Stalking http://ift.tt/2DTLOo9

Sourced by Time Trap Photography sharing the best photography tips, news and tricks throughout the industry. Time Trap Photography is dedicated to freezing those special moments in life that can be revisited and admired for generations to come. - Shannon Bourque
Please visit our main site for booking availability and rates.


"Time


Receive valuable industry knowledge delivered free to your email each day.


"Time

29. Januar 2018

4:02:00 AM

Das Bild des Tages von: michael kiess


kwerfeldein – Magazin für Fotografie http://ift.tt/2Ek3YNz

Sourced by Time Trap Photography sharing the best photography tips, news and tricks throughout the industry. Time Trap Photography is dedicated to freezing those special moments in life that can be revisited and admired for generations to come. - Shannon Bourque
Please visit our main site for booking availability and rates.


"Time


Receive valuable industry knowledge delivered free to your email each day.


"Time

Sunday, January 28, 2018

How to Find Your Lost Car Keys

4:21:00 PM

How to Find Your Lost Car Keys

There are times and places in the great outdoors where it seems that everywhere you turn, things look amazing and beautiful. In other cases, you have to go looking for the winning shot. At such times, it can help to have an idea of what you are looking for.

If you've ever lost your car keys in the coach cushions, you know what a frustrating experience it can be. Where could they be? The last time this happened to me, I can remember thinking how important my keys were and that I really needed to find them. I had somewhere to go and couldn't do it without my car keys. If I had approached the search by trying to look everywhere for them, it could have taken forever. Looking everywhere just wouldn't be a very efficient strategy. Of course, the solution was to retrace my steps, and envisioning where they could be, skipping places I hadn't been around recently enough for them to possibly be concealing my keys. I knew what my keys looked like, and I could imagine the various scenarios of what might have transpired to end up with them getting lost. Were they still in the pocket of the pants I was wearing yesterday? Easy enough to check. Had they fallen off the counter into the garbage? Thankfully, no. You get the idea.

My point here is that the task of finding them, as hard as it may have been, was made far easier by previsualizing possible answers and then checking each out until I found one that yielded success. As you may have guessed by now though, my real point is that this same idea holds true when trying to find good compositions for your photography. Yes, sometimes a great shot can simply jump out at you without any need to go looking for it. Sometimes, though not always, this can be the case when you pull off the road at a marked "scenic overlook." They do put those signs there for a reason. Other times, you can find easy success by visiting one of the top National Parks such as Yosemite, Grand Tetons, or dare I mention it, Mt. Rainier National Park in my neck of the woods. But not everyone can be in such a place every weekend (please, no). And even when you are so fortunate, Mother Nature isn't always as cooperative as you might hope. You have to be able to find good image possibilities. And sometimes they can be illusive as finding your car keys in the couch cushions.

The idea of previsualization in photography is frequently credited to Ansel Adams, the pioneering large-format photographer of the American West who wrote about "the ability to anticipate a finished image before making the exposure" as being a critical part of image making. But whether it was really Adams, or perhaps Minor White, Edward Weston, or someone else, the idea is the same. And it's a good one: my having a mental image of what you want to photograph, you're that much better positioned to do so.

You know what your camera and lens can do (or you should know). You understand the way various focal lengths dictate different shooting distances, and thus their various renderings of perspective. In addition to their obvious impact on exposure, you know the consequences of changing shutter speed and aperture. All of these are the equivalent of learning the scales when taking up a musical instrument. They're foundational, and necessary for you to understand what your camera and lens will see, and thus what you can use them for to create an image with the look you are after.

But you should also understand as much as you can about the location you are visiting, and what you might find there and what it might look like. The more you know about the various elements you have to work with, the better you are likely to be at combining them into a great image. And it's a good idea to investigate the area before even getting out your camera gear to see what you can find. Found a good foreground element? Check. Now you need a background, and with any luck, an additional element or two that you can position in the frame to support your composition.

Things don't always work out as you envisioned of course. Sometimes your line of sight for that great image is spoiled by a tree branch or a trail marker sign. Sometimes your car keys aren't in your pants pockets from yesterday. Sometimes you may need to look elsewhere. Of necessity, previsualization often includes having to give up on your first idea and move on to your second or even third possible composition. With a mental list of design elements that might work though, your chances of coming up with a winning combination can still be pretty good. What you are after is to move from simply taking images to making them, building a winning image from the elements you have found, and putting them together with the tools and skills you have available.

Previsualization is one of those photographic buzzwords that many photographers have heard of, but few regularly employ in the field. But consider the alternatives. You won't always be able to stumble on good images without trying.

Learn how to find your car keys. There are good images out there, but you need to know how to find them.

Let's block ads! (Why?)


Earthbound Light Photography Tips http://ift.tt/2niZqjA

Sourced by Time Trap Photography sharing the best photography tips, news and tricks throughout the industry. Time Trap Photography is dedicated to freezing those special moments in life that can be revisited and admired for generations to come. - Shannon Bourque
Please visit our main site for booking availability and rates.


"Time


Receive valuable industry knowledge delivered free to your email each day.


"Time

About Us

Time Trap Photography is dedicated to freezing those special moments in life that can be revisited and admired for generations to come. - Shannon Bourque

The lens in focus

“Life is like a camera. Just focus on what’s important and capture the good times, develop from the negatives and if things don’t work out, just take another shot.” — Unknown

TIME TRAP PHOTOGRAPHY COPYRIGHT 2016