Thursday, January 31, 2019

Echtes Leben Zeigen – Stillleben

10:02:00 PM

Frau stillt Baby

Ein Beitrag von: Echtes Leben Zeigen

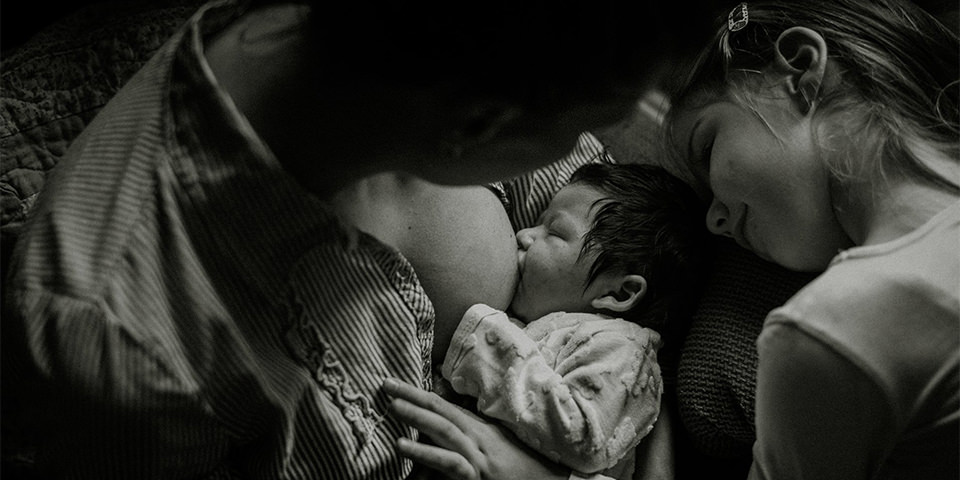
Frauen, die stillen, sieht man auch heute noch recht selten in der Öffentlichkeit. Und auch heute noch sehen sich stillende Frauen häufig missbilligenden Blicken, herablassenden Bemerkungen oder gar Anfeindungen ausgesetzt. Auch in den sozialen Medien wie Facebook wurden Bilder stillender Frauen, auf denen die bloße Brust zu sehen war, immer wieder gelöscht und die Konten deswegen blockiert.

Stillen ist das Sinnbild von Leben und Fürsorge, von Mütterlichkeit und Liebe! Und gerade deshalb ist es wichtig, Bilder zu zeigen, die das Muttersein feiern und all jenen etwas entgegensetzen, die vergessen haben, dass sie einem weiblichen Schoß entsprungen sind und an Mamas Busen begonnen haben, die Welt für sich zu entdecken.

Aber auch jenen, die mit dem Fläschchen großgezogen wurden, ist die Brust der Mutter vertrauter als alles andere der Welt. Sie ist der Ort, an dem Geborgenheit gespendet wird, Schutz und Wärme. Sie ist der Ort, wo der Mensch auf das Leben vorbereitet wird.

Frau stillt Baby

© Julia Vogel

Stillen ist echtes Leben, Stillen ist ein Menschenrecht!

„Echtes Leben Zeigen“ vereint dokumentarisch arbeitende Fotograf*innen im deutschsprachigen Raum. Mit ihren regelmäßig ausgerufenen Challenges sammeln sie Arbeiten, die bestimmte Themen bearbeiten und veröffentlichen ausgewählte Fotografien auf ihrer Webseite.


kwerfeldein – Magazin für Fotografie http://bit.ly/2GfJGb2

Sourced by Time Trap Photography sharing the best photography tips, news and tricks throughout the industry. Time Trap Photography is dedicated to freezing those special moments in life that can be revisited and admired for generations to come. - Shannon Bourque
Please visit our main site for booking availability and rates.


"Time


Receive valuable industry knowledge delivered free to your email each day.


"Time

32MP Front-Facing Camera Blade V10 Smartphone in the Works from ZTE

7:13:00 PM

What do you do when your competition finally starts to catch up to you?

You could let them overtake you in the marketplace, or you can move the goalposts once more.

ZTE Blade V9 image via ZTE.

It looks like ZTE is going with the latter with its plans to release a 32MP front-facing camera smartphone within the near future.

This is a pretty big deal in the world of smartphone cameras because most of the devices used for front-facing cams is not as hot as what the rear-facing cameras are rocking.

DPReview bases its report on filings with Chinese regulatory authorities that describe a model that possibly uses the Samsung ISOCELL GD1 camera sensor.

The new model, thought to be the next in the Blade line of phones, could be out as soon as later this year.

A ZTE Blade V10 doesn’t really come as a shock but putting that kind of front-facing camera on it makes it stand out.

Other details that emerged about the phone from the regulatory filing also put it within the middle price bracket for smartphones. The ISOCELL GD1 comes with real-time video HDR capabilities according to DPReview in addition to a “0.8 micron pixel pitch and pixel-binning technology, merging four adjacent pixels into one for better dynamic range and lower noise levels” that could make the phone could in high-contrast uses.

The model’s main camera will have a 16MP primary and 5MP secondary sensor with a 6.3 inch LCD HD+ display.

Of course, who knows what markets this phone will be available in when it launches. If anything, ZTE (and its rival Huawei) stay in the news for regulatory issues in overseas markets, some of which have outright banned the devices.

That’s a shame because it looks like ZTE is turning out some good kit these days.

Let's block ads! (Why?)


Light Stalking http://bit.ly/2CTDaDy

Sourced by Time Trap Photography sharing the best photography tips, news and tricks throughout the industry. Time Trap Photography is dedicated to freezing those special moments in life that can be revisited and admired for generations to come. - Shannon Bourque
Please visit our main site for booking availability and rates.


"Time


Receive valuable industry knowledge delivered free to your email each day.


"Time

3 Characteristics Every Good Photographer Possesses

8:03:00 AM

The question of what it takes to be a good photographer is a question that will draw as many answers as people it is asked of. Many will cite things like the ability to form a perfect composition, achieve proper exposure or consistently get in-focus shots.

While these hallmarks of technical proficiency aren’t meaningless, history has revealed that a photo can lack one or all of these traits and still be considered a good photo — great, even.

Being a good photographer is about so much more than an evenly distributed histogram.

At the risk of being a bit abstract, I’d like to submit three characteristics that I believe anyone who is driven to be a good photographer must possess.

1. Curiosity

Kids have adults beat when it comes to curiosity. Children enjoy everything except vegetables and bedtime because everything is a new experience. They seek out new discoveries, new sensations. Sure, their curiosity can lead them to mischief every now and then, but it’s part of the learning process.

Photographers would do well to acquire (or re-acquire) and maintain a childlike curiosity.

Garry Winogrand championed curiosity when he claimed, “I photograph to find out what something will look like photographed.”

I can’t think of a more fundamental reason to pick up a camera. Of course, as you continue to photograph the faces, places and things around you, your reasons for shooting will grow and become more nuanced but the underlying motivator will remain.

Go out and discover what the world around you really looks like.

2. Courage

Curiosity isn’t all that valuable if you don’t act on it. Having the courage to get up and act on your curiosity doesn’t apply only to photographing difficult subjects or working in dangerous environments.

Street photography stirs up anxiety in some individuals; for others, portrait photography or macro photography can be intimidating. The specific reasons for why one might experience angst over a given type of photography is unimportant here, though I suspect a general fear of failure is a common thread.

Courage, though, is how you make things happen. Don’t fear failure — we all fail at some point. Pull yourself up, learn from your mistakes and keep trudging along. Don’t fear new experiences — they will reshape your thought process and expand your creativity.

3. Commitment

To be a good photographer you need to commit to what you’re doing. It doesn’t matter what your skill level is, what genre of photography you tend to indulge in, where you live or what kind of camera you own.

You must commit to following through on those concepts of curiosity and courage that we discussed above. You must commit to continuous self-improvement (both creatively and technically). You must commit to your work in such a way that nothing — not even Instagram fame, or the lack thereof — can hamper your passion for photography.

Things won’t always go according to plan, but some good old fashioned “sticktoitiveness” will help get you through the discouraging times.

Final Thoughts

There are things you can do in an effort to become a good photographer — study, practice, seek feedback — all of which will prove useful. But like all creative endeavors, the foundation of success (not in financial terms) is based largely on internal attributes and motivations.

Whether you have what it takes to be a good — or great — photographer is up to you.

Further Reading

Further Learning

If you're looking for a pragmatic way to improve your photography without getting bogged down in theoretical tomes and technical manuals, Action Cards are the thing you will want to get your hands on.

The Action Cards are 65 beautifully designed and printable project sheets that will give you over 200 photography assignments, covering everything you can imagine.

Each sheet contains:

  • Notes on how to shoot a specific composition or genre.
  • An exercise for you to practice with.
  • Insightful questions to ask yourself about your results (and more importantly, how you can improve them).

Grab yours here today

Shareable Images for Pinterest

Let's block ads! (Why?)


Light Stalking http://bit.ly/2WzYGGP

Sourced by Time Trap Photography sharing the best photography tips, news and tricks throughout the industry. Time Trap Photography is dedicated to freezing those special moments in life that can be revisited and admired for generations to come. - Shannon Bourque
Please visit our main site for booking availability and rates.


"Time


Receive valuable industry knowledge delivered free to your email each day.


"Time

7 Tips On How To Improve Your Photography Using Backdrops

5:03:00 AM

Finding and using adequate backdrops is one of the most important tasks for every studio photographer. The type and color of backdrops you use can seriously impact the quality and atmosphere of your photos, so you should take time to choose them carefully.

The first thing you need to decide is what type of backdrop you want to use. There are three main types of backdrops – muslin, seamless paper and painted canvas.

Muslin backdrops are usually very affordable and they are made of woven cotton fabric. This makes them very portable and easy to clean and use many times. When it comes to paper backdrops, they are also quite common and they come in the form of paper roll. They are light and easy to use. Another great thing about them is that they can be found in a variety of colors and textures. However, they are fragile and it’s hard or impossible to clean them, which means they are best for one-time use.

Photo by Alexander Dummer on Unsplash

Finally, canvas backdrops are somewhat more expensive and they can be found in majority of established photography studios. They are a good investment because they can hang flat and have a consistent look regardless of how many times they have been used.

Now a couple of really useful tips for using backdrops:

1.Coordinate the colors in the background and the foreground

The purpose of the backdrop is to make the subject stand out and complement it. Because of this, you should choose a background color or pattern that highlights the subject, without detracting their look. The choice of colors should depend on the subject’s clothing and features, such as skin and hair color. Always test a few different colors (lighter and darker ones) for every subject you shoot.

Photo by Ambar Simpang on Unsplash

2.Make sure your subject is not too close to the backdrop

For majority of backdrops, placing the subject about 6 ft. (180cm) in front of the backdrop gives the best results. This distance diffuses the details of the backdrop, but it still shows its texture. If you ask your subject to stand too close to the backdrop, you’ll probably end up having issues with reflections and harsh shadows.

Photo by Moose Photos on Pexels

3.Don’t choose a backdrop that will take attention away from the subject

Be careful about those “fun” backdrops with aggressive patterns, color swirls or bold graphics. They can easily take the focus away from the subject. However, if you’re shooting something more experimental, such as musicians or other types of artists, don’t worry that much about these common guidelines.

Photo by Rawpixel on Pexels

4.Try to fill the frame with your subject

In case you’re shooting a rather simple portrait and you aren’t using any props, filling the frame with your subject is a good idea. Too much empty space around the subject will probably look unnecessary and make the emotional impact of the photo weaker, since the backdrop will look dominant.

Photo by Spencer Selover on Pexels

5.High-key or low-key lighting for dramatic effects

If you want to create a truly dramatic studio portrait, you can experiment with high-key and low-key lighting. High-key lighting will blow out the backdrop and focus all the attention on the subject by surrounding them with light. When it comes to low-key lighting, it will also draw attention to the subject, but by surrounding them with shadows.

Photo by Frank Busch on Unsplash

6.Position your subject properly

You might be tempted to put your subject in the dead center of the backdrop, but try to avoid this! The rule of thirds and other compositional rules matter even when you’re shooting a simple portrait in your studio.

Photo by Juan Mendez on Pexels

7.Create a fantasy land with your backdrops and props

Backdrops can take your subject anywhere – in case you want to create a truly unique scene, try combining creative backdrops (vivid colors, interesting textures) with various props, such as stools, tables or boxes. Such scene will have a great storytelling potential and it will be more memorable than a regular portrait in front of the backdrop.

Photo by Gerry Roxby on Pexels

These are just some initial steps towards improving your studio portraits. In case using backdrops sounds fun and you want to learn more about it and improve your studio shoots, check out these useful links below:

Further Resources:

  1. Photography Backdrops: A guide For a Complete Beginner
  2. Photography Backdrop: The Ultimate Guide to Getting your Backdrop Right
  3. Buying Guide: Choosing the Right Studio Backdrop for Your Photo Shoot

Shareable Images for Pinterest

Let's block ads! (Why?)


Light Stalking http://bit.ly/2RsGE5x

Sourced by Time Trap Photography sharing the best photography tips, news and tricks throughout the industry. Time Trap Photography is dedicated to freezing those special moments in life that can be revisited and admired for generations to come. - Shannon Bourque
Please visit our main site for booking availability and rates.


"Time


Receive valuable industry knowledge delivered free to your email each day.


"Time

31. Januar 2019

4:03:00 AM

Das Bild des Tages von: ZweiB Optik


kwerfeldein – Magazin für Fotografie http://bit.ly/2t1VBRX

Sourced by Time Trap Photography sharing the best photography tips, news and tricks throughout the industry. Time Trap Photography is dedicated to freezing those special moments in life that can be revisited and admired for generations to come. - Shannon Bourque
Please visit our main site for booking availability and rates.


"Time


Receive valuable industry knowledge delivered free to your email each day.


"Time

Wednesday, January 30, 2019

Style, Light, Shoot! – LED-Effektlichter

10:04:00 PM

Ein Beitrag von: Christina Key

Heute gibt es einen weiteren und letzten Einblick in das neue Buch von Christina Key: „Style, Light, Shoot!“ aus dem Verlag Rheinwerk. Wenn Ihr gern experimentiert und auf der Suche nach kreativen Low-Budget-Lösungen seid, ist dieses Buch genau das richtige für Euch. Heute stellen wir eine weitere Idee aus den insgesamt 50 Tipps vor: LED-Effektlichter.


Jetzt wird’s bunt: LED-Effektlichter

Vor allem in der Advents- und Weihnachtszeit sieht man sie überall: Hübsche LED-Leuchten, die ein farbenprächtiges Lichterspektakel an Häuser und Wände projizieren. Diese Idee ist sehr schnell umgesetzt, wenn Ihr über ein LED-Effektlicht verfügt, sei es ein Projektor oder eine rotierende Partyleuchte. Ihr könnt dann direkt anfangen, kreative Fotos zu schießen.

Es empfiehlt sich, eine zusätzliche Lichtquelle wie eine Nachttischlampe, einen Baustrahler oder einen DIY-Beautydish zu verwenden, um das Foto zunächst einmal grundsätzlich auszuleuchten beziehungsweise gezielt Haar- oder Streiflichter zu setzen.

Mit einem LED-Effektlicht habt Ihr gleich zwei Möglichkeiten, Schwung in Eure Bilder zu bringen: Ihr könnt auf der einen Seite damit den Hintergrund interessanter gestalten und auf der anderen Seite das Objekt beziehungsweise Modell direkt anleuchten. Die meisten Effektlichter drehen sich oder rotieren frei, weshalb man die Lichtpunkte nicht genau einrichten kann.

Aber gerade weil die Lichter immer unterschiedlich ausfallen, wirkt jedes Foto anders. Macht auf jeden Fall viele verschiedene Aufnahmen hintereinander, um am Schluss diejenigen auszuwählen, bei denen Euch das Lichtspiel am besten gefällt.

Es gibt auch LED-Partylichter , die Ihr einfach in eine herkömmliche Lampenfassung einschrauben könnt. Diese erzielen einen sehr ähnlichen Effekt wie Weihnachtsleuchten und lassen sich anschließend sogar für Eure Silvesterparty weiterverwenden.

Portrait mit bunten Lichtern

35 mm, f/2, 1/200 s, ISO 400, Abendlicht bei bewölktem Himmel von vorn durch Fenster

Die bunten Leuchtpunkte auf dem Modell sind ein toller Hingucker und wirken fast schon künstlerisch. Für dieses Portrait habe ich die Lampe so eingestellt, dass sie direkt auf das Modell schien. Der Blick des Modells wirkt sehr anziehend. Getoppt wird das Bild durch die coole runde Sonnenbrille. Neben dem Effektlicht kam hier nur Abendlicht, das von vorn in den Raum fiel, zum Einsatz.

Frauenportrait mit Farbpunkten

50 mm, f/2, 1/160 s, ISO 500, Bildschirm und Baustrahler

Auch als Hintergrundbeleuchtung eingesetzt, ist ein LED-Effektlicht ideal geeignet. So bildet es bei diesem Foto einen tollen Hintergrund, der vor allem durch die bunten Lichtpunkte besticht.

Lampe mit bunten Farblichtern

Hinter den Kulissen: Als Lichtquelle von vorn rechts diente hier übrigens ein Bildschirm, auf dem ein weißes Fenster geöffnet war, damit er möglichst hell strahlte. Zusätzlich habe ich einen Baustrahler vorn rechts positioniert, vor den ich weißes Papier gespannt habe. Dadurch wird das Gesicht mit weichem Licht erhellt, während auf den Hintergrund kaum Umgebungslicht fällt.

Kind mit Lichtern auf dem Boden

Die tanzenden Lichter faszinieren besonders Kleinkinder, sodass Ihr als Fotograf*innen auf spielerische Weise tolle Fotos schießen könnt. Eine Win-win-Situation für beide Seiten!


Wir hoffen, wir konnten Euch neugierig machen und Ihr habt einen guten Eindruck des Buches „Style, Light, Shoot!“ bekommen. Vielleicht habt Ihr ja auch schon eine der Ideen umgesetzt? Dann zeigt gern die entstandenen Aufnahmen in den Kommentaren! Wir sind gespannt.


kwerfeldein – Magazin für Fotografie http://bit.ly/2Us0kZ1

Sourced by Time Trap Photography sharing the best photography tips, news and tricks throughout the industry. Time Trap Photography is dedicated to freezing those special moments in life that can be revisited and admired for generations to come. - Shannon Bourque
Please visit our main site for booking availability and rates.


"Time


Receive valuable industry knowledge delivered free to your email each day.


"Time

Rumor Mill Report: Three Rear Cameras and a USB-C Port Coming to Next-Gen Apple iPhones

6:17:00 PM

Looks like the smartphone camera wars are heating up again as rumors are starting to surface that Apple is going hard with its next-gen iPhones in the camera department.

Joining other models that have already done this, the next-gen iPhones will reportedly have three front-facing cameras to bring Apple’s marquee product on par with other top-of-the-line offerings from competitors.

Image via Mateusz Dach from Pexels.com.

Not only that but also the new iPhones will be using USB-C connectors instead of the current (and somewhat hated) Lighting cords currently used.

According to The Verge, the successor to the XS Max will have three cameras with the newest addition capturing a wider field of view.

To quote, the third camera will “capture more pixels so Apple software could, for example, automatically repair a video or photo to fit in a subject that may have been accidentally cut off from the initial shot.”

In addition, the live photos feature will be extended from 3 seconds to six seconds.

All of these updates will arrive in 2019 and, per The Verge’s report, will feature minimal changes to the overall design of the phones.

But the addition of a new camera as the USB-C connectivity are pretty big changes for some of us. As many will point out, this brings the iPhone more in line with other smartphones out there.

Looking ahead, Apple is working on pioneering 3D cameras for smartphones that have the ability to make 3D reconstructions of the surrounding environment that would work at distances of up to 15 feet. That’s some pretty out there tech but would definitely be a feather in Apple’s cap if they can pull it off.

Of course, we’re sure they’re not the only ones out there looking into wild new smartphone camera technologies.

What do you think? Is three cameras enough or too many? Let us know in the comments.

Let's block ads! (Why?)


Light Stalking http://bit.ly/2CVULuR

Sourced by Time Trap Photography sharing the best photography tips, news and tricks throughout the industry. Time Trap Photography is dedicated to freezing those special moments in life that can be revisited and admired for generations to come. - Shannon Bourque
Please visit our main site for booking availability and rates.


"Time


Receive valuable industry knowledge delivered free to your email each day.


"Time

4 Core Lessons I Learnt From Creating A Showreel – By Jason Row

8:04:00 AM

To photographers, a portfolio is an extremely important tool. It’s our way of showing the world what we are capable of, where we specialise and how our creative thought processes work. 

A showreel works on the same principle but for motion not stills. With so many photographers crossing between the two mediums on a daily basis, today I am going to share with you my experiences in creating a showreel to showcase my stock video footage.

Creating A Showreel Is The Motion Equivalent Of A Portfolio. Photo by Andre Hunter

1. The Basics – What Do You Want To Say?

Despite having a reasonable amount of experience in editing, I had never put together a showreel. The first stop was a little Internet research to find out the absolute basics. Perhaps the most important thing I learnt in my initial research was not to make the showreel too long. 

I also learnt that despite being a showcase of your very best work, it should still feel like you are telling a story, that is the video has a clear opening, middle and ending. 

Like in a photographic portfolio, you should choose footage that shows off your abilities. As a recently qualified CAA drone pilot, this meant showcasing plenty of aerial footage but also footage captured both on a gimbal and a static tripod. 

As a travel stock photographer and videographer, my showreel needed to highlight that my work was intended for stock agencies rather than for specific clients. It needs to make potential video buyers want to check out more of my work at stock agencies. 

I Did Plenty Of Research Before Embarking On My Project. Photo by João Silas

2. Choose Your Clips Carefully

Before I even opened up my editing software, I spent the best part of a day selecting potential clips. As I had in mind telling a visual story from before dawn through to night, I created folders for  Twilight, Dawn, Day, Sunset and Evening and moved suitable clips there. 

In editing, you need a lot more footage than you intend to use, so I selected everything that I felt would work within the brief I had set myself. In reality, this was a couple of hundred clips of varying lengths but all were suitable for inclusion. 

Spend Plenty Of Time Narrowing Down Your Clip Choice

3. Find A Soundtrack

This was perhaps the hardest part of the entire process. In my mind, I wanted a cinematic soundtrack that started slow, had a sudden increase in pace and then slowed down for the finale. It needed to have some nice chords running through, with which to transition the visuals.

As the project was not a paying gig per se, I tried first looking for Creative Commons based music. This is music that has been released as free to use on sites such as Youtube. Indeed Youtube has a well-curated collection of free music for you to use in your projects. However after two days of searching, test editing with various free tracks, nothing was working well for what I had in mind. 

I spent another half day searching various music stock agencies before stumbling across a track at Pond5 that I knew was right. As with most stock agencies, you can download a preview version that has a voice-over watermark. This allowed me to edit the video and be 100% sure that the track was right before paying for the license.  

Finding A Suitable Soundtrack Was The Hardest Part

4. Edit, Edit Then Edit Some More

With the soundtrack in place, it was time to bring all of the media together for editing. My editing suite of choice was Final Cut Pro X although there are many options. If you are on a tight budget yet want a fully professional level video editing suite, check out DaVinci Resolve 15 from Blackmagic. Its free and extremely powerful. Apart from FCPX, one of the best-paid options is Adobe Premier.

The editing was perhaps the most enjoyable aspect of the entire process. There are a couple of reasons for this, firstly the preselection of clips and audio had narrowed my focus to exactly what I wanted. This eliminated the frustrating aspect of going back to search for other clips that might work better. Secondly, I had no time restrictions. Having editing for clients with deadlines, I know that working under pressure can sometimes stifle your creativity. In this case, by having no restrictions on myself I could take my time and get it right.

Overall the edit took around five days. I would spend a couple of hours editing, preview it on a 4K TV, make notes on the issues then step away for a few hours.

That stepping away is an important aspect of creating a showreel. It’s very easy to get so involved in the project that you do not see its flaws. By breaking from it for a few hours, you can come back and see it in a new light. 

It’s also important to see the film away from the editing suite. I would put mine on a USB and preview it on my TV screen, it gives you a much better understanding of how the visuals and audio are working with each other. 

Step Away From The Edit And Come Back To It

Overall the editing took around 5 days, working several hours a day. I would do an edit, preview it, correct issues, experiment with different clips. Eventually, I was happy with the end result and published to Youtube and Vimeo. I also added it to the video work page on my own photographic website. 

Overall I have enjoyed my experience in creating my first showreel. It has been a relaxing yet educational journey. If you are contemplating making a showreel and have questions, I am happy to answer them in the comments below, although I would not consider myself an expert just yet. 

And here is the end result – thanks for viewing!

Let's block ads! (Why?)


Light Stalking http://bit.ly/2RnTBgV

Sourced by Time Trap Photography sharing the best photography tips, news and tricks throughout the industry. Time Trap Photography is dedicated to freezing those special moments in life that can be revisited and admired for generations to come. - Shannon Bourque
Please visit our main site for booking availability and rates.


"Time


Receive valuable industry knowledge delivered free to your email each day.


"Time

How To Shoot Creative Group Portraits

5:03:00 AM

Many amateur portrait photographers feel intimidated by group portraits and it is not without reason. Group portraits require a great deal of technical knowledge and patience to pose everyone correctly. In addition to this, those truly creative group portraits such as band photo-shoots also require unconventional or humorous ideas.

If you want your group portraits to be more than just mediocre photos, consider the following tips and tricks!

1. Choose a location wisely

You shouldn’t use a location that is too busy or has many distracting details. Places like wide-open landscapes or peaceful meadows with no houses nearby are usually great choices. Of course, if your clients want something more adventurous, you should plan it well ahead. Locations such as rooftops or other urban areas aren’t always available for photo-shoots and might require a shooting permit, so you have to make sure that you are fully prepared for this kind of session.

Photo by Allyson Weislogel

2. Ask everyone to wear solid colors

While this is not something you need to stick to, solid colors will make sure the attention is drawn to the faces, not the clothing of your clients. Graphic details like logos and stripes often look too distracting and you should probably avoid them. For more traditional group portraits, neutral colors such as beige, grey or black will work great. On the other hand, if you’re shooting a group of artists, you can experiment with bolder colors as well.

Photo by Akson

3. Mind the horizon line

Heads of your models shouldn’t be in the horizon line because their faces will look more prominent if they are framed by solid colors, such as the sky or the ground (but not both of them at the same time!). In order to achieve this, you should shoot the group slightly from below or from above. If this doesn’t work, you can also change the position of your group completely, so that their heads have a non-distracting background.

Photo by Duy Pham


4. Be careful about your aperture

Very common mistake found in amateur group portraits is a shallow depth of field. In order to have everyone in focus, set your aperture at f/8 or even higher, depending on the other settings.

Photo by Rawpixel

5. Don’t take a long time to pose people

You will definitely lose the attention and cooperation of the group if you take too long to pose them and if you don’t know what you’re doing. This is especially true if you have to work with kids. In order to avoid this kind of unpleasant scenario, have some posing ideas prepared before the actual photo-shoot.

Photo by Clarke Sanders

6. Use props and take some spontaneous shots

Props can bring your group portraits to a whole new level! Don’t be afraid to experiment with various pieces of furniture or bicycles, cars, flower pots, empty boxes and so on. In case you run out of posing ideas, ask your models for a piece of advice or let them do something totally unexpected and spontaneous. You might be surprised by how creative these candid images can be.

Photo by Jed Villejo

If you want to learn more about the secrets of posing and shooting larger groups, feel free to check out the links below.

Further Resources:

  1. 12 Tips for More Enjoyable Group Portraits
  2. 4 Secrets To Creating Great Family Portraits
  3. Want to Know how to Take Amazing Group Photos?

Shareable Images for Pinterest

Let's block ads! (Why?)


Light Stalking http://bit.ly/2BbJZ3w

Sourced by Time Trap Photography sharing the best photography tips, news and tricks throughout the industry. Time Trap Photography is dedicated to freezing those special moments in life that can be revisited and admired for generations to come. - Shannon Bourque
Please visit our main site for booking availability and rates.


"Time


Receive valuable industry knowledge delivered free to your email each day.


"Time

Landscape Photography: I Shoot because I Feel

4:15:00 AM

What should I shoot, where should I go or what do I want to see and capture? These are questions that many of us photographers, at all skill sets ask ourselves quite often? Whether it be for business or hobby purposes, trying to figure out what we want to photograph can be challenging. For me, to put it simply, I photograph how I feel. My imagery is more feeling based these days. If I see a particular scene, I try to make some type of visual connection with that scene. It could be a certain composition that‘s drawing me in. It may be the light that’s sparking my interest at the moment of capture, but all in all it comes down to how I’m feeling at the time that I’m pressing that shutter button.

Here are some ideas I like to use when I head out into the field, that help me with my vision and image making process.

When I am out in the field, I try to make some type of connection with the landscape.  With this connection I find capturing  what I see becomes more fluid.  As a result, my mind, eyes, and feelings about the landscape I am seeing at the time of capture, are all in sync, and to a degree,  my feelings and emotions subconsciously take control of the camera.

Landscape Photography example of Peak fall colors, Swamps of Southern USA.

Peak fall colors, Swamps of Southern USA.

Light

Light…it is what makes our imagery come to life.  I feel that some form of light, sparks some inherent emotional responses when in the field.  Regardless of how the light is, whether it be cloudy, sunny, partly cloudy, let the light and conditions dictate what subjects you choose to photograph. Ask yourself, how does the light make you feel when you’re looking at a particular scene?  What are you seeing? Are you seeing smaller scenes with no sky or a smaller scene that focuses on textures, patterns, colors, or just the light itself?  This type of thinking will help your vision/productivity while out in the field and with your post processing.

Creating a moody landscape photos in Hazy morning light. Badlands National Park, South Dakota.

Hazy morning light. Badlands National Park, South Dakota.

Expression

Let the above points of feelings and light be your creative outlet of your expression. However you are feeling at the time of the capture, express those feelings with your vision and imagery.  If you’re witnessing this amazing sunset, and overwhelmed with excitement and joy, let your emotions show in the imagery.  Once you connect with the landscape, it will show in your work.

Capturing joy with late summer sunset along the Oregon Coast. Oregon.

Late summer sunset along the Oregon Coast. Oregon.

Mood

There are times before I go out and shoot, and I’ll ask myself a series of questions, “How am I feeling today?”  What’s my overall mood before I head out for a shoot?   Am I feeling creative?  Do I want to try something new today?  Most times when I am feeling this way I tend to want to completely step outside of the box, and try something different while out in the field.  Stepping out of your comfort zone can produce compelling imagery….only if you let yourself be free, and take risks.  It’s ok to do something different!

Creative Landscape Photography using a drone to view patterns within a salt lake. Southwest USA.

Aerial view of patterns within a salt lake. Southwest USA.

Conclusion

These are just some observations I have made over the years during my photography journey.  I never realized how important feelings or emotions played into a persons creativity and vision.  From experience, personal feelings have impacted how I create my imagery, both positive and negative. What I have learned is to just let my emotions and feelings dictate how I create in the field.  Let yourself be free and let those feelings flow within your vision.  As a result, it has made me a better photographer……but more importantly, a better person.

LEARN ABOUT CREATIVITY & PHOTOGRAPHY COMPOSITION
Check out the following tutorials on Visual Wilderness:

  • Behind the Lens

    $149.00
  • Creating Impact

    $85.00
  • Creating Impact Vol-2

    $80.00

About Author David Thompson

I’m just a regular guy with a camera from Las Vegas, Nevada that has a deep passion for landscape photography. I love being out in nature, photographing different subjects, and trying to make visual connections with the landscape.

Let's block ads! (Why?)


Visual Wilderness http://bit.ly/2WrasTE

Sourced by Time Trap Photography sharing the best photography tips, news and tricks throughout the industry. Time Trap Photography is dedicated to freezing those special moments in life that can be revisited and admired for generations to come. - Shannon Bourque
Please visit our main site for booking availability and rates.


"Time


Receive valuable industry knowledge delivered free to your email each day.


"Time

About Us

Time Trap Photography is dedicated to freezing those special moments in life that can be revisited and admired for generations to come. - Shannon Bourque

The lens in focus

“Life is like a camera. Just focus on what’s important and capture the good times, develop from the negatives and if things don’t work out, just take another shot.” — Unknown

TIME TRAP PHOTOGRAPHY COPYRIGHT 2016