
Every new version of Adobe Lightroom Classic comes with new features and sometimes they generate a lot of buzz, with everyone scrambling to integrate them in their usual workflow. Other times, they tend to slip under the radar and aren’t noticed as much. This was the case, at least for me, with the Range Mask control that was recently added to Lightroom. I didn’t really understand its potential until a friend pointed it out to me.
Here are few landscape photos on Visual Wilderness created using Range Masks in Lightroom. As you can see Range Masks in Lightroom offer an incredible potential for landscape photography.
-

Processed with Range Mask in Gradient Tool in Lightroom, Castle Valley, Moab, Utah
-

Range Masks in Lightroom used to bring our details in sky and water, Bruarfoss, Iceland


Range Masks in Lightroom
What’s great about being able to apply range masks to the Graduated Filter, Radial Filter, and Adjustment Brush tools of the Develop Module is that Lightroom users can now select with much more precision where their adjustments apply. This is almost as powerful as using layers and masks in Photoshop, with the ability to create something akin to luminosity masks, all without leaving Lightroom.
The new range mask control is perfectly suited for photos where you want to selectively edit the sky without affecting objects protruding from the horizon. It also makes it easy to select complex areas, like the foliage of trees.
Now that I’ve seen how powerful it is, I am going to use it much more often and, to make life easier for you, I’ve created a little video tutorial on how to exploit this tool.
How to use Range Masks in Lightroom
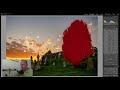
The essential steps for using Range Masks in Lightroom to process your landscape photos are as follows:
- Add an Adjustment Brush to the area of the tree, increasing its luminosity.
- Add a Graduated Filter to the top of the image, covering the sky.
- Set the adjustments for the filter. In this case, I lowered the luminosity and shifted temperature towards the blue.
- Enable the Range Mask – Color option.
- Grab the eye-dropper picker tool and select a point of the blue sky.
- Switch to the Adjustment Brush tool and select the previously created brush.
- Enable the Range Mask – Luminance option.
- Grab the eye-dropper picker tool and select a point on the tree.
- Paint on the tree with the brush, taking care to cover all the edges.
-

Landscape photography example before post processing from Kill Chriosd, Isle of Skye, Scotland by Ugo Cei
-

Landscape photography example after post processing using Range Masks in Lightroom from Kill Chriosd, Isle of Skye, Scotland by Ugo Cei


Have you used Range Masks in Lightroom for landscape photography? Feel free to share your own experience in the comments below.
About Author Ugo Cei
Ugo Cei is a fine-art travel and landscape photographer from Italy. If you were to ask him what he does, he would say that he is an educator who helps photography enthusiasts sharpen their skills, so that they can take amazing pictures.
He does this in various ways. First of all, by providing a wealth of free content here on Visual Wilderness and on his own website.
He leads photography tours and workshops to some cool destinations, including Scotland, Venice, Cappadocia, Oman, Greece, Tanzania, and others.
He co-hosts and publishes a weekly podcast about travel photography, The Traveling Image Makers. Every week, they pick the brains of famous and not-so-famous travel photographers to learn what it means to travel for the love of photography and photograph for the love of travel.
Visual Wilderness https://ift.tt/2mXMkqH
Sourced by Time Trap Photography sharing the best photography tips, news and tricks throughout the industry. Time Trap Photography is dedicated to freezing those special moments in life that can be revisited and admired for generations to come. - Shannon Bourque
Please visit our main site for booking availability and rates.

Receive valuable industry knowledge delivered free to your email each day.


No comments:
Post a Comment
Thank you so much for your comment. A moderator will review and approve all relevant posts. We appreciate your support and encourage you to stay with us by subscribing to our email updates. Where you can easily pick and choose what photography subjects interests you. Subscription link: http://bit.ly/photo-sub